Chapter 01
Safety first
A 3D printer melts plastic and moves on its own. Read this page once before the first print.
The nozzle runs at roughly 200–280 °C and the bed at 60–110 °C, depending on the material. Both stay hot for several minutes after a print. Do not touch the nozzle, the heater block or the bed until the screen shows them near room temperature.
The print head and bed move without warning when a print starts, when the printer homes, levels or probes, and when anyone sends a job from a computer or phone. Keep hands, hair and tools out of the machine while it is working. The screen reminds you during calibration with “Keep hands clear of the bed” and “Leave the printer alone while this runs.”
- Emergency stop. The red hand at the bottom-left of every screen stops everything. Press and hold it for about ¾ second (details). If the screen reports that the stop did not reach the printer, switch the printer off at the wall.
- Fumes. ABS, ASA and PC give off fumes while printing. Print them in a ventilated room and keep the door of the printer closed.
- Stay nearby for your first prints, especially for the first layer, which is where most failures start.
- Power. Use the supplied power cable and a grounded outlet. Do not switch the printer off at the wall during a print unless it is an emergency: the print can be recovered (chapter 12), but the part may not survive.
Chapter 02
Wi‑Fi and remote access
Wi‑Fi lets you send prints from OrcaSlicer straight to the printer and, with 3DISM Remote, watch it from anywhere. You can also print from a USB stick without any network.
Connect to Wi‑Fi
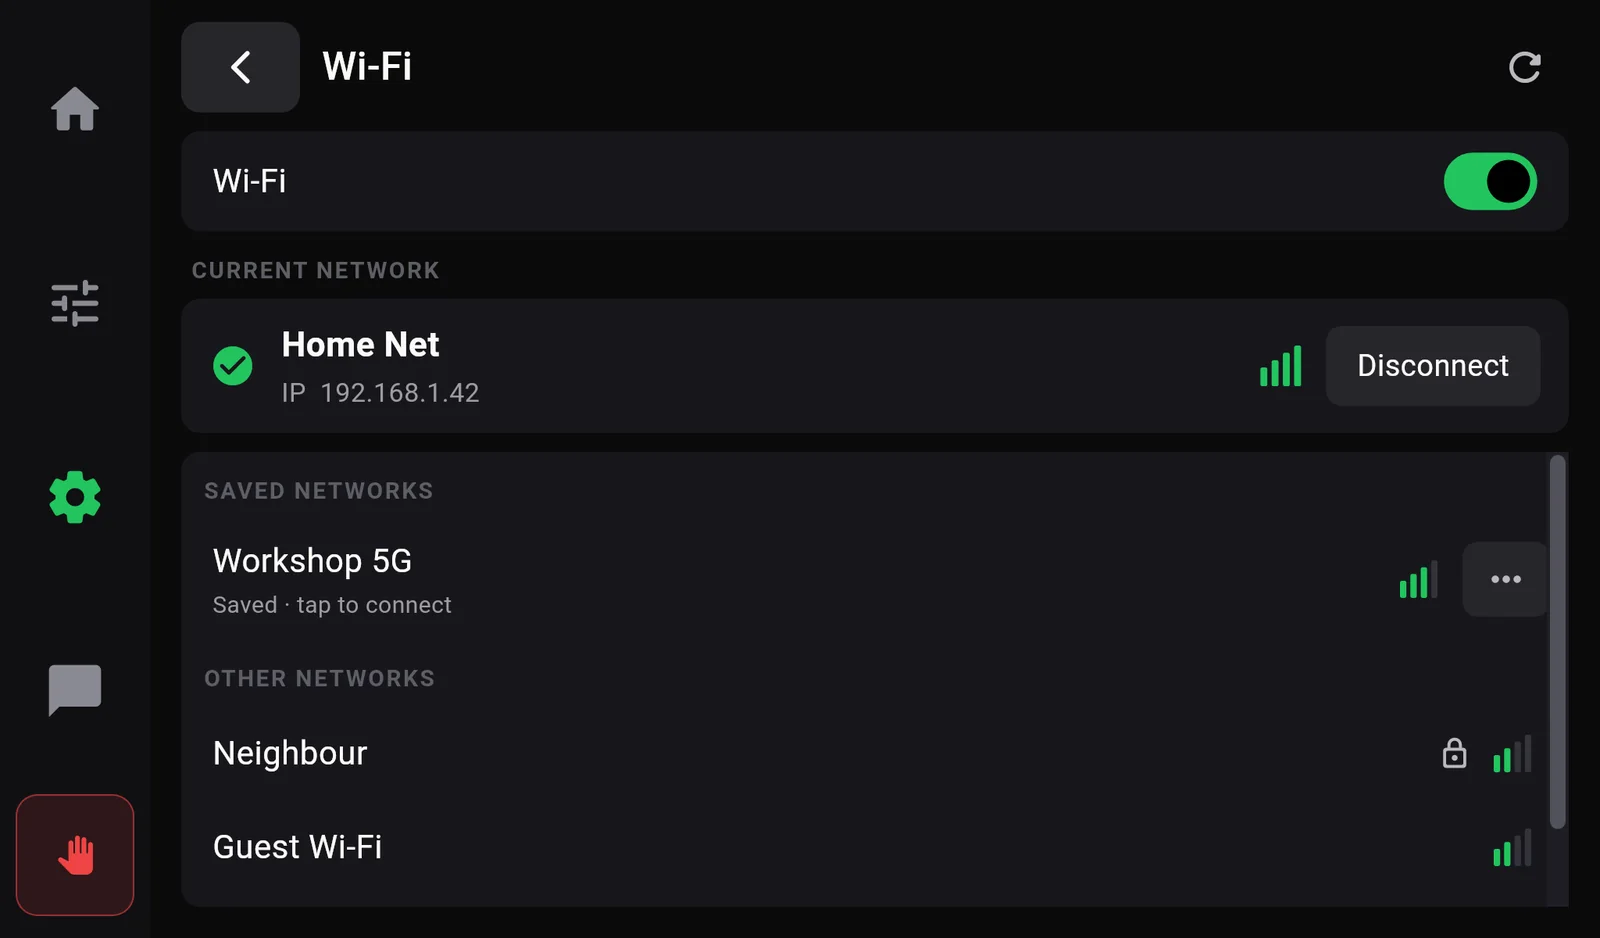
- Open the Wi‑Fi page. On Home, tap the Wi‑Fi tile, or go to Settings›Wi‑Fi.
- Check the Wi‑Fi switch is on (green) at the top of the page.
- Tap your network under OTHER NETWORKS. A lock means it needs a password. The bars show signal strength: four green bars is excellent, one is weak.
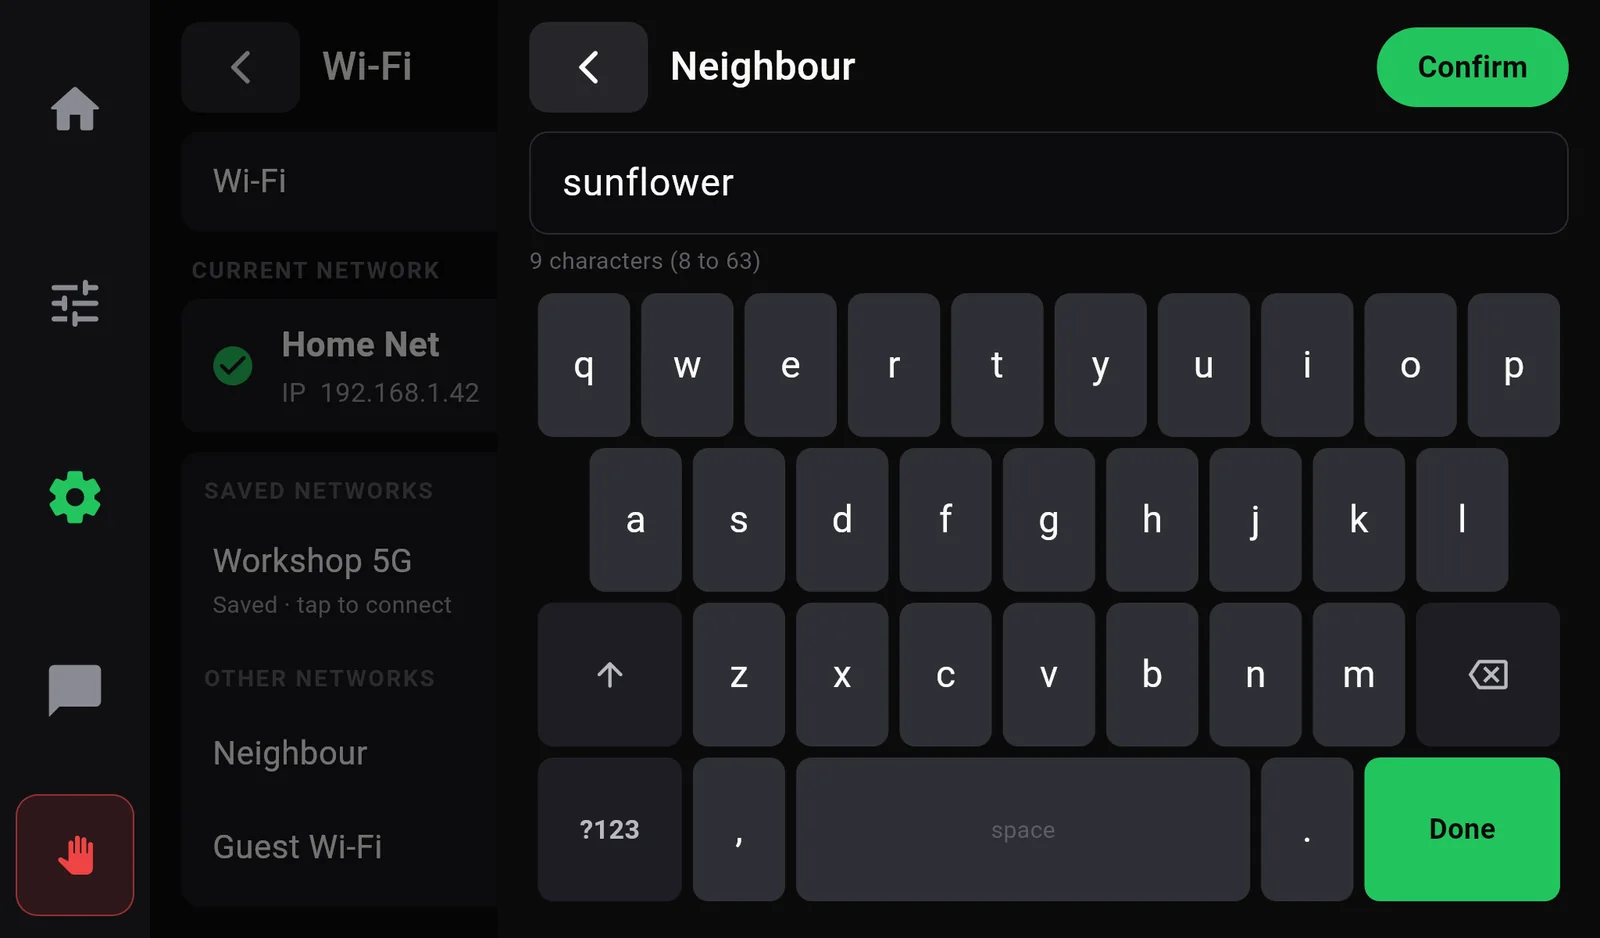
- Type the password on the on-screen keyboard. The password is shown in plain text as you type, so you can check it. Most home networks need 8 to 63 characters; the line under the box counts them for you. Use ⇧ for capitals (tap twice for caps lock) and ?123 for numbers and symbols.
- Press Confirm (or Done on the keyboard). Joining can take up to a minute: Connecting to <network>… This can take up to a minute.
- Done. The bottom of the page says Connected to <network> in green, and CURRENT NETWORK shows the network with the printer's address, for example IP 192.168.1.42.
Saved networks
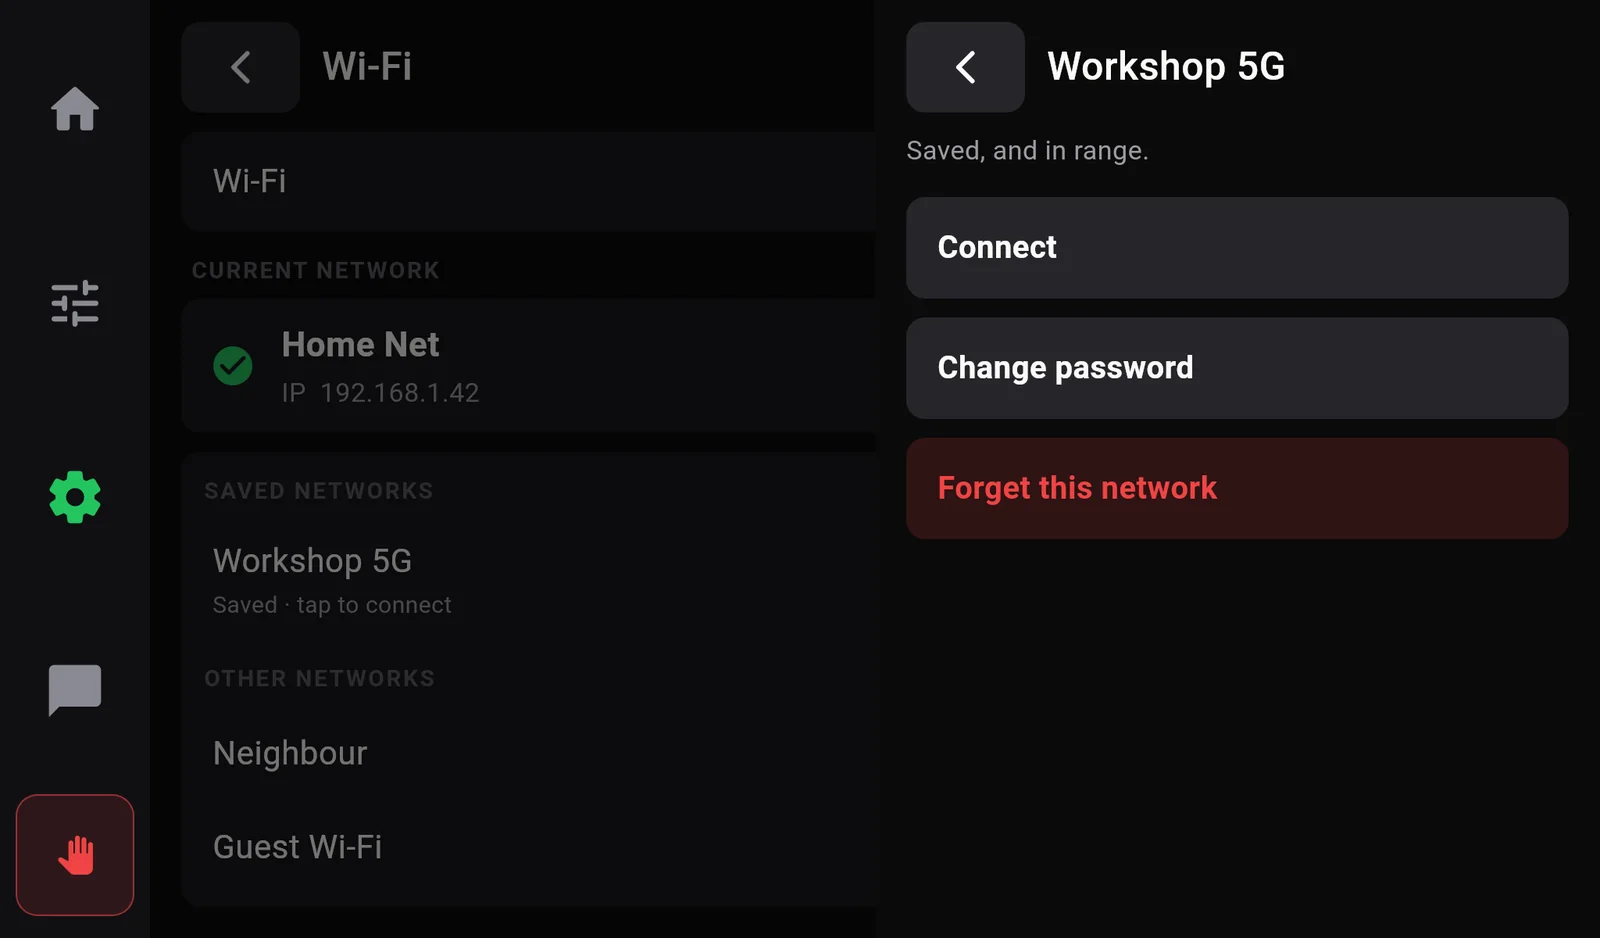
Networks the printer has joined before are listed under SAVED NETWORKS. The printer rejoins them by itself. Tap one that is in range to connect without typing the password again, or tap its … button for Connect, Change password and Forget this network.
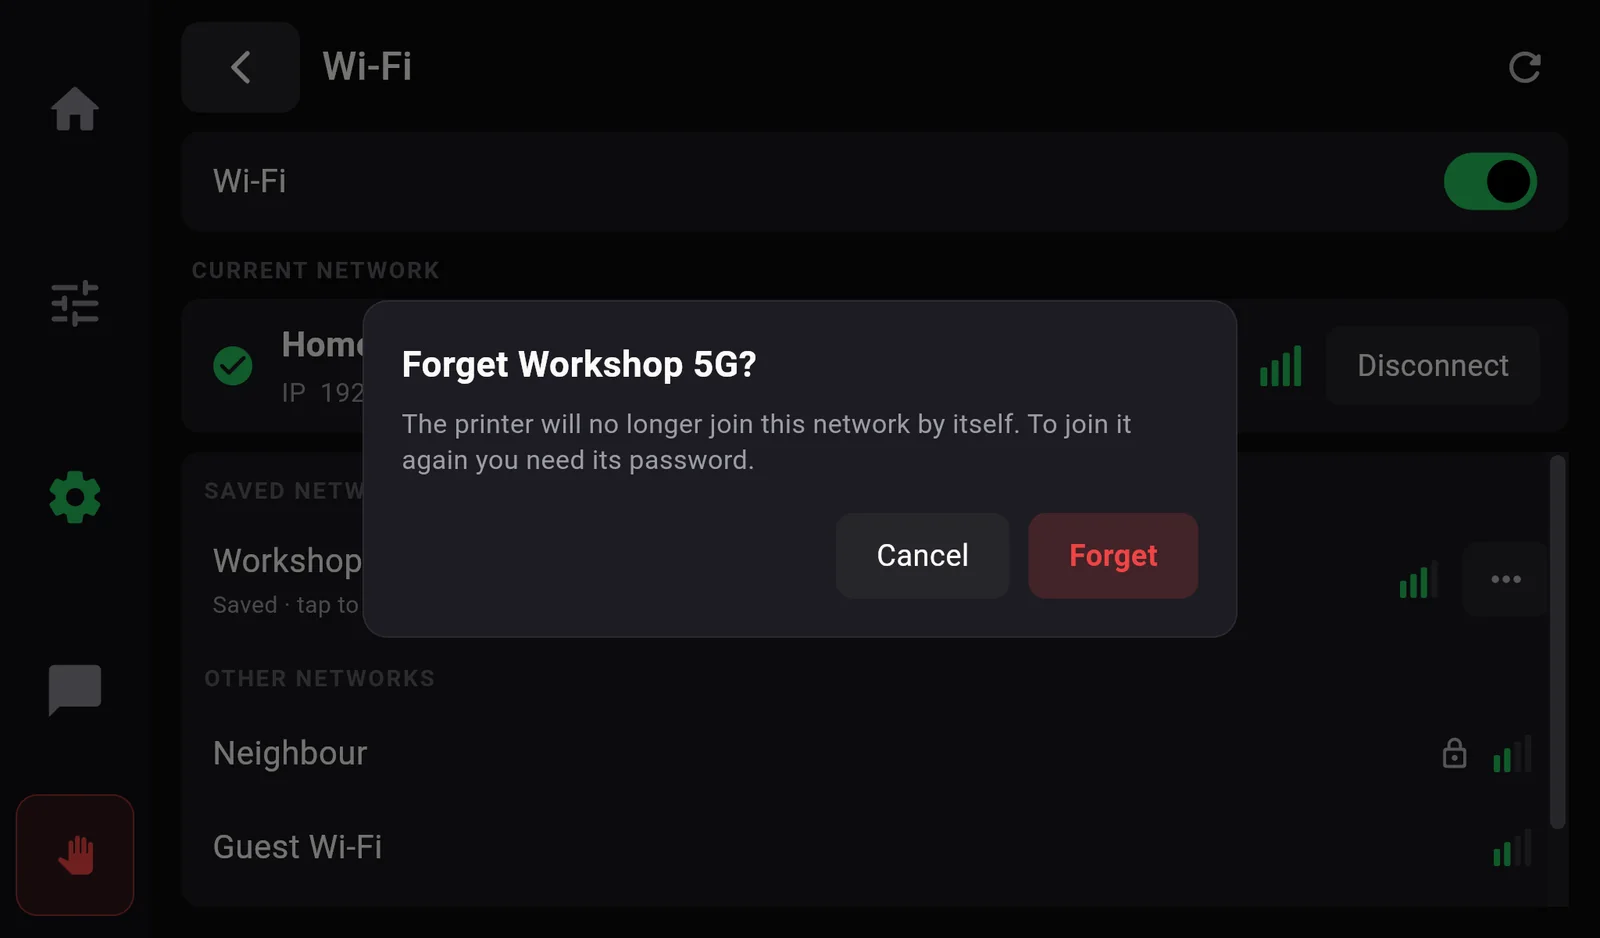
Forgetting a network deletes its saved password: The printer will no longer join this network by itself. To join it again you need its password. Use it when you change routers, or before giving the printer to someone else.
- The network you are connected to has no … button. To forget it or change its password, tap Disconnect first.
- Hidden networks, and work or school networks that ask for a user name as well as a password, cannot be joined from the screen.
- Switching Wi‑Fi off, or disconnecting, also cuts 3DISM Remote until the printer is back on Wi‑Fi.
If joining fails
| Message at the bottom of the Wi‑Fi page | What to do |
|---|---|
| The network did not accept the password. | Retype the password carefully, including capitals. |
| The network turned the printer away: usually a wrong password, sometimes a weak signal. | Check the password, then move the router or printer closer. |
| The network is out of range or switched off. | Check the router is on, and that the network appears in the list. |
| The printer joined, but the router gave it no address. Restart the router, then try again. | Restart the router. |
| The network did not answer in time. | Try again. If it repeats, move the printer closer to the router. |
| Too short: Wi‑Fi passwords have at least 8 characters. | The password typed is too short for this kind of network. |
| This screen is not allowed to change the Wi‑Fi. Contact 3DISM support. | Contact 3DISM support. |
The printer's IP address
You need the printer's address (its IP address) to connect OrcaSlicer. It is shown in two places:
- Settings›Wi‑Fi, under the current network: IP 192.168.1.42. This one is always up to date.
- Info, under NETWORK › IP address. This is read when the screen starts.
Typing that address into a web browser on a computer on the same network opens the printer's web interface.
3DISM Remote: your printer from anywhere
3DISM Remote links the printer to your 3DISM account, so you can check progress, watch the camera and control the machine from the 3DISM app or from 3dismcloud.com when you are away from it. Pairing takes a minute and is done once.
- On the printer, open Settings›3DISM Remote (the card on the left of Settings). The page first checks whether the printer is paired already (Checking with 3DISM Cloud…). If it is, it says so; skip to the last step.
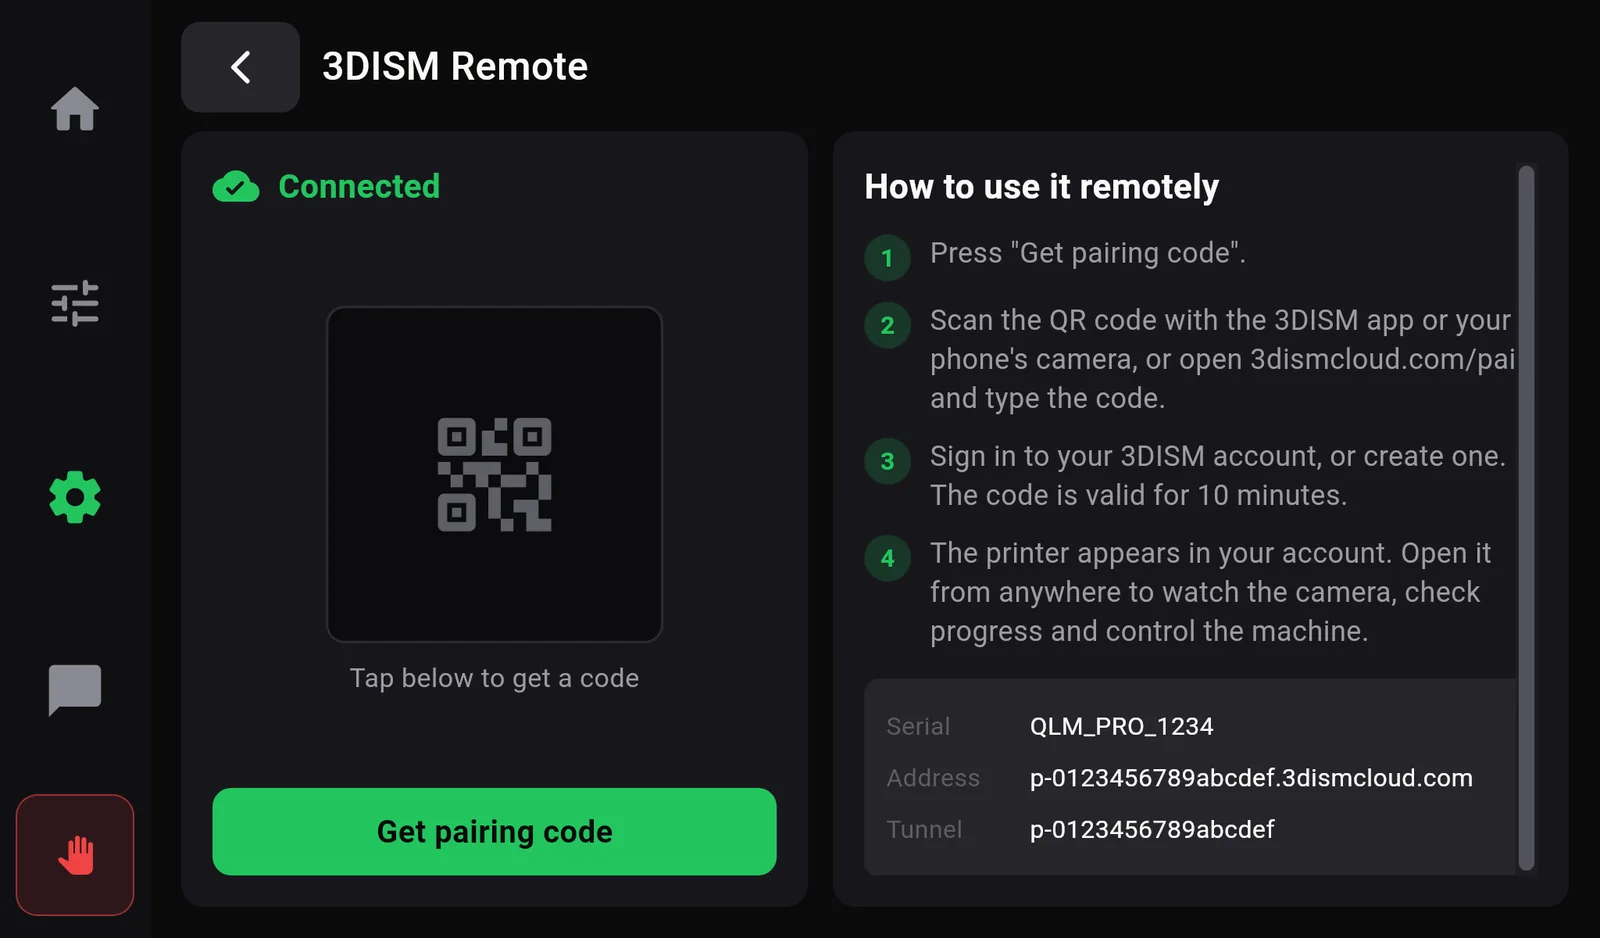
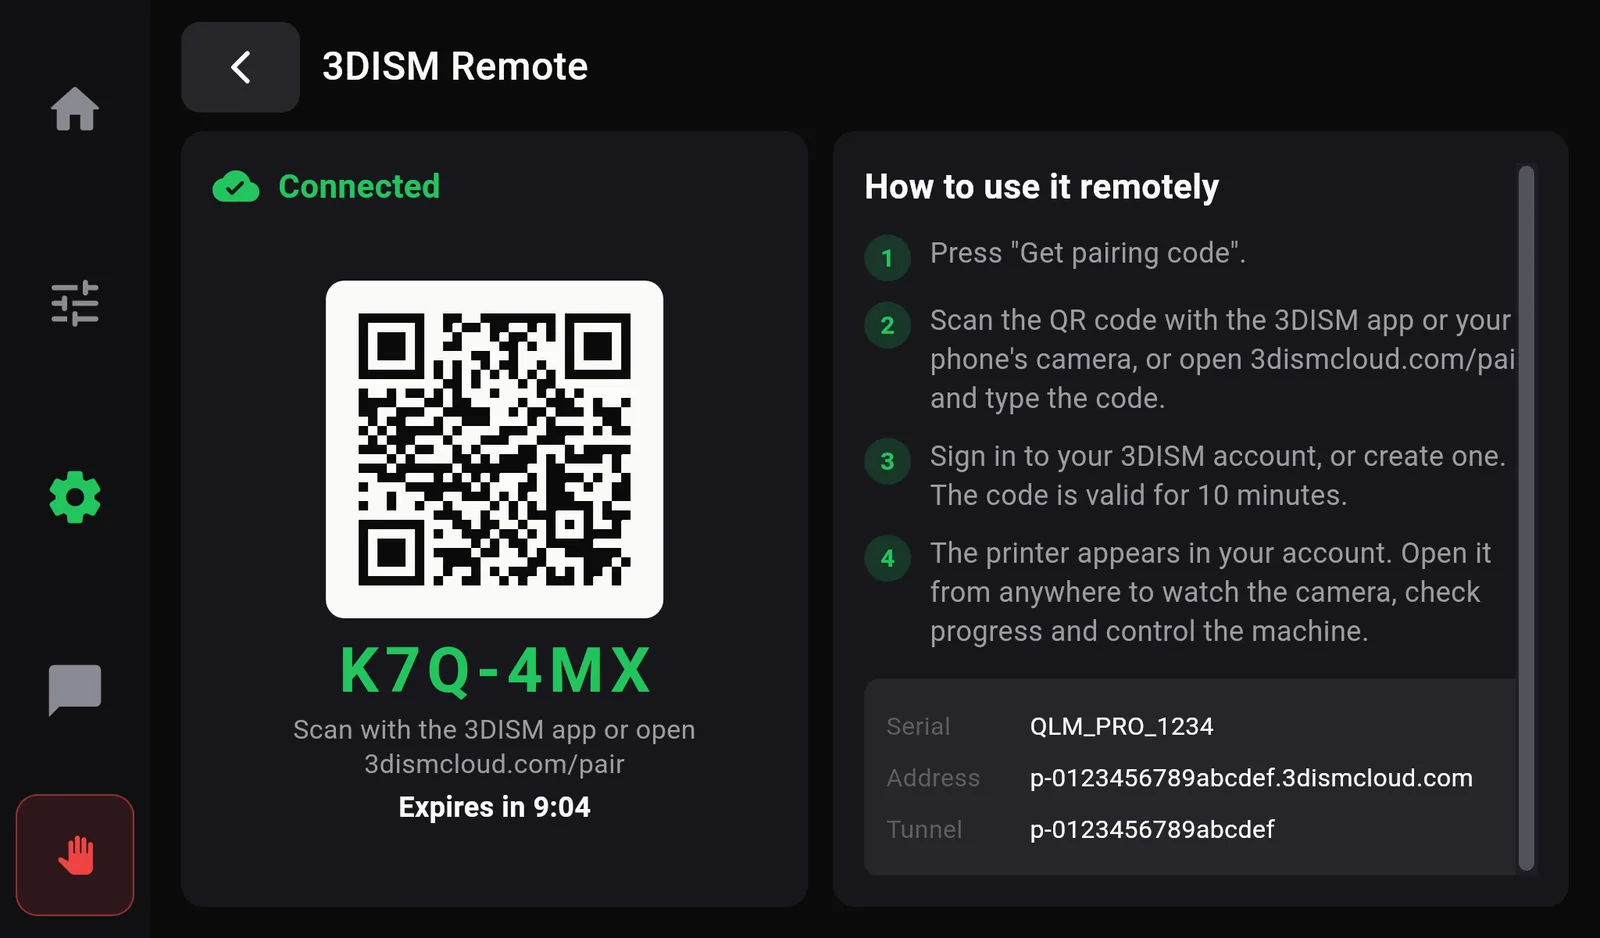
- Press Get pairing code. After a few seconds (Asking 3DISM Cloud…) a QR code appears, with a six-character code under it, for example K7Q-4MX. It is valid for 10 minutes; the countdown is shown under it.
- Scan the QR code with the 3DISM app or your phone's camera. On a computer, open 3dismcloud.com/pair and type the code instead.
- Sign in to your 3DISM account, or create one.
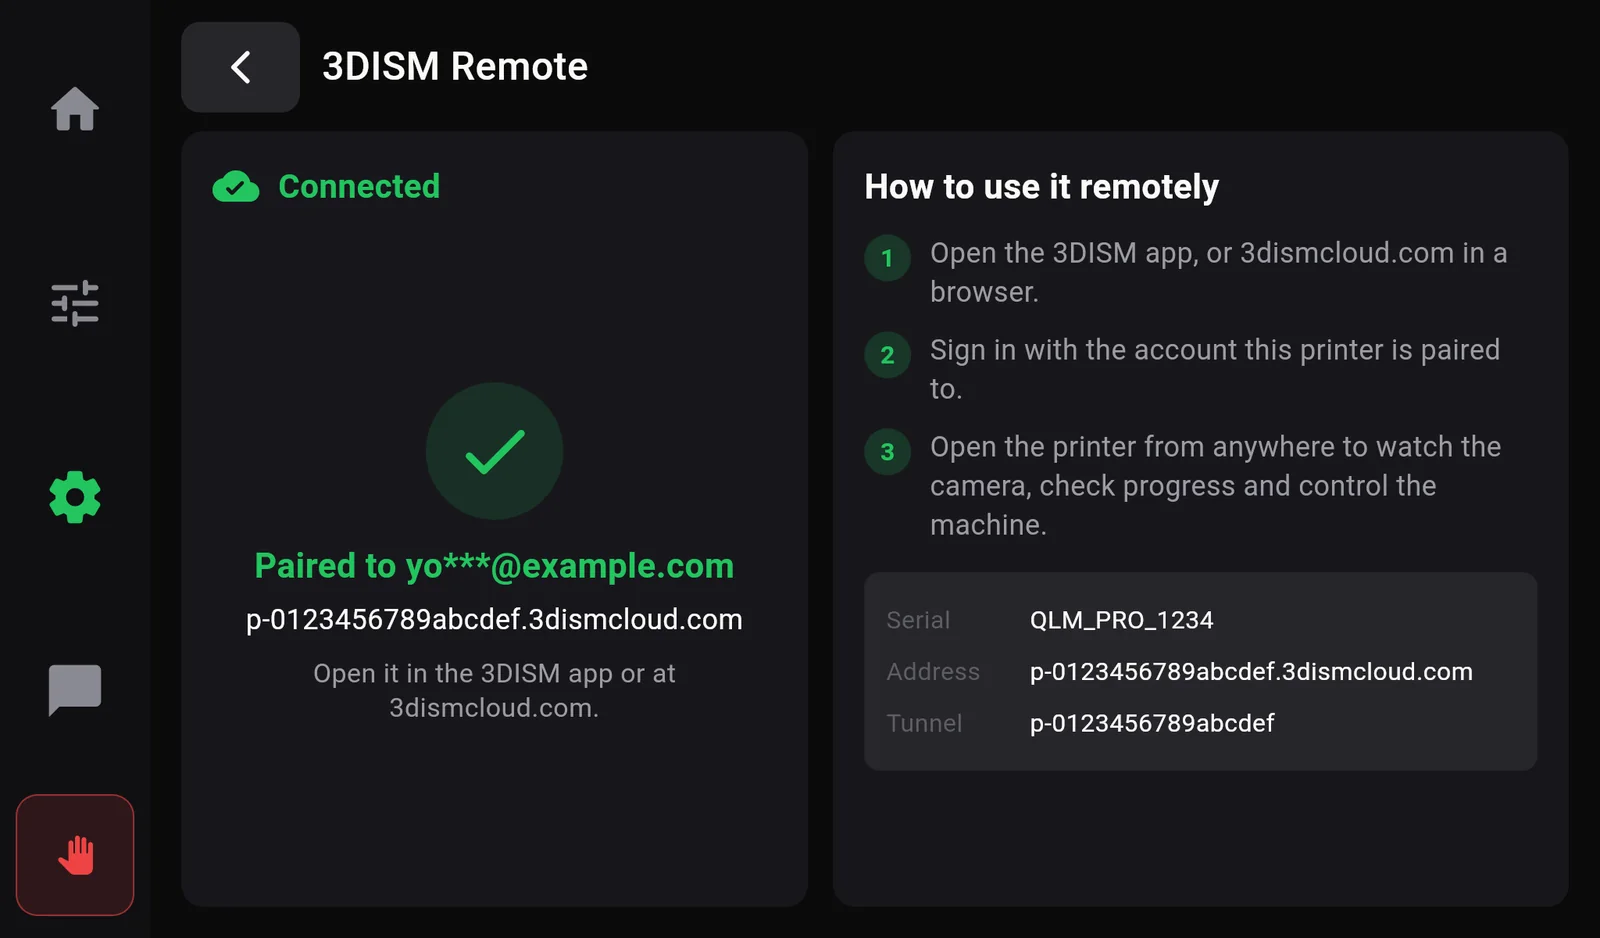
- Done. Within a few seconds the printer shows Paired to and your account, with the printer's remote address. The printer now appears in your app and at 3dismcloud.com.
| Message on the Remote page | What to do |
|---|---|
| Expired — get a new code | The 10 minutes ran out. Press Get new code. |
| This printer is already paired to an account. Open it in the 3DISM app or at 3dismcloud.com with that account. | It is paired to another account. Sign in with that account, or ask its owner to remove the printer. |
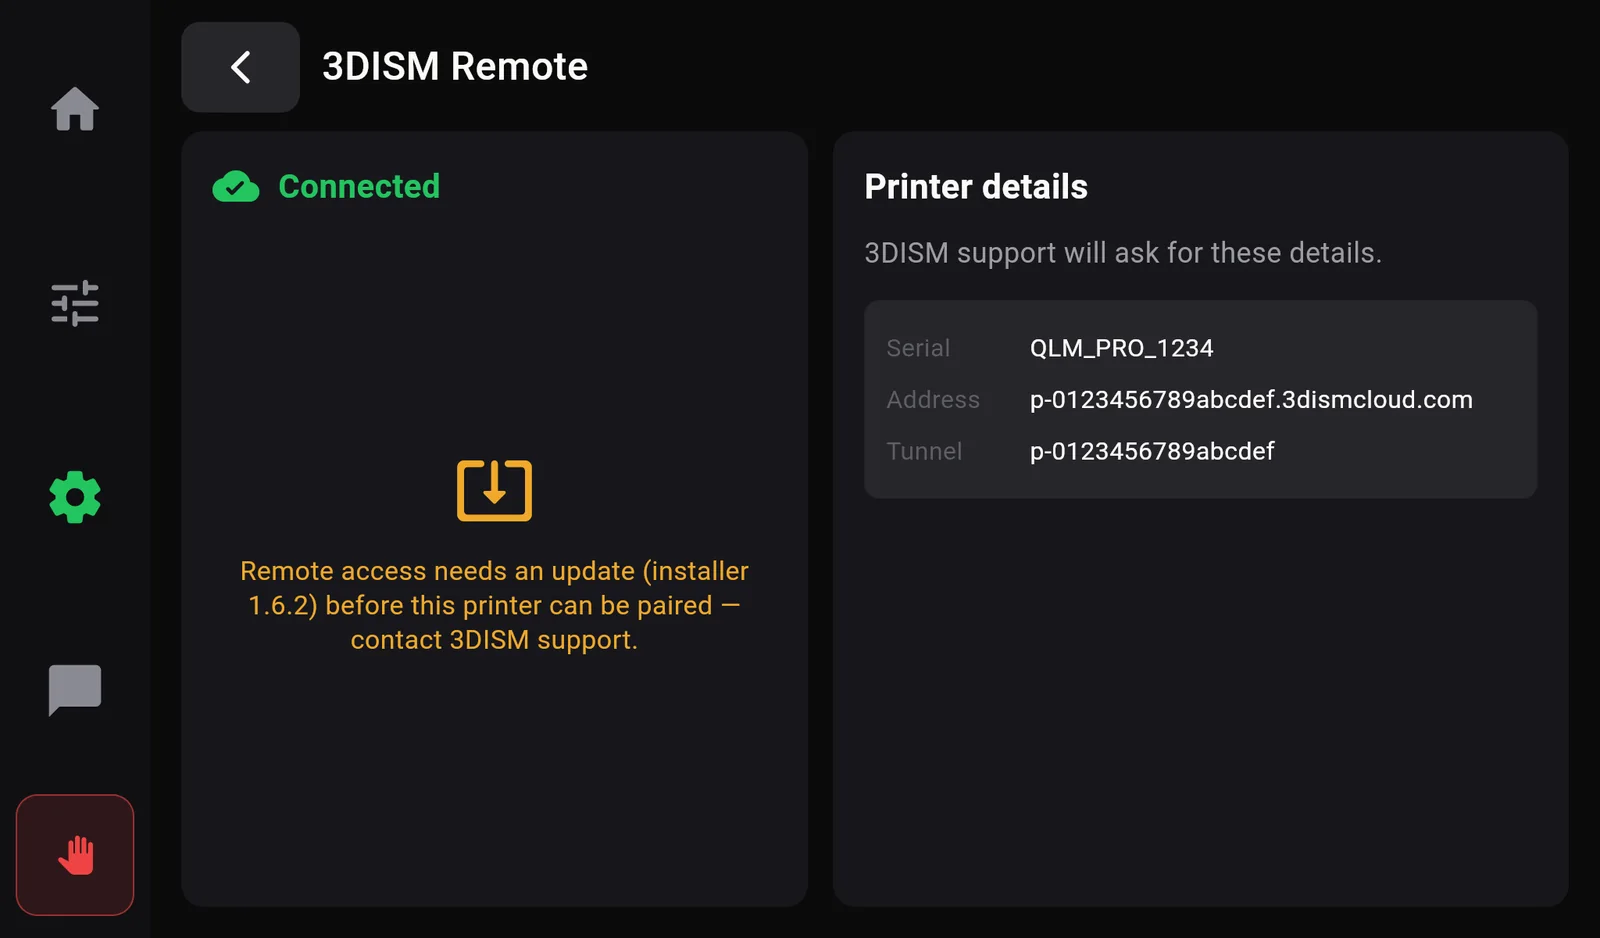
| Remote access needs an update (installer 1.6.2) before this printer can be paired — contact 3DISM support. | Contact 3DISM support. The page shows the serial number they will ask for. |
| Remote access is not installed on this printer. Contact 3DISM support. | Contact 3DISM support. |
| Any other message in red | It is 3DISM Cloud's own explanation. Check the printer is on the internet (Wi‑Fi), wait a minute and try again. If it repeats, contact 3DISM support. |
Check your machine's details
The  Info icon opens Machine Information: model, build volume, serial number, IP address, remote address and software versions. Have this page open (or a photo of it) when you contact 3DISM support. It is described in chapter 11.
Chapter 03
Your first print, step by step
This chapter takes you from a switched-off printer to a finished part. It assumes you have never used a 3D printer before. Allow about an hour, most of it waiting for the bed to be measured and the part to print.
Step 1 · Switch on
- Place the printer on a stable, level table with some space around it for air, and remove all packing material from inside the printer.
- Switch it on. The screen shows Starting up, then Home.
- Wait for Ready in green on Home, and the robot showing OK.
Step 2 · Join Wi‑Fi
Follow Connect to Wi‑Fi and note the IP address shown under the current network. If you will only print from USB sticks, you can skip this step.
Step 3 · Load filament
- Open Controls›Filament. The spool picture shows the material the printer thinks is loaded, for example PLA.
- If it is not the material you are loading, tap Edit, choose the material (PLA, PETG, ABS…) and a colour, and press Confirm. This sets the temperature used to load and unload.
- Mount the spool and guide the filament end towards the print head. Cut the end at an angle with side cutters so it feeds cleanly.
- Tap Load. The nozzle heats first; the ring shows the nozzle temperature rising towards the target (figure). Then the screen shows each step the printer reports.
- Feed the filament in when the printer is ready for it, and keep a gentle push on it until the extruder grips it and pulls it in.
- Watch the nozzle. Loading is done when clean plastic in the new colour comes out and the Filament page returns to normal.
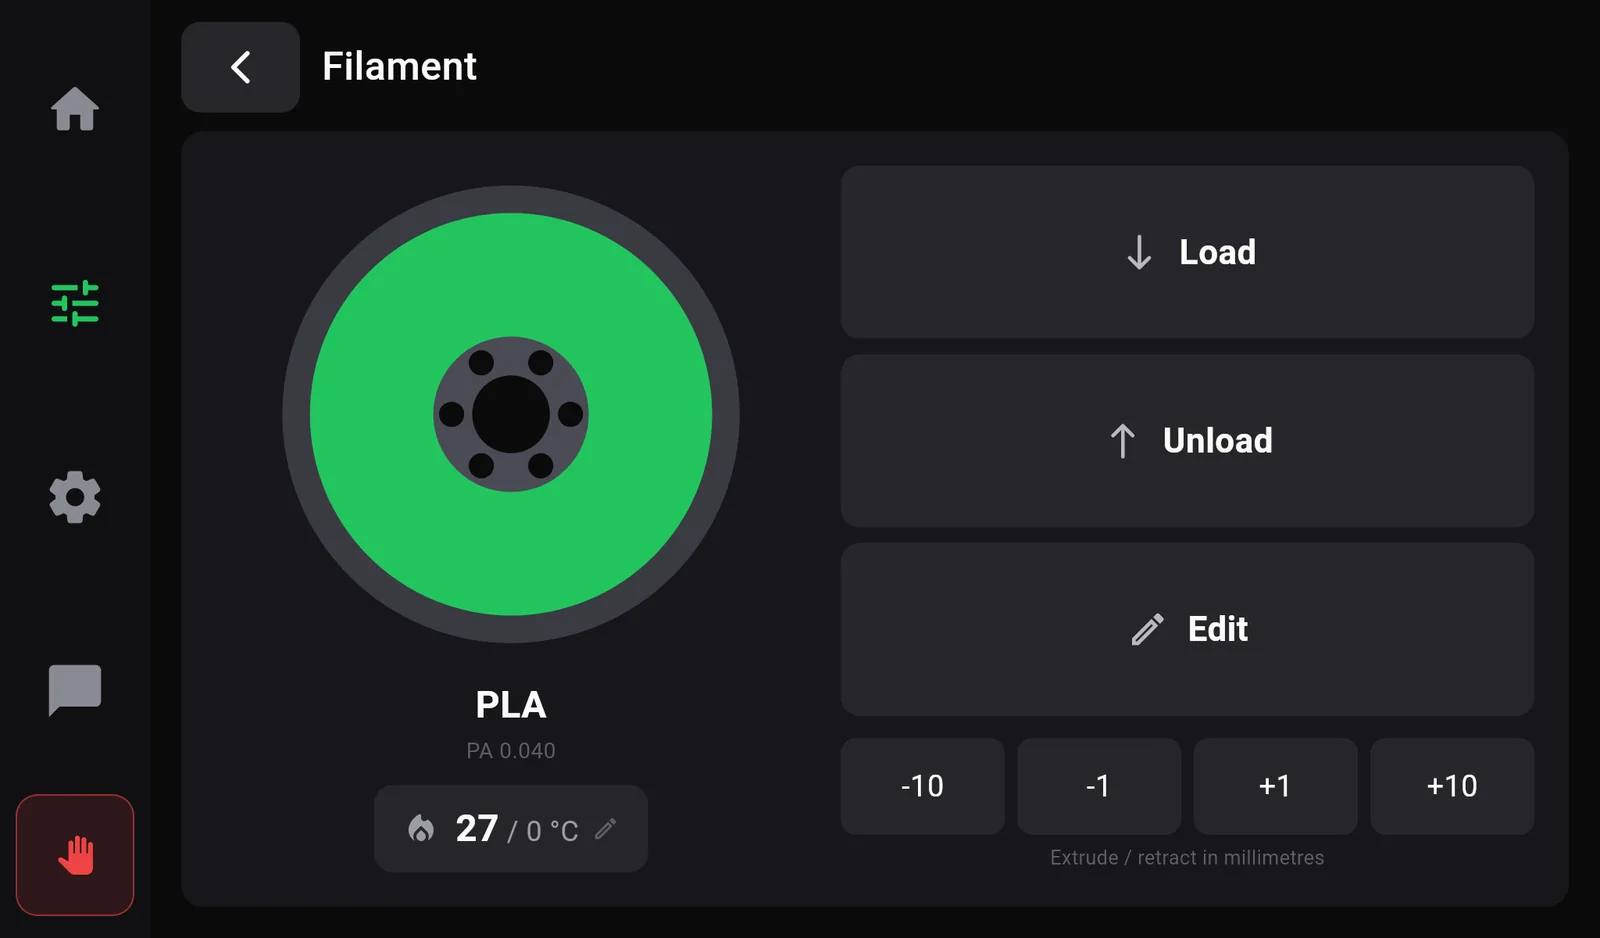
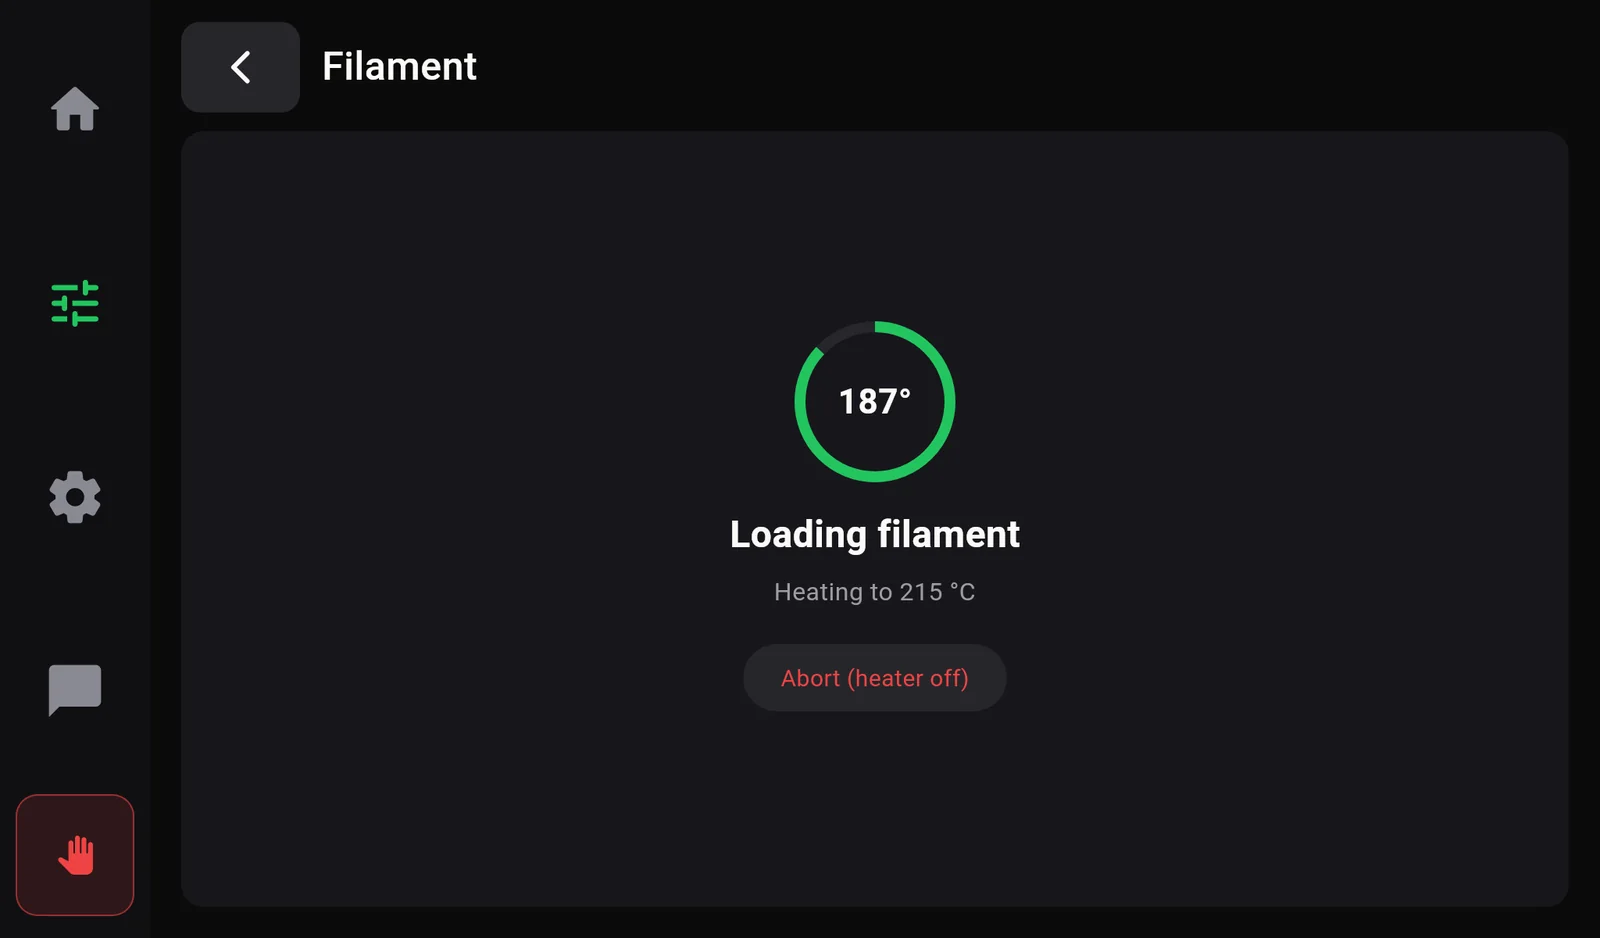
Always Unload the old filament before loading a new one. Abort (heater off) only switches the nozzle heater off; let the printer finish its current step.
Step 4 · Level the bed for your material
The bed is never perfectly flat, and its shape changes as it heats. Auto Bed Levelling measures the bed at the temperature you print at and stores that map, so the first layer comes out even everywhere. You do this once per material temperature, not before every print.
- Remove anything lying on the bed.
- Open Settings›Printer Calibration›Auto Bed Leveling.
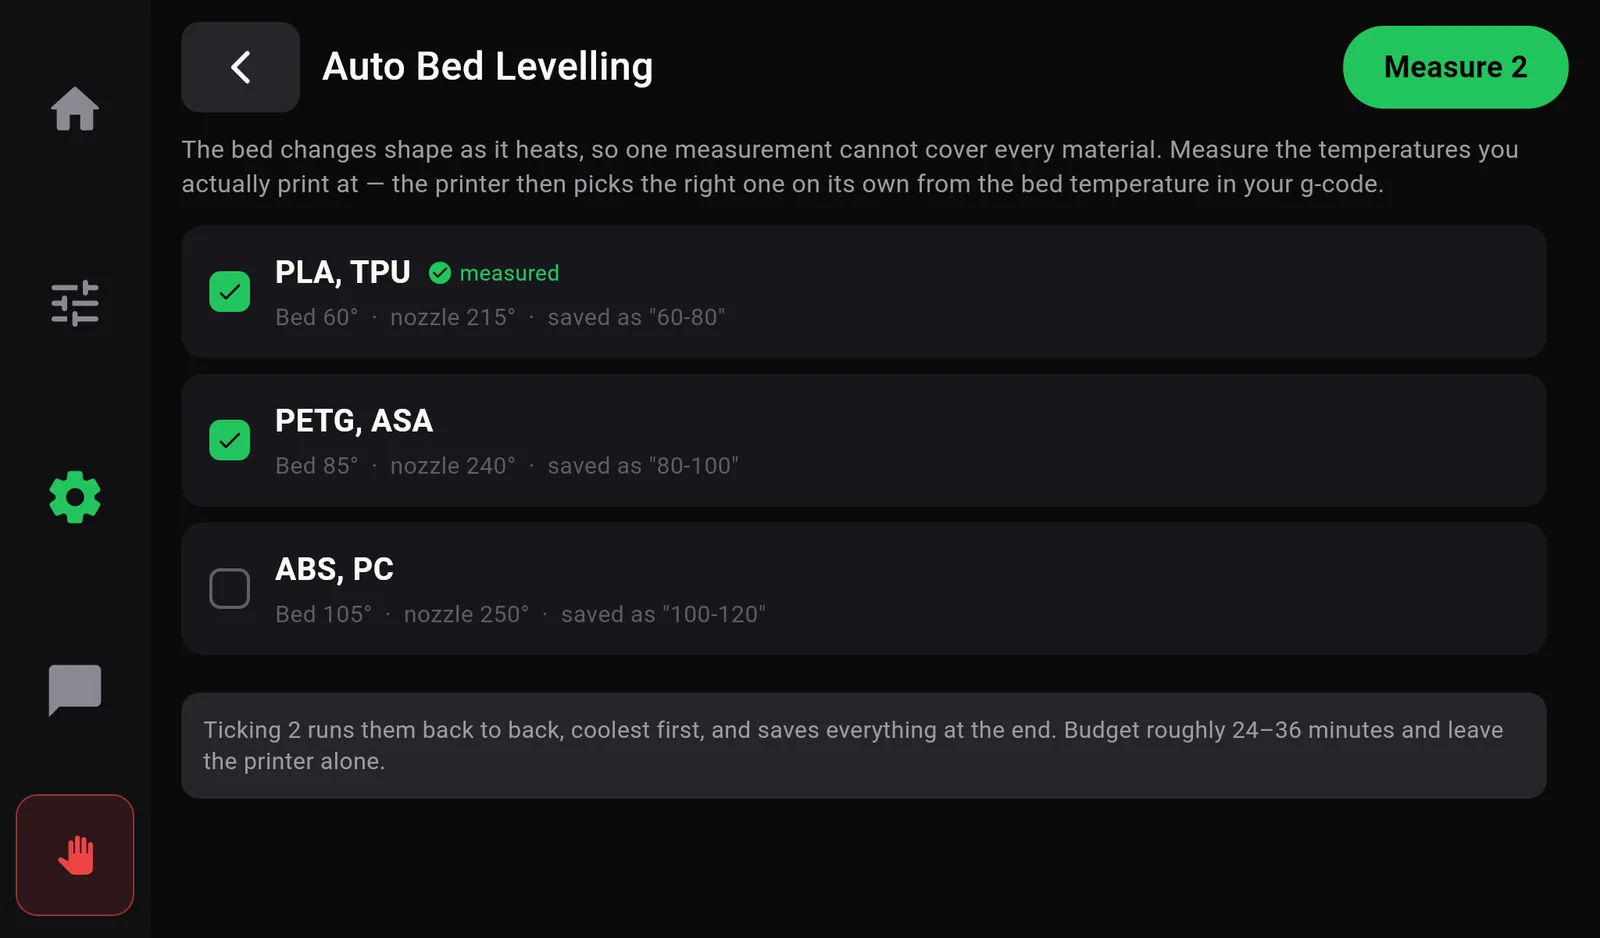
- Tick the materials you print. PLA, TPU is ticked already. Add PETG, ASA or ABS, PC if you use them.
- Press Measure 1 (the number is how many you ticked). The printer heats the bed, homes, prepares and probes the bed point by point. Each temperature takes roughly 12–18 minutes. Do not touch the printer.
- Done when the message 1 mesh saved — The printer restarted to store them appears. The material now shows a green measured badge.
Full details: Auto Bed Levelling.
Step 5 · Prepare the file in OrcaSlicer
A 3D model (STL or 3MF) has to be turned into printer instructions (a G-code file) by a slicer. Set up OrcaSlicer with the Qalam profile once (chapter 5), then for each print:
- Pick the Qalam printer, the filament you loaded and a print profile, for example 3DISM QALAM 400, PLA QALAM and 0.2 … tuned profile.
- Add your model and press Slice plate.
- Send it: Print → Upload puts the file in the printer's Print Files; Upload and Print also starts it. Or export the G-code to a USB stick.
Choose something small and flat for your first print, such as a 20 mm calibration cube. It prints in under half an hour and shows at once whether the first layer is right.
Step 6 · Start the print
- On Home, tap Print Files. Your file is at the top of the list (newest first). Files on a USB stick are under USB Drive.
- Tap the file. Check the details: estimated time, filament weight, material.
- Make sure the bed is empty and clean and the right filament is loaded.
- Press Print. The print starts immediately, without a second question. The message Print started appears and the screen switches to the print.
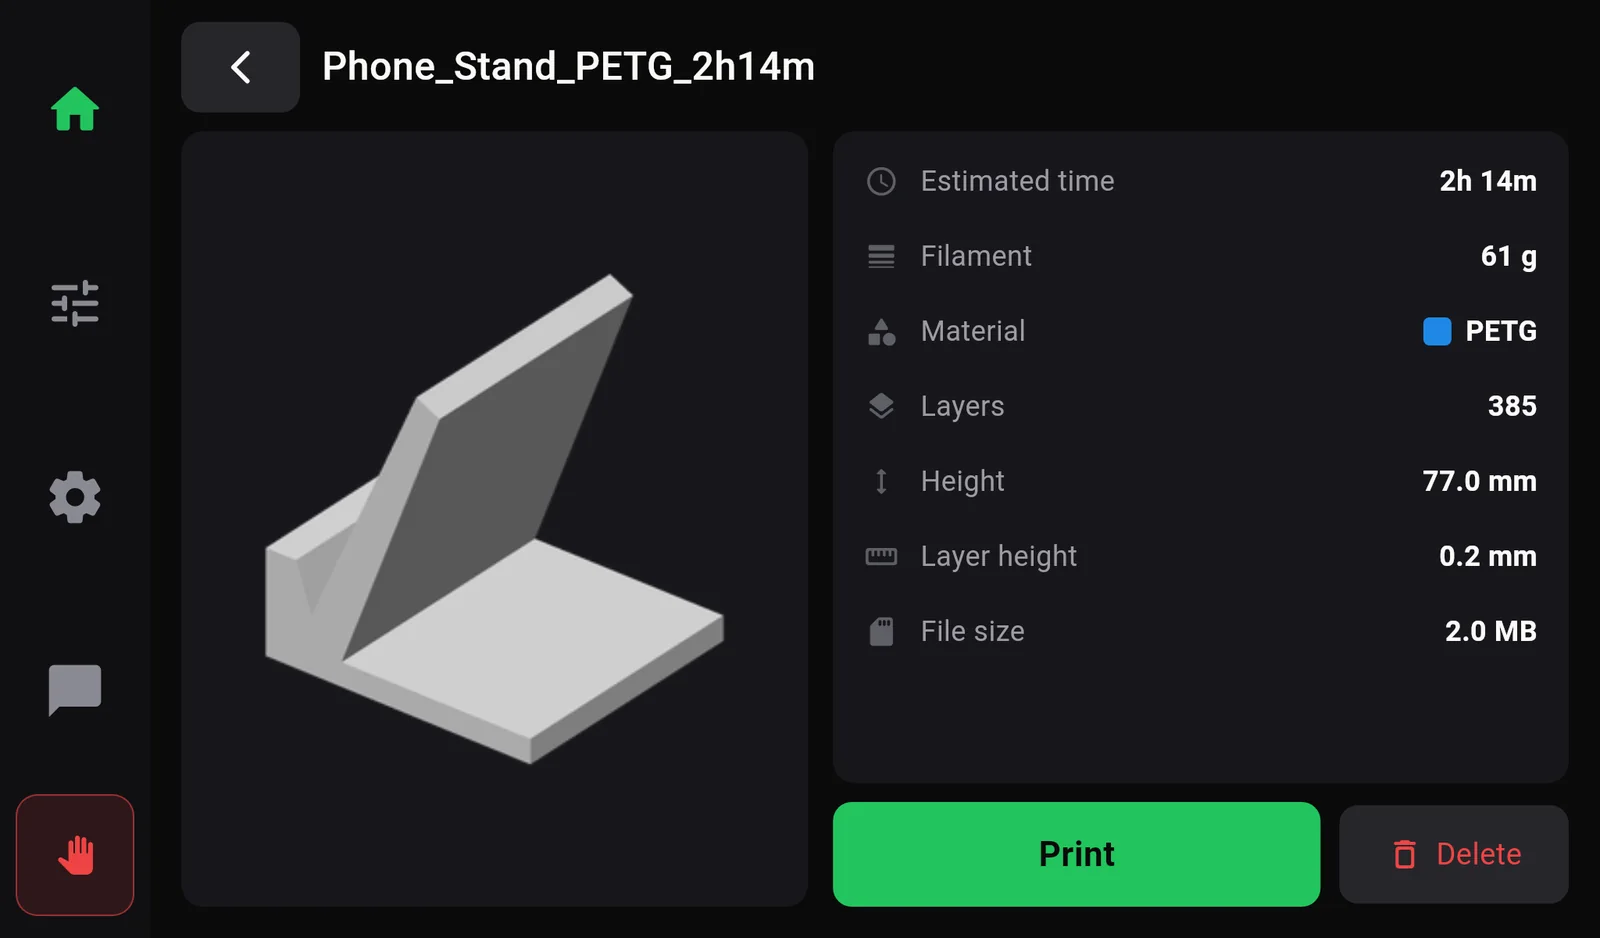
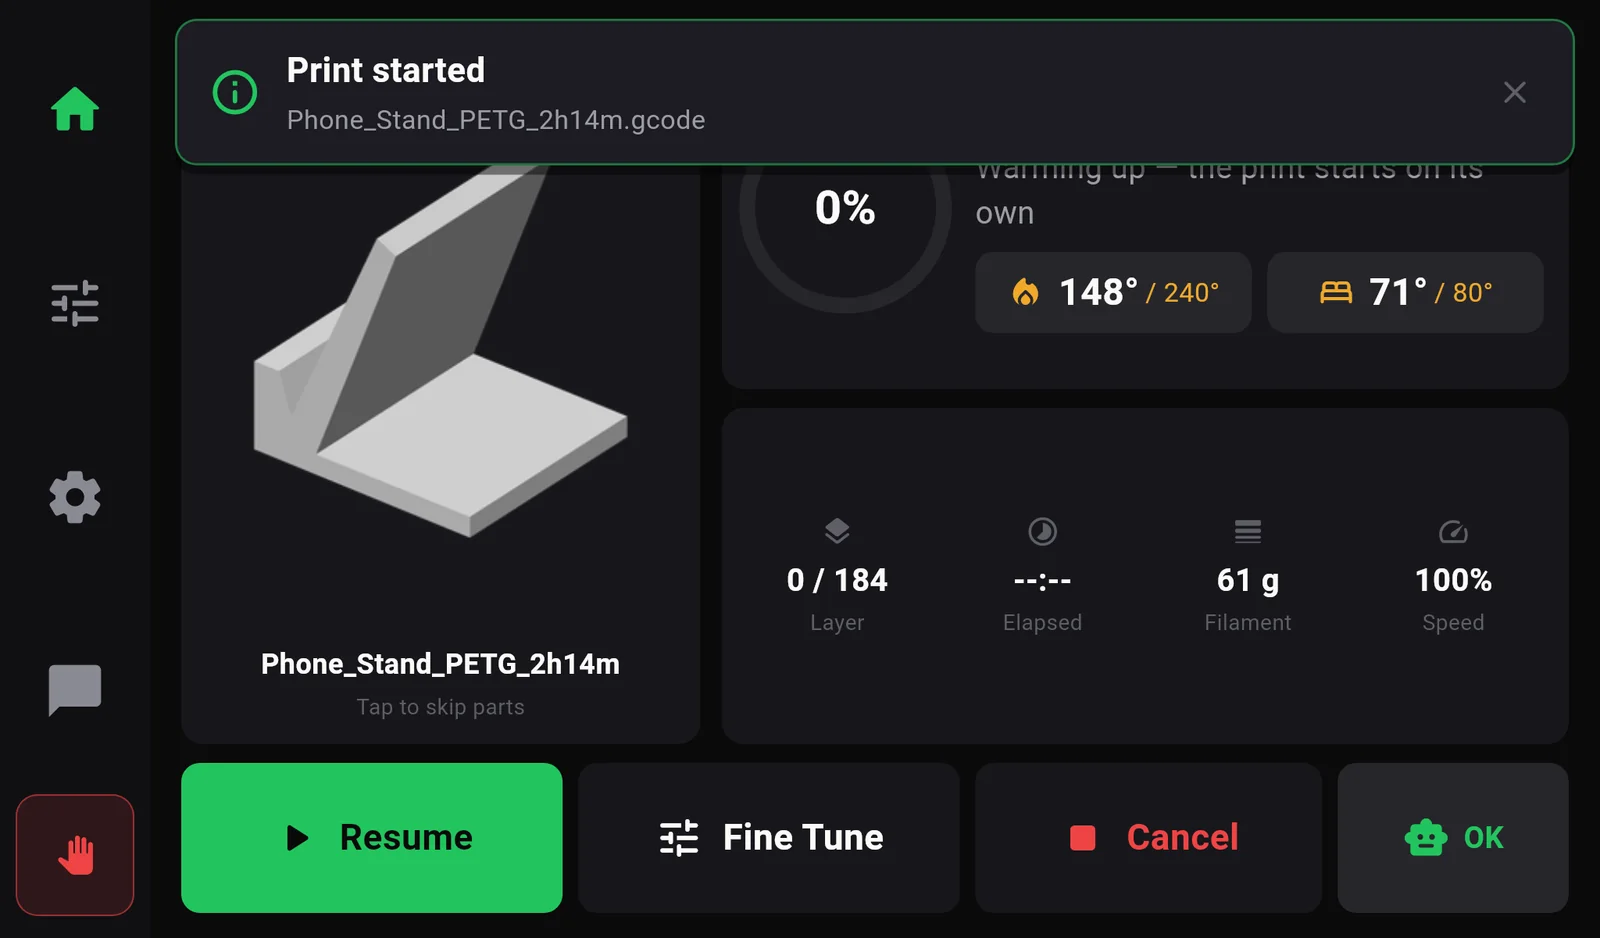
First the printer heats the bed and nozzle; the print screen says Heating — Warming up — the print starts on its own and the temperatures turn from amber to green as they arrive. It then prepares (homing, levelling) and starts printing by itself.
The left button shows a green Resume during heat-up. You do not need to press it: the print starts on its own when the printer is hot. Leave the printer alone until it is printing.
Step 7 · Check the first layer
Stay with the printer for the first layer. A good first layer is flat and slightly squashed: the lines touch each other with no gaps, and the surface feels smooth.
| What you see | Cause | Fix in Fine Tune |
|---|---|---|
| Round lines with gaps between them; lines lift or drag around | Nozzle too high | Closer to bed, one press at a time |
| Thin, see-through lines, rough ridges, or the nozzle scraping | Nozzle too low | Further from bed |
| Good in one area, bad in another | Bed not measured at this temperature | Run Auto Bed Levelling for this material |
To adjust, tap Fine Tune on the print screen and use the Z offset buttons. Each press moves the nozzle by the step size (0.010 mm by default) straight away. How the Z offset works.
Step 8 · Finish
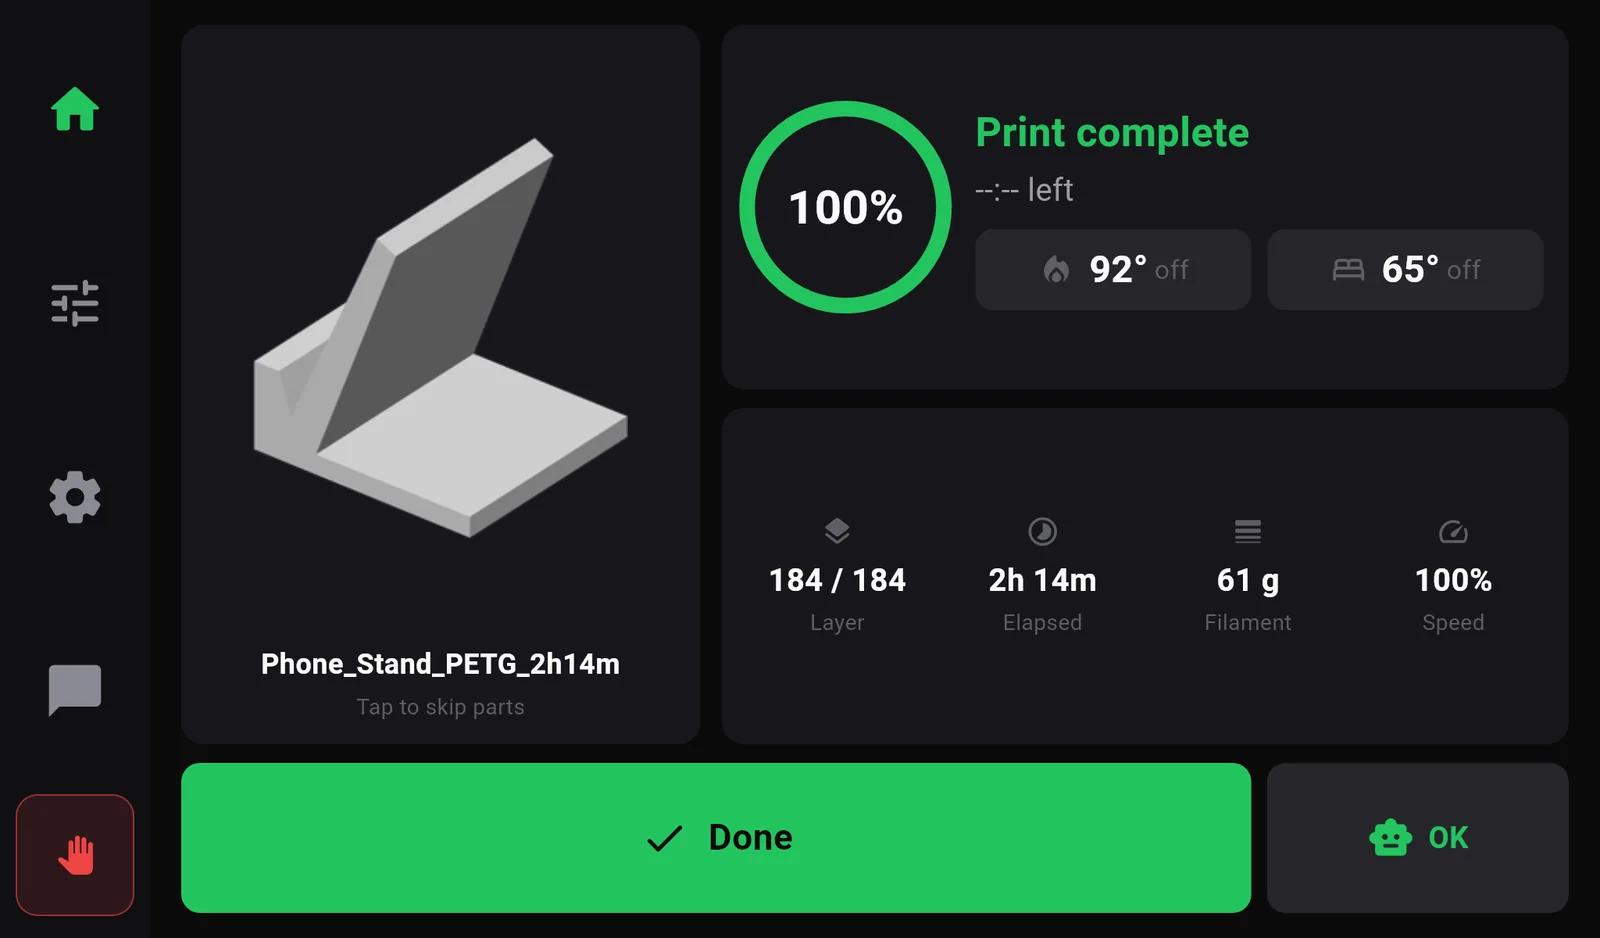
- The screen says Print complete with the ring at 100%.
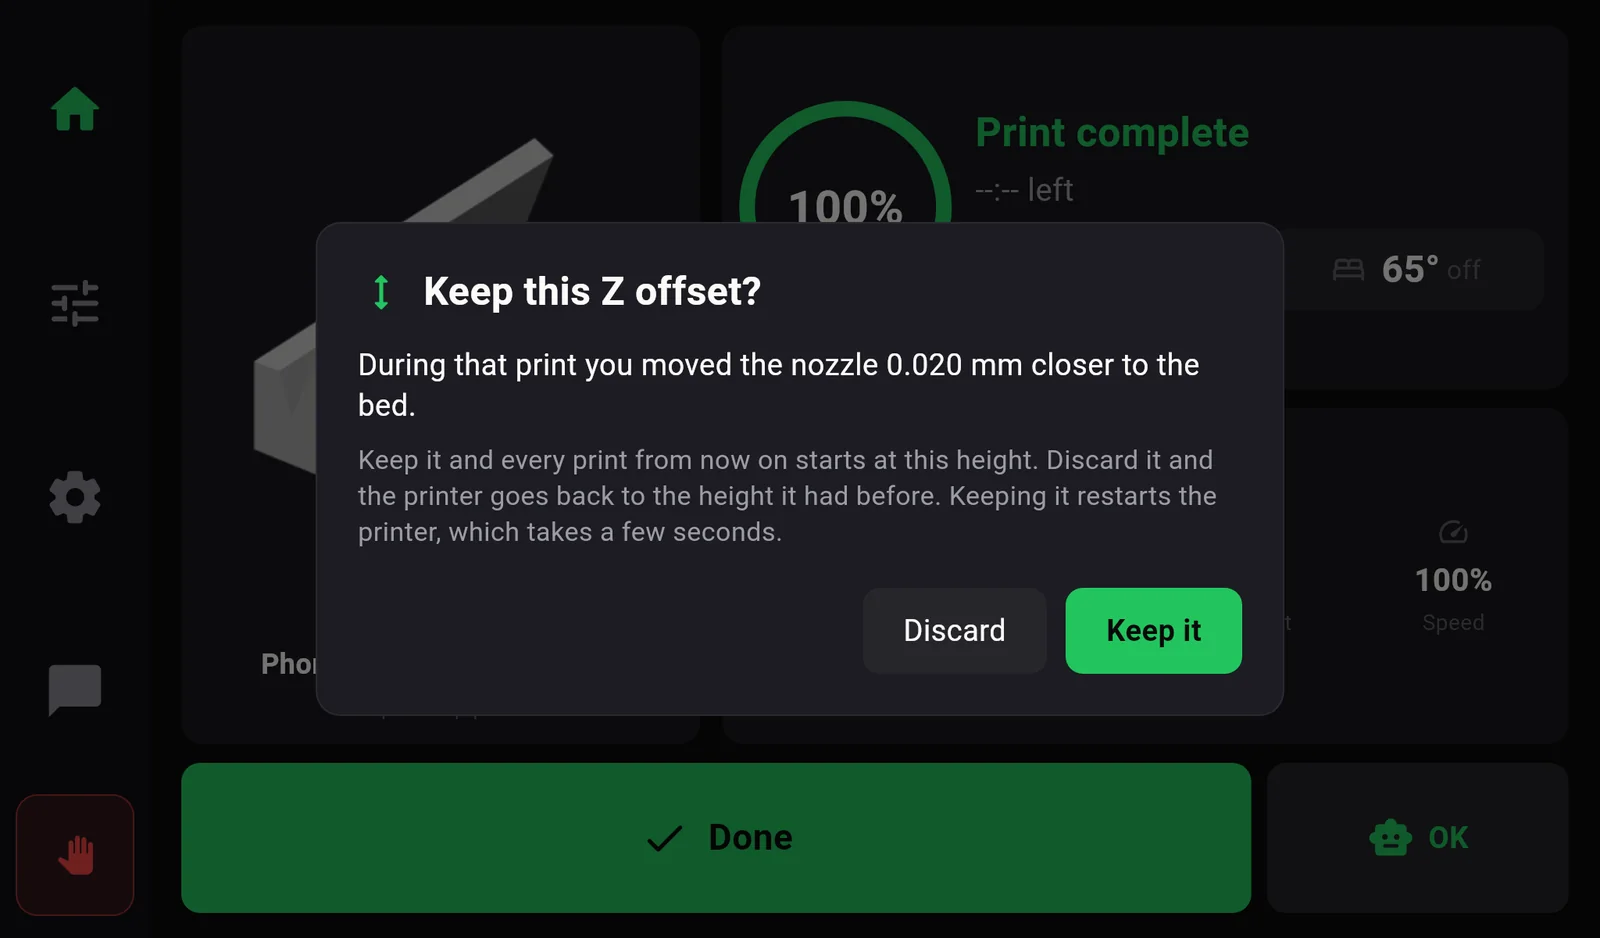
- If you changed the Z offset during the print, the printer asks Keep this Z offset? Press Keep it if the first layer looked right, so every print from now on starts at that height. The printer restarts in a few seconds to store it. Press Discard if you are not sure.
- Let the bed cool for a few minutes. Most parts release more easily from a cool bed.
- Remove the part, then tap Done to clear the finished job and return to Home.
Chapter 04
OrcaSlicer: profiles, connection and sending prints
OrcaSlicer turns a 3D model into the G-code file the printer runs. The 3DISM Qalam profile tells OrcaSlicer everything about your machine: bed size, speeds, temperatures and the start and end routines. Set it up once; after that, printing is three clicks.
The OrcaSlicer pictures were taken in OrcaSlicer 2.3 on Windows. Your version may look slightly different, and the names of the profile files 3DISM gives you may differ slightly from the examples here.
1 · Install OrcaSlicer
- Download OrcaSlicer for Windows, macOS or Linux from its official releases page: github.com/OrcaSlicer/OrcaSlicer/releases. On Windows choose the file ending in Windows_Installer_…_x64.exe; on a Mac, the one ending in Mac_universal_….dmg. It is free.
- Install and open it. The first time, a setup wizard asks for your region, a printer and a filament, and it will not go on without one of each. Tick Generic Printer Klipper and Generic PLA, then press Next until Finish. Your Qalam printer comes from the 3DISM profile you import next.
2 · Import the Qalam profile
3DISM supplies the Qalam profile as files: a printer profile for your model, filament profiles for each material, and process (print quality) profiles. They may come as one bundle file or as several .json files. If you do not have them, ask 3DISM support.
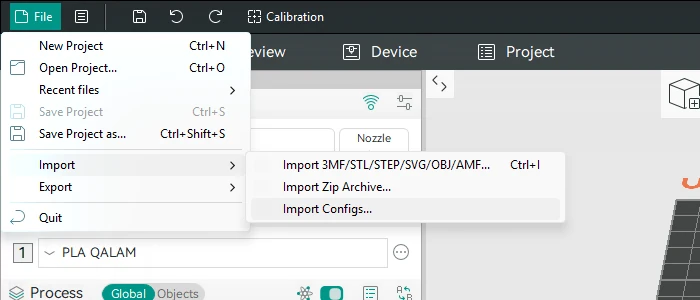
- In OrcaSlicer, open the File menu › Import › Import Configs…
- Select the profile files 3DISM gave you (you can select several at once) and click Open.
- OrcaSlicer confirms the import. The Qalam profiles now appear in the Printer, Filament and Process lists, under User presets.
3 · Choose the Qalam printer, filament and process
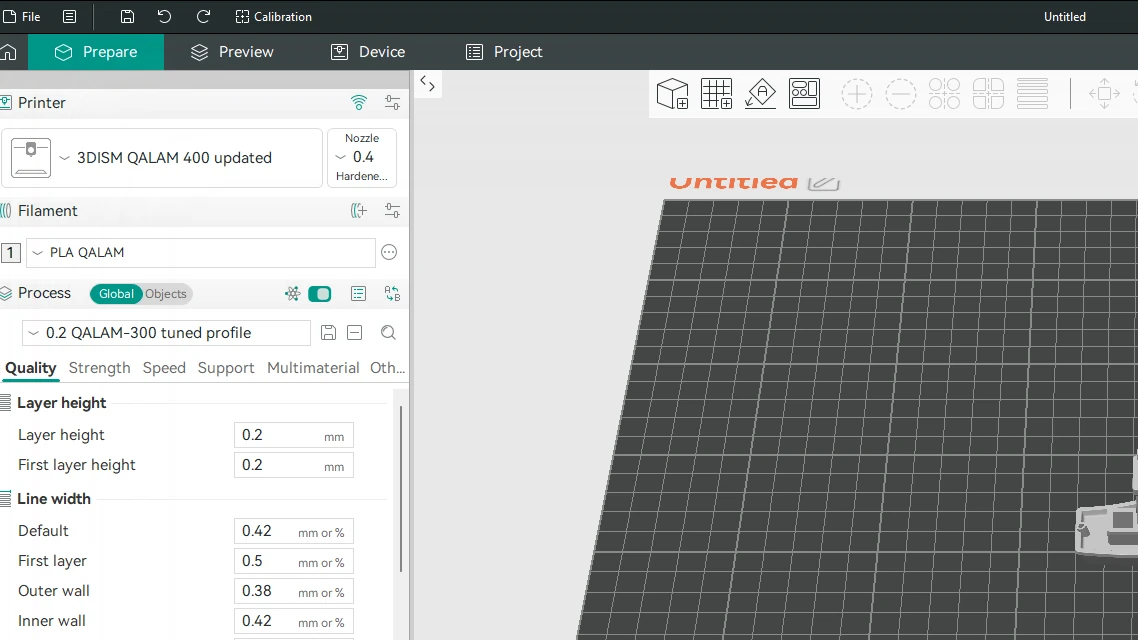
On the Prepare tab, the panel on the left has three drop-down lists. Choose:
| List | Choose | Example names in the 3DISM profile |
|---|---|---|
| Printer | Your model and nozzle size. A Pro 400 needs the 400 profile; a Pro 300 the 300 profile. | 3DISM QALAM 400 updated 3DISM QALAM 300 3DISM QALAM 300 0.6mm |
| Filament | The material on the spool | PLA QALAM · QALAM TPU ABS_QALAM_PRO · PC_QALAM |
| Process | Layer height and quality. 0.2 mm is the everyday choice; 0.24 and 0.28 print faster with more visible layers. | 0.2 QALAM-300 tuned profile 0.24 … · 0.28 … tuned profile |
What the Qalam profile sets up for you
You do not need to change any of these. They are listed so you know why the 3DISM profile matters.
| Setting | Pro 400 | Pro 300 | Why it matters |
|---|---|---|---|
| Printable area | 400 × 400 mm | 300 × 300 mm | Choosing the wrong printer can send the nozzle outside the bed (“The file asked to move outside the printer”). |
| Printable height | 500 mm | 300 mm | |
| G-code flavour | Klipper | The printer's firmware. | |
| Start G-code | START_PRINT with the temperatures, layer count, print area and material | Heats the printer and prepares it, including the bed map for your material. Do not edit. | |
| End G-code | PRINT_END | Finishes the print cleanly. | |
| Power-loss recovery | PLR_ENABLE / PLR_DISABLE | Lets an interrupted print be resumed (chapter 12). | |
| Thumbnails | 100×100, 320×320 PNG | 48×48, 300×300 PNG | The pictures of your parts on the printer's screen. |
The printer relies on them to heat, prepare, record its progress for power-loss recovery and finish safely. If a setting needs changing, ask 3DISM support.
4 · Connect OrcaSlicer to the printer
With a connection, OrcaSlicer sends files straight to the printer over your network. The computer and the printer must be on the same network.
- Find the printer's IP address on the screen: Settings›Wi‑Fi, under the current network (how).
- In OrcaSlicer, click the Wi‑Fi icon to the right of the Printer heading (figure above).
- Set Host Type to Octo/Klipper.
- In Hostname, IP or URL, type the printer's IP address, for example 192.168.1.42. Leave the API key empty.
- Click Test. OrcaSlicer reports that the connection works. Click OK to save.
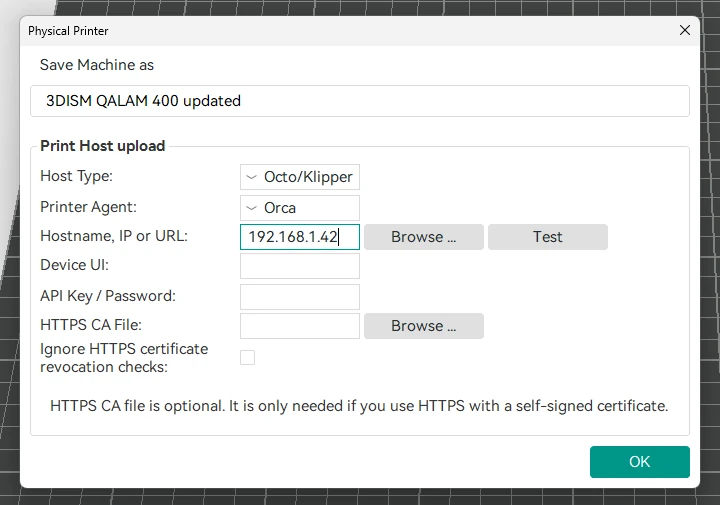
Most routers give the printer the same address every time, but some change it after a power cut. If OrcaSlicer can no longer reach the printer, check the address on the Wi‑Fi page and update it here. A router setting called DHCP reservation or static lease keeps it fixed.
5 · Slice and send a print
- Add your model: drag an STL, 3MF or STEP file onto the plate, or use File › Import › Import 3MF/STL/STEP/SVG/OBJ/AMF….
- Check the printer, filament and process in the left panel.
- Click Slice plate. OrcaSlicer switches to the preview and shows the estimated time and filament.
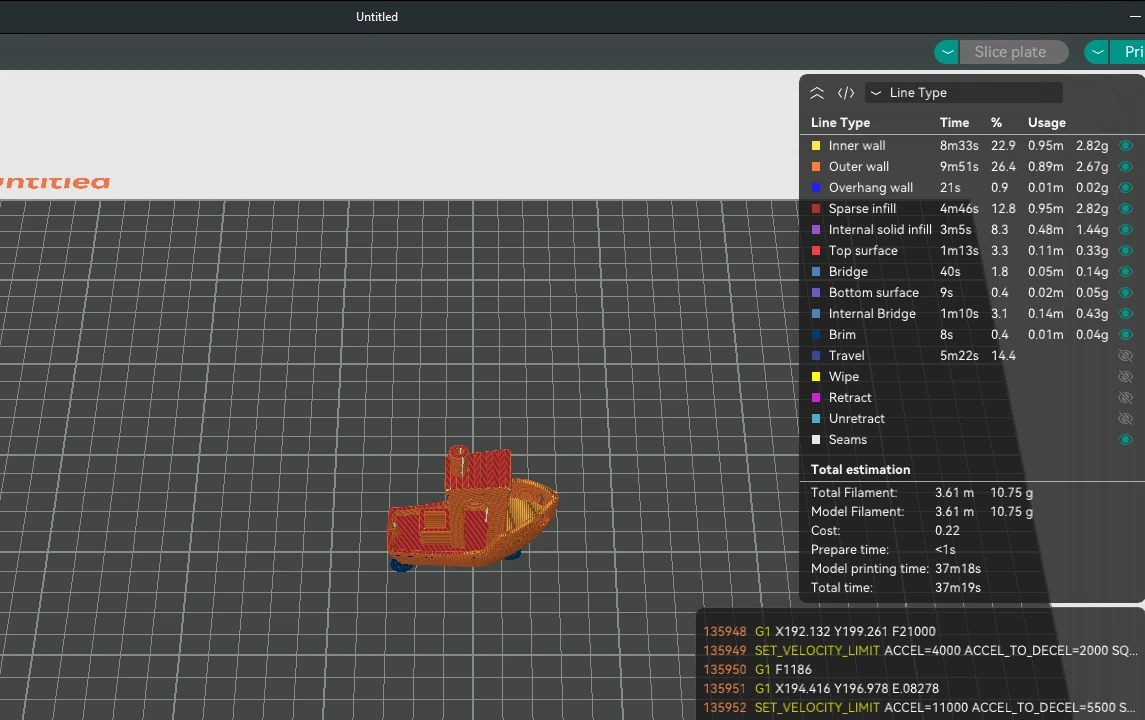
Sliced: the estimate shows the filament (10.75 g) and time (37 min). Print is at the top right. - Click Print. In the window that opens, choose:
- Upload: the file goes to the printer's Print Files. Start it from the screen when you are ready.
- Upload and Print: the file goes to the printer and starts at once. The printer's screen jumps to the print. Only use this when the bed is clear and filament is loaded.
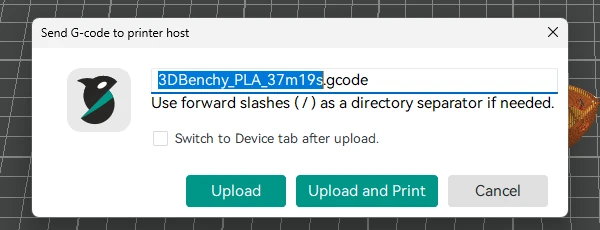
Printing from a USB stick instead
- In OrcaSlicer, after slicing, click the arrow next to Print and choose Export G-code file, then save the .gcode file to the USB stick.
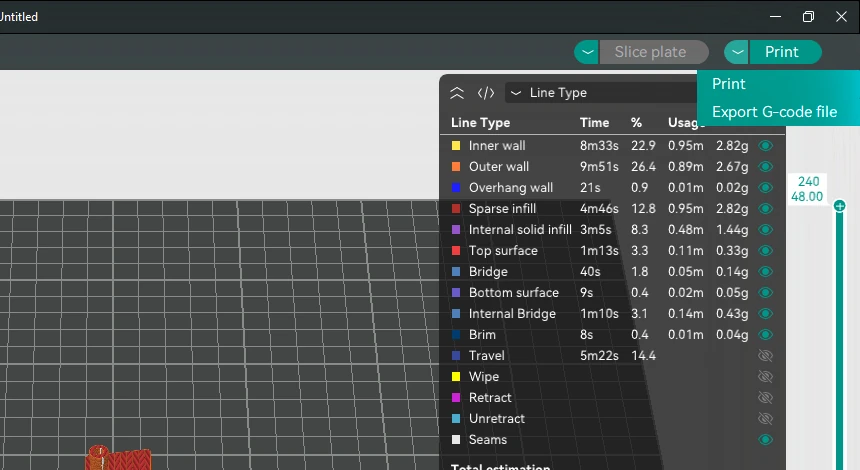
The arrow next to Print: Export G-code file saves the file instead of sending it. - Plug the stick into the printer. Within a few seconds the USB Drive tab in Print Files becomes available.
- Open Print Files›USB Drive and tap the file.
Slicer settings worth knowing
| Setting | Why |
|---|---|
| Label objects on | Lets you skip one failed part in the middle of a print without stopping the others (how). Without it the printer's Objects page says No objects in this file. |
| Bed temperature of the filament profile | The printer picks the bed map measured at that temperature: 60–80 °C (PLA, TPU), 80–100 °C (PETG, ASA) or 100–120 °C (ABS, PC). Measure the ranges you print at (Auto Bed Levelling). |
| Thumbnails kept on | Without them, files show a grey box instead of a picture of the part. |
| Colour change at a layer | In the preview, add a pause or filament change at a layer. The printer pauses there; load the new filament from Controls›Filament and press Resume. |
| File name | OrcaSlicer names files after the model, material and time, for example Phone_Stand_PETG_2h14m.gcode. The printer shows the name without .gcode. |
A new brand or material can need a different temperature, flow ratio and pressure advance. The filament tuning guide walks you through OrcaSlicer's calibration prints on the Qalam, one test at a time, and saves the results in your own filament profile.
Chapter 05
Calibration
Calibration routines measure the machine and store the results so every print starts from the same, correct baseline. Open Settings›Printer Calibration. They cannot run while a print is loaded.
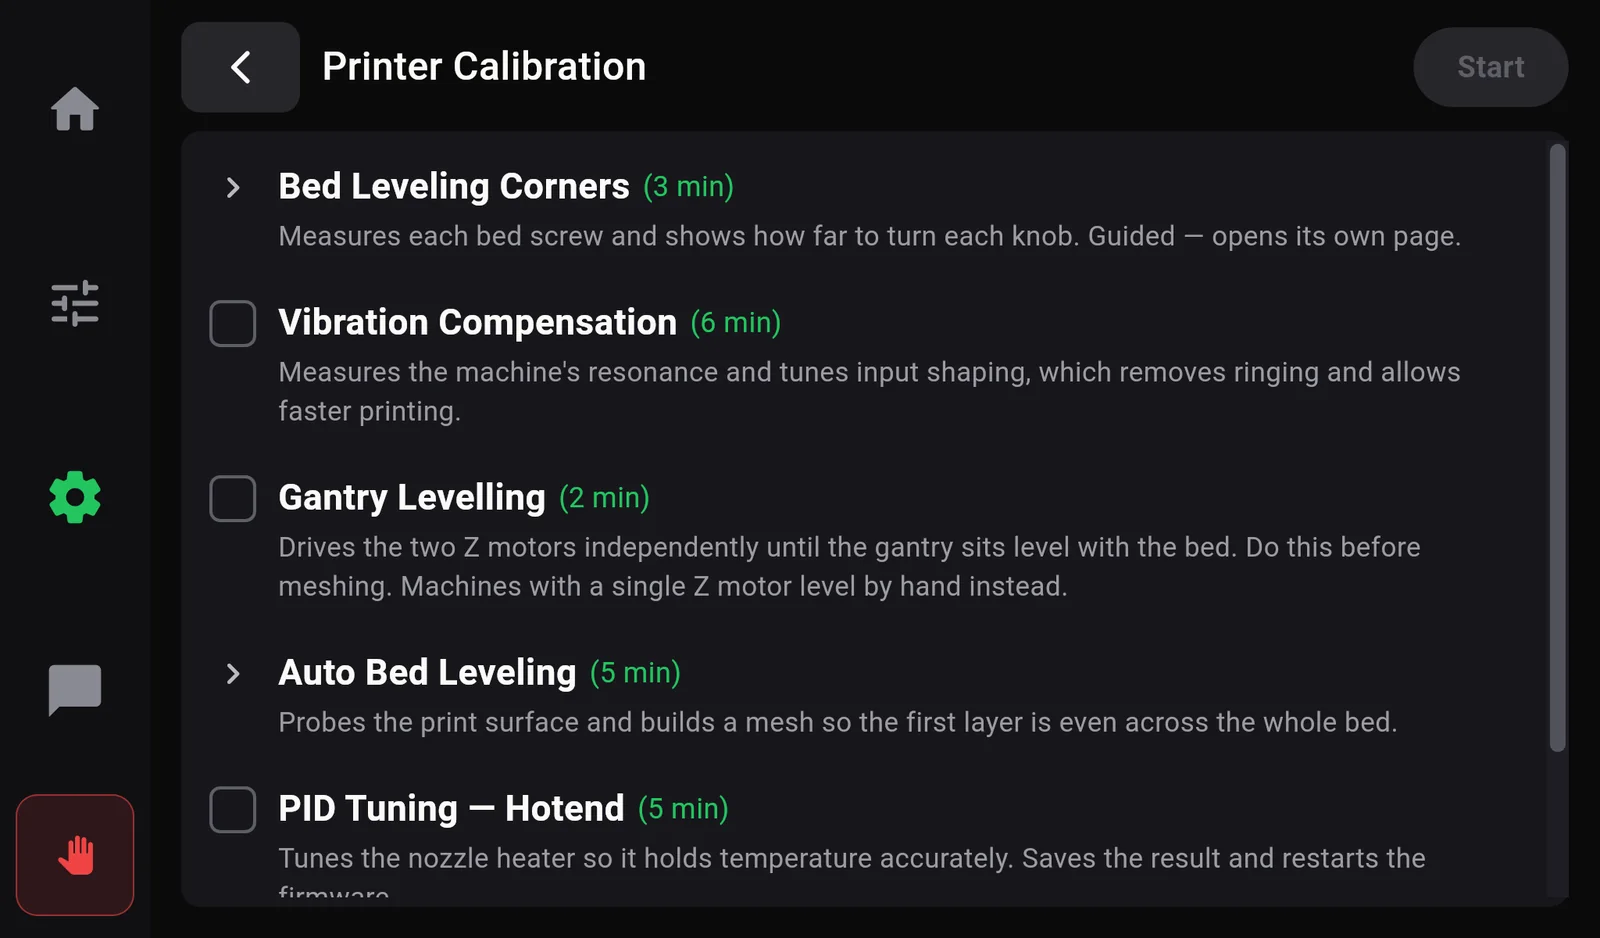
| Routine | Time | What it does | Run it when |
|---|---|---|---|
| Bed Leveling Corners | 3 min | Measures each bed screw and shows how far to turn each knob. | The bed has been removed or knocked, or first layers are thick on one side and thin on the other. |
| Vibration Compensation | 6 min | Measures the machine's resonance and tunes input shaping, which removes ringing and allows faster printing. | After moving the printer to a new table, or when you see ripples next to sharp corners. |
| Gantry Levelling (Pro 400) | 2 min | Drives the two Z motors independently until the gantry sits level with the bed. | After the printer has been moved or knocked. Do it before Auto Bed Levelling. |
| Auto Bed Leveling | 12–18 min per temperature, including heating | Probes the print surface and builds a map so the first layer is even across the whole bed. | Before your first print with each material, after changing the build plate, and when first layers become uneven. |
| PID Tuning — Hotend | 5 min | Tunes the nozzle heater so it holds its temperature accurately. | The nozzle temperature swings, or after a heater or sensor has been replaced. |
| PID Tuning — Heatbed | 8 min | Tunes the bed heater the same way. | The bed temperature swings. |
A routine marked (not available) in grey is not fitted on your machine, for example Gantry Levelling on a machine with a single Z motor.
These routines calibrate the machine. Temperature, flow, pressure advance and retraction belong to the filament and are tuned in OrcaSlicer: see the filament tuning guide.
Running Vibration Compensation, Gantry Levelling and PID tuning
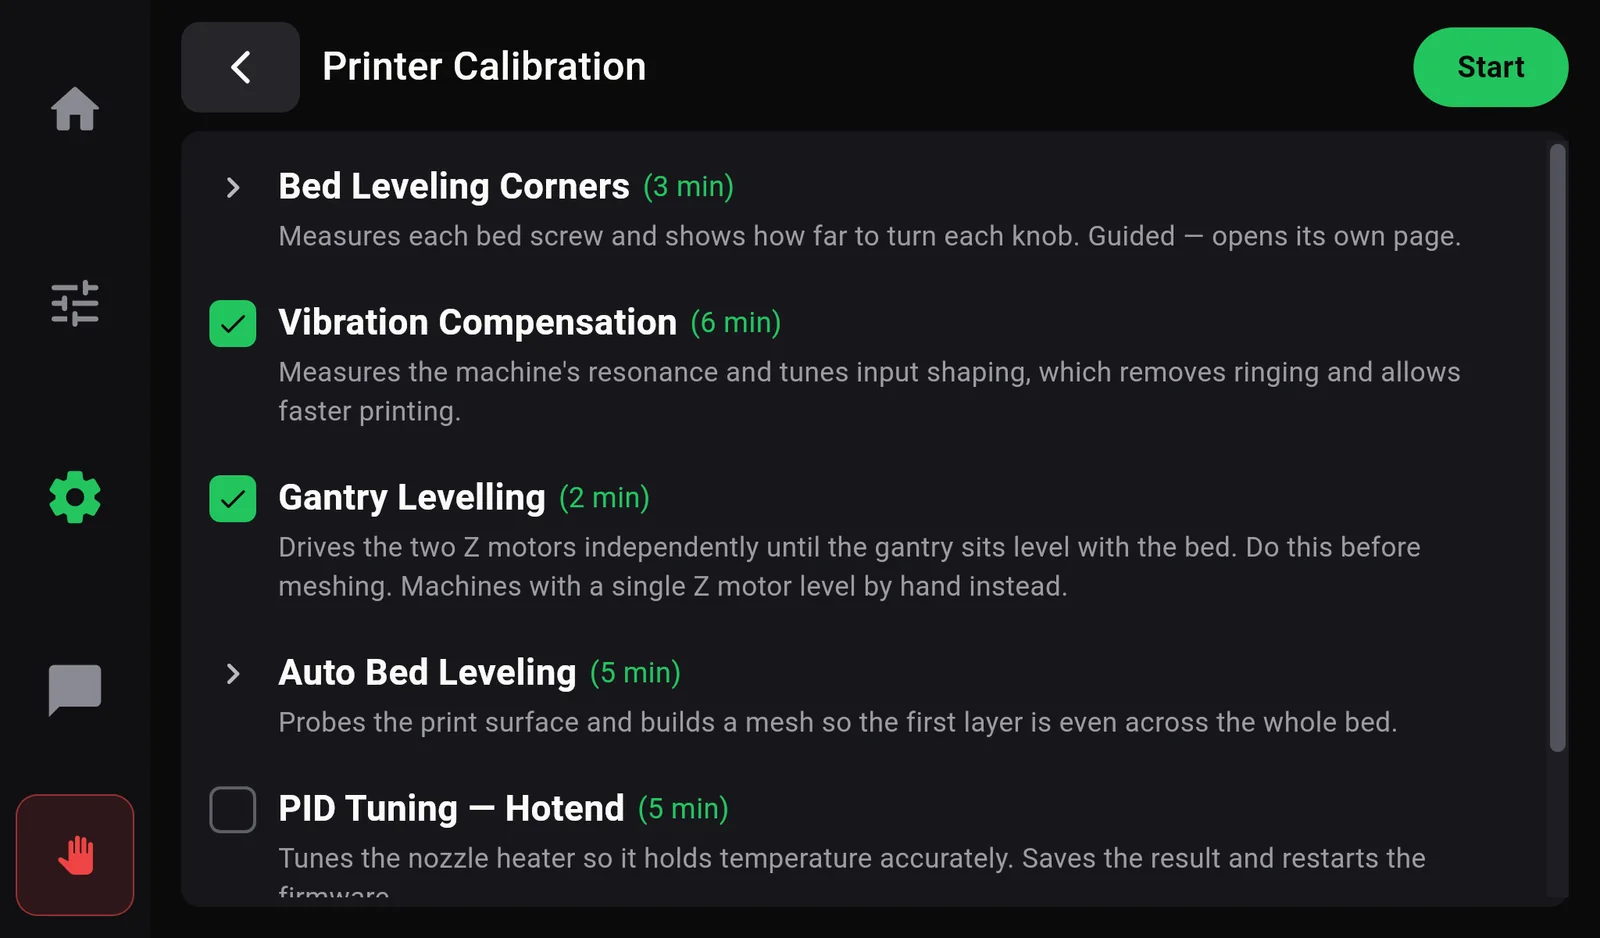
- Tick the routines you want. They run in list order.
- Press Start. The printer homes first (Homing — Finding the endstops), then runs each routine. The screen shows the step, Step 1 of 2 and the time elapsed.
- Leave the printer alone. Vibration Compensation shakes the machine noisily for several minutes; this is normal.
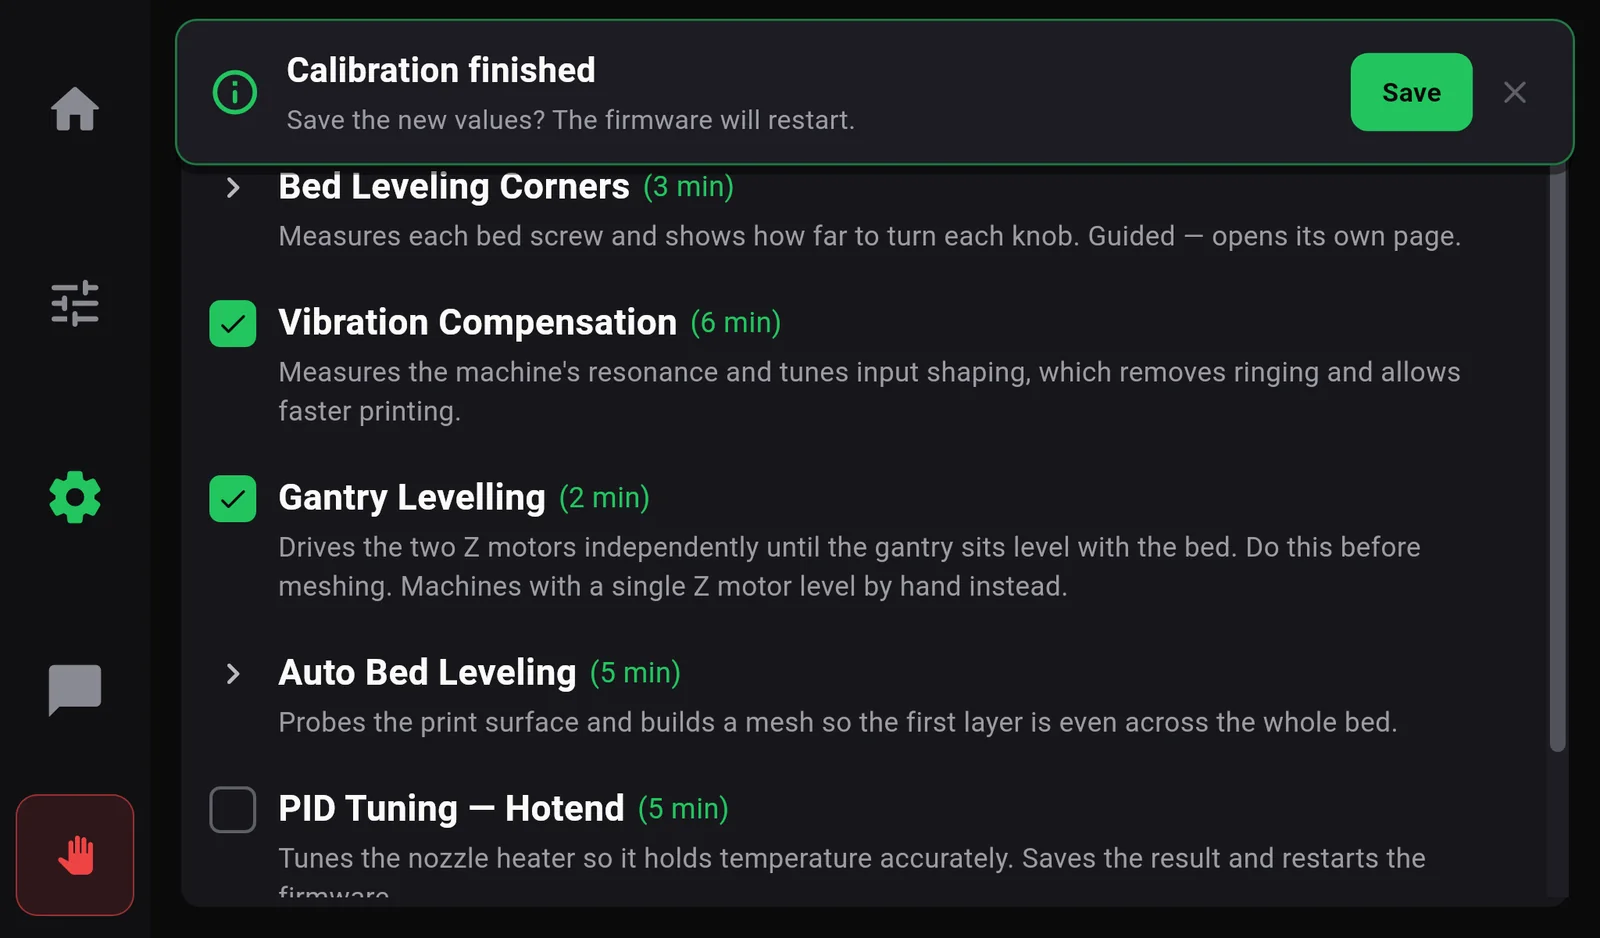
- When it finishes, press Save in the message Calibration finished — Save the new values? The firmware will restart. The message only stays for a few seconds. If you miss it, the new values are not stored; run the routine again.
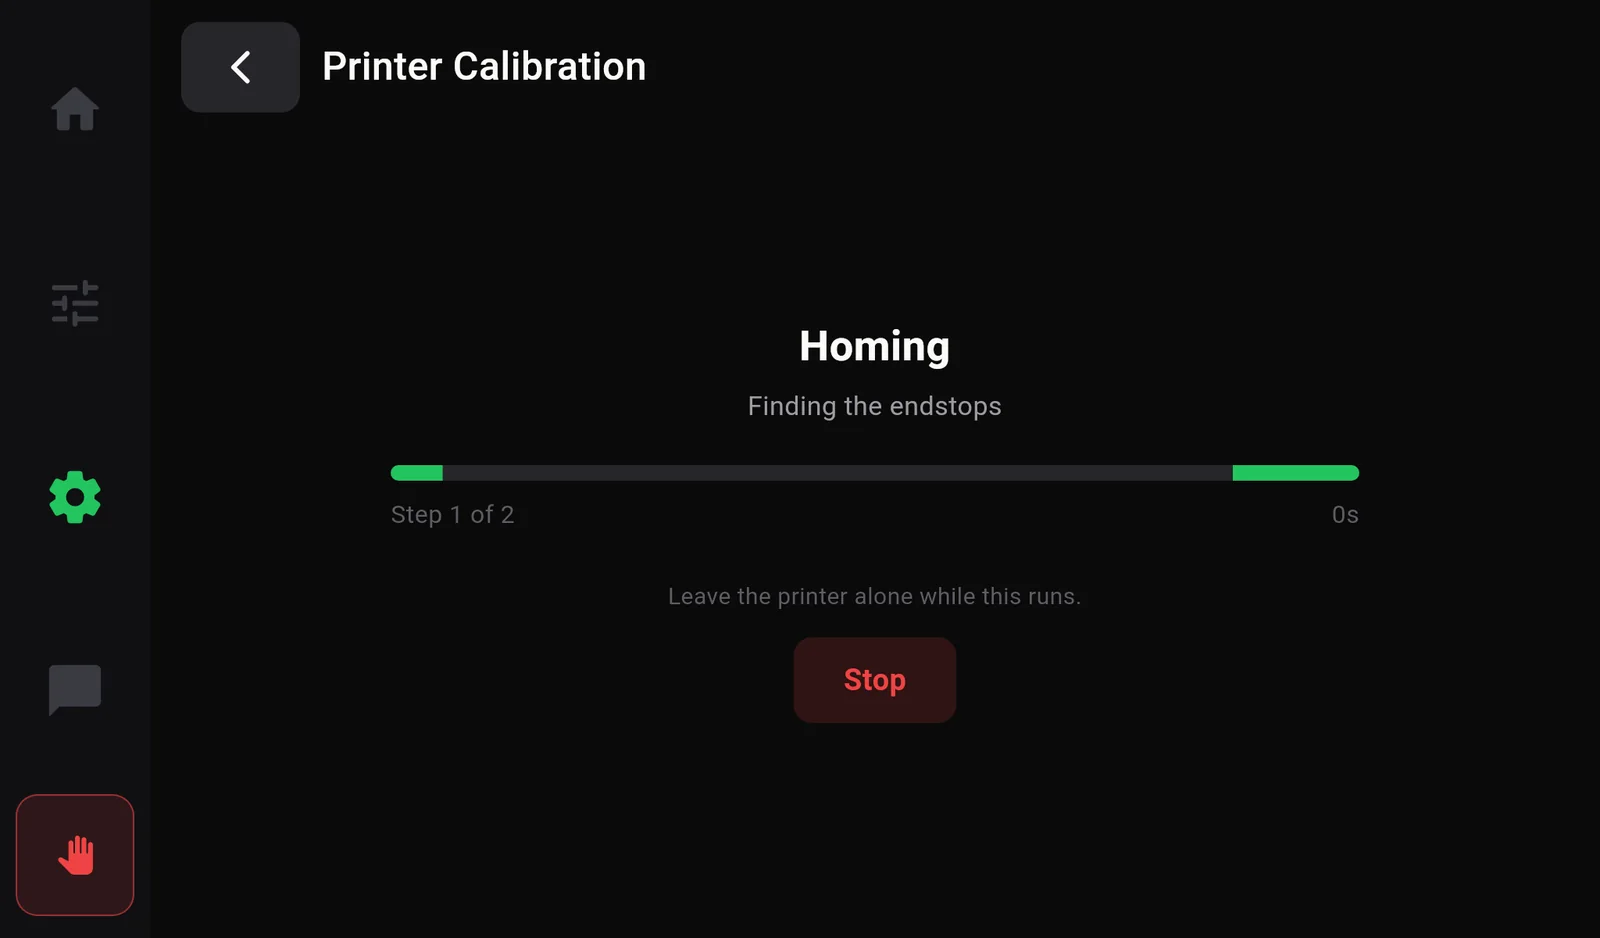
- Stop switches the heaters off. The step in progress has to finish first, then nothing more runs and nothing is saved: Calibration stopped — Heaters are off. Nothing was saved.
- While a calibration runs, the sidebar and the back button are locked so the result is not lost.
- Gantry Levelling on its own has nothing to save; the message then just says Calibration finished. The same levelling is also on the Motion page (Level the bed).
Bed Leveling Corners
The bed rests on adjustable knobs at its corners. This routine touches the nozzle probe down at each one and tells you which way, and how far, to turn each knob so the bed sits flat.
- Start with the bed at room temperature. A hot bed expands and gives a false reading.
- Open Printer Calibration›Bed Leveling Corners and press Probe. The printer homes if needed and touches each corner. Keep hands clear.
- Read the drawing of the bed (the back of the machine is at the top):
- reference: the corner the others are compared with. It is never adjusted.
- level: within 5 minutes of the reference. Leave it.
- Amber arrow with an amount, such as 20 min clockwise or 1 turn 5 min anticlockwise: turn that corner's knob by that amount, the way the arrow points.
- Press Probe again and repeat until the page says All four corners are level and Bed is level.
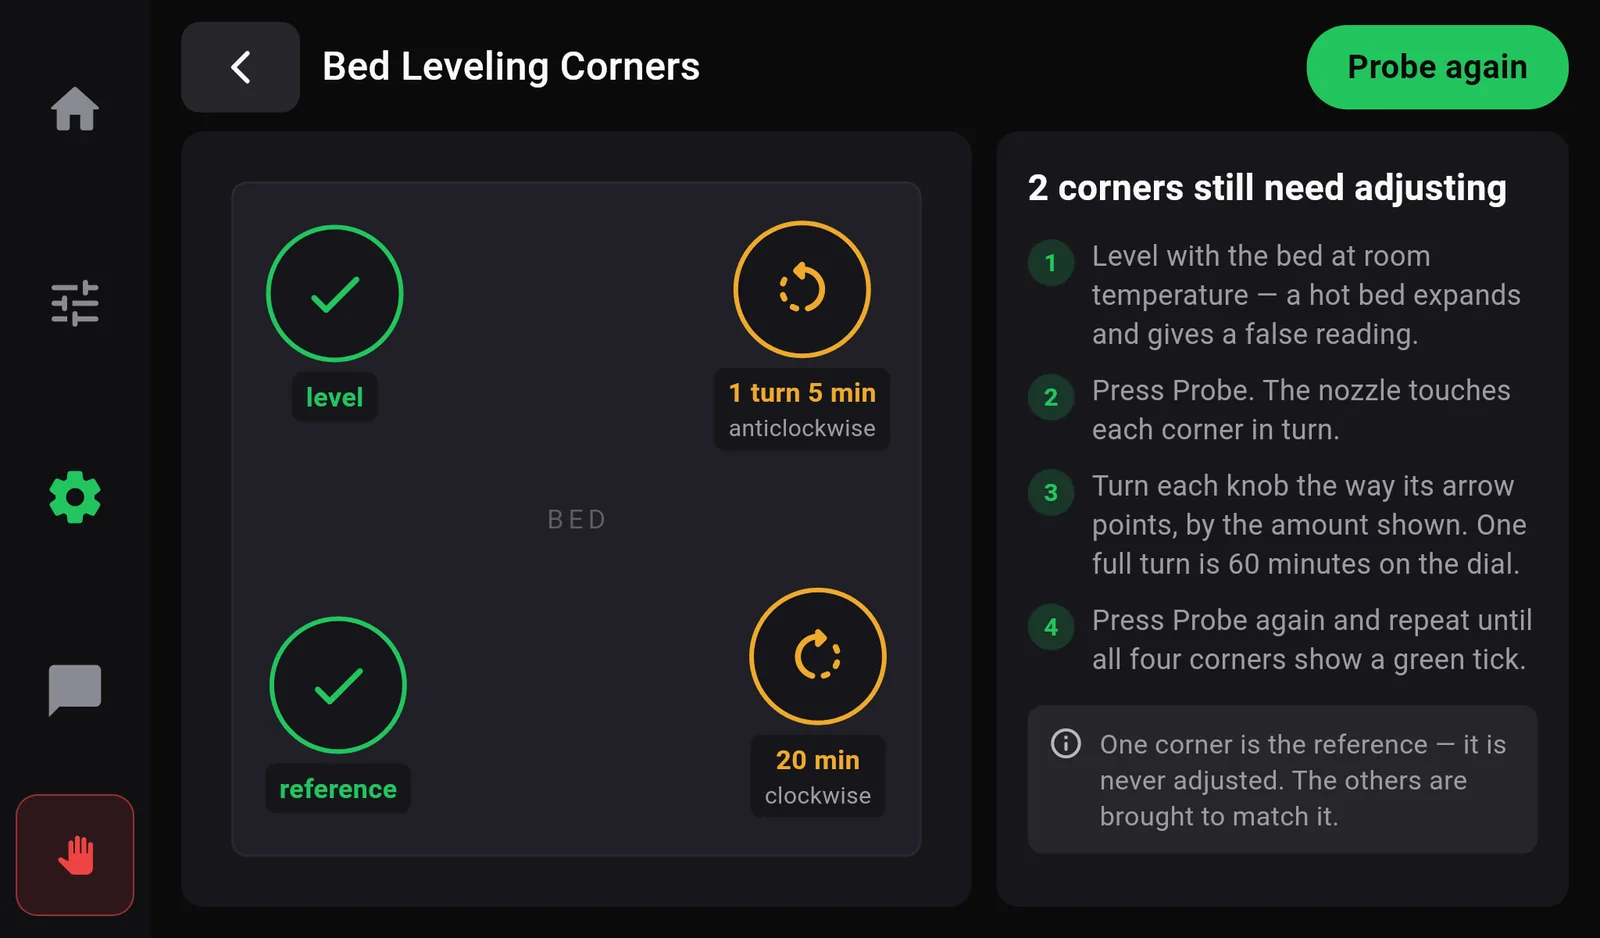
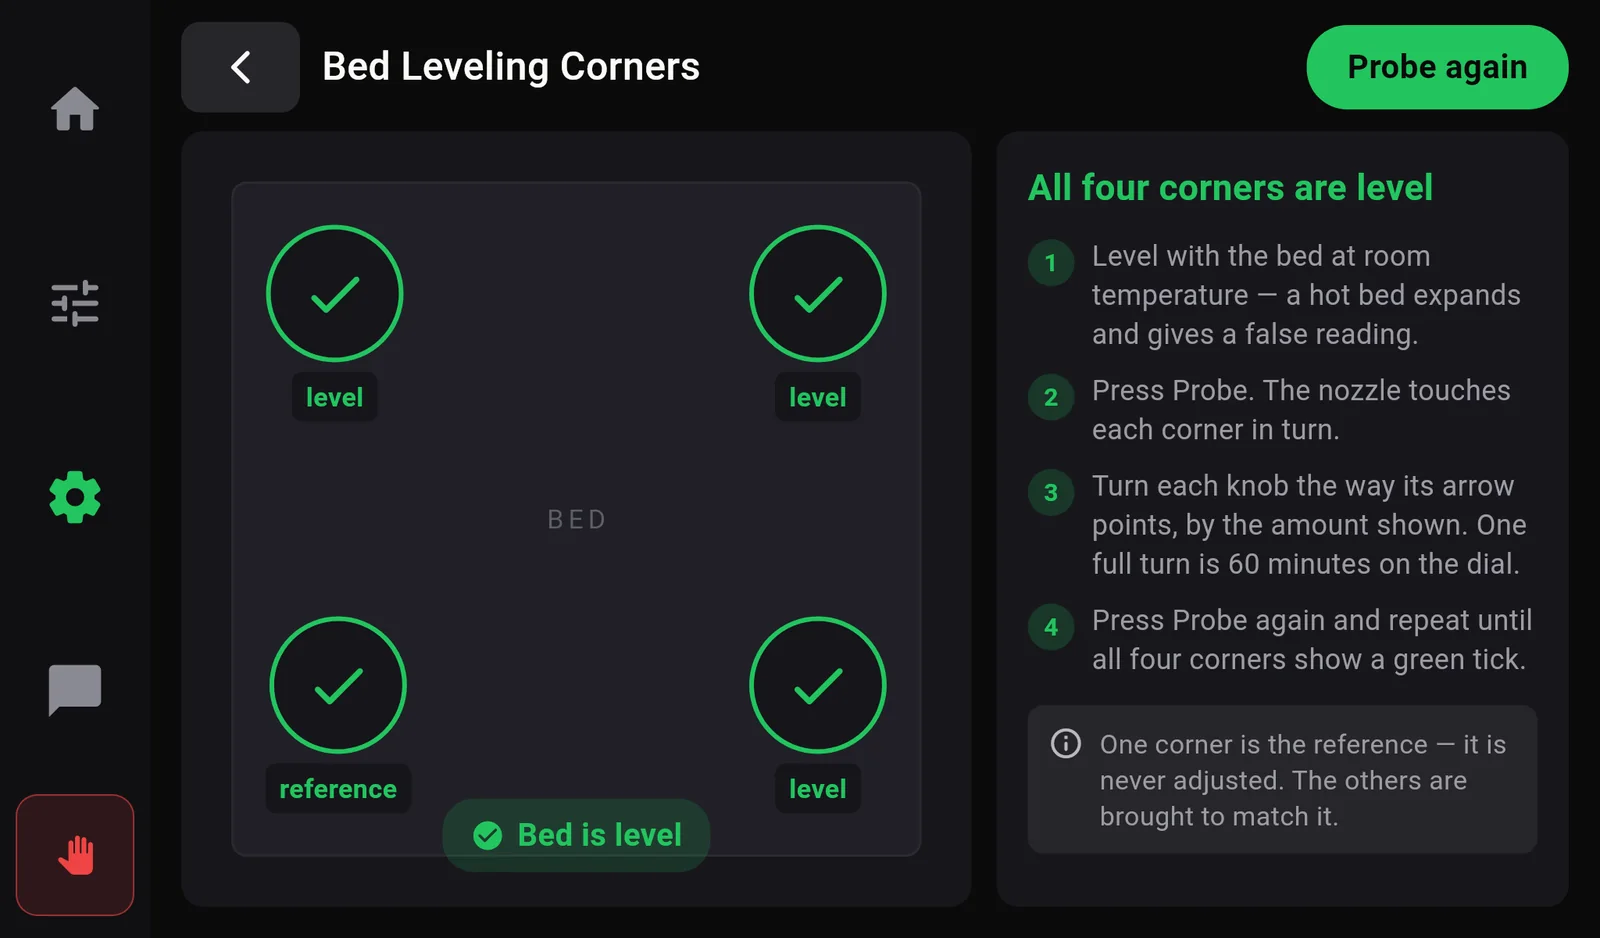
Amounts are given like a clock face: 60 minutes is one full turn of the knob, 30 minutes half a turn, 15 minutes a quarter turn, and 5 minutes a small nudge. 1 turn 5 min means one full turn plus a nudge. If a corner gets worse after you adjust it, you turned it the wrong way: turn it back past where it was.
Auto Bed Levelling
The bed changes shape as it heats, so the printer keeps a separate bed map for each range of bed temperature and picks the right one by itself from the bed temperature in your print file. Measure the temperatures you actually print at.
| Tick | Measured at | Saved as | Used for prints with a bed of |
|---|---|---|---|
| PLA, TPU | bed 60 °C · nozzle 215 °C | "60-80" | 60–80 °C |
| PETG, ASA | bed 85 °C · nozzle 240 °C | "80-100" | 80–100 °C |
| ABS, PC | bed 105 °C · nozzle 250 °C | "100-120" | 100–120 °C |
- Clear the bed.
- Tick one or more temperatures. A green measured badge means that one is already stored. With several ticked, they run back to back, coolest first; allow about 12–18 minutes each.
- Press Measure. The page follows the run: Heating › Homing › Preparing › Probing › Saving, with live nozzle and bed temperatures and, while probing, Point 12 of 49.
- Wait for the message 3 meshes saved — The printer restarted to store them. It picks the right one automatically from the bed temperature.
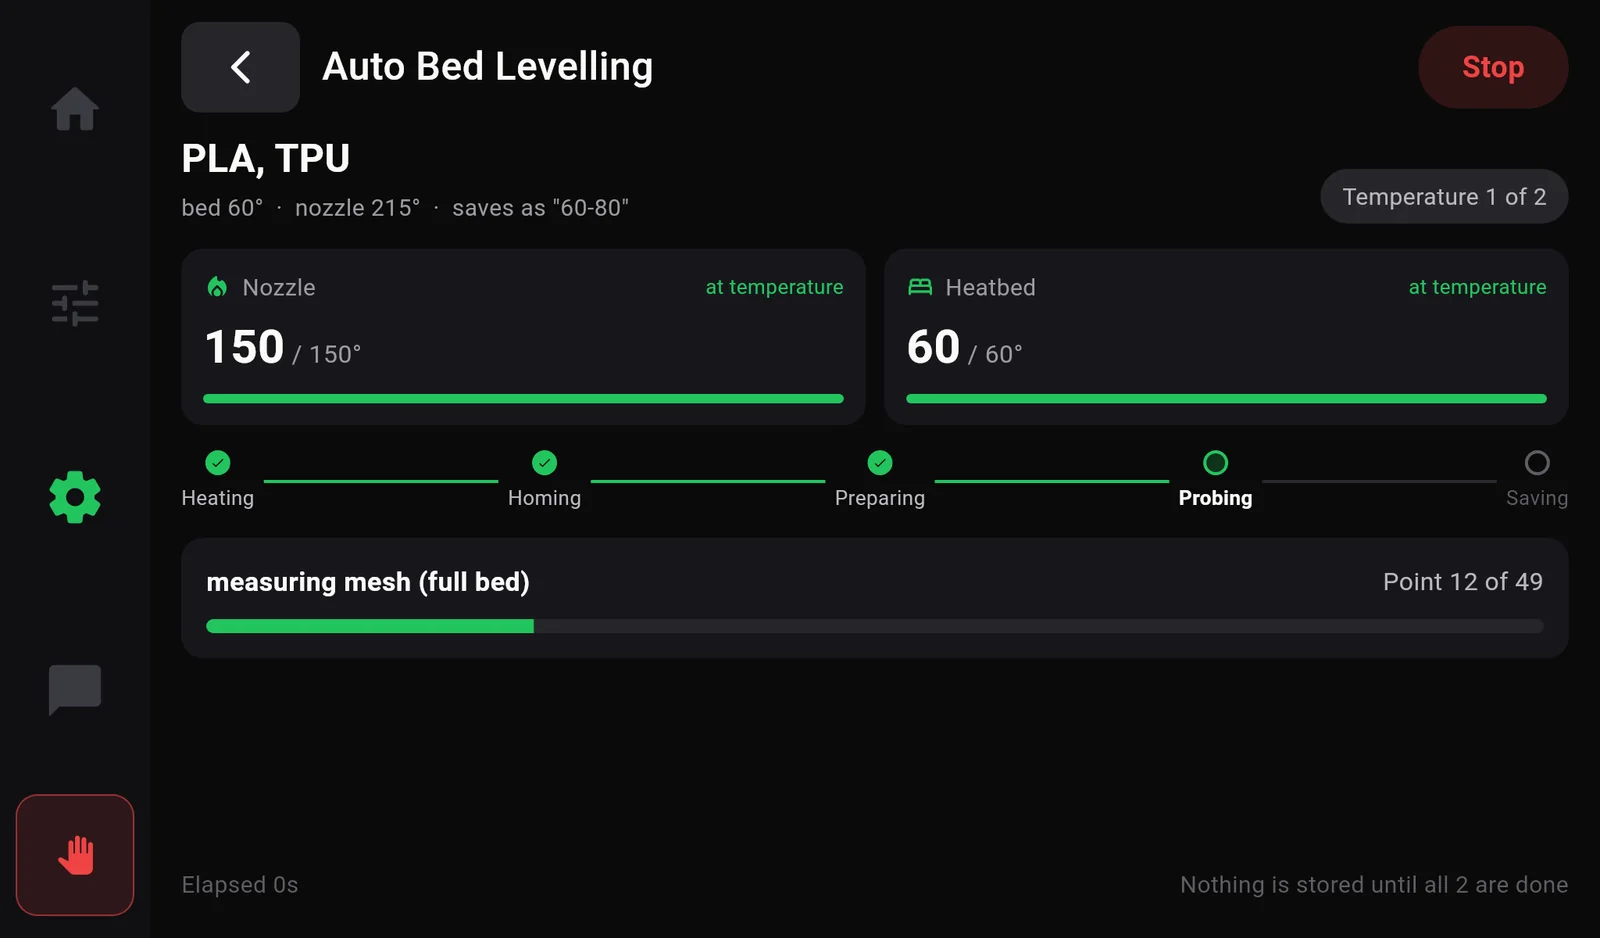
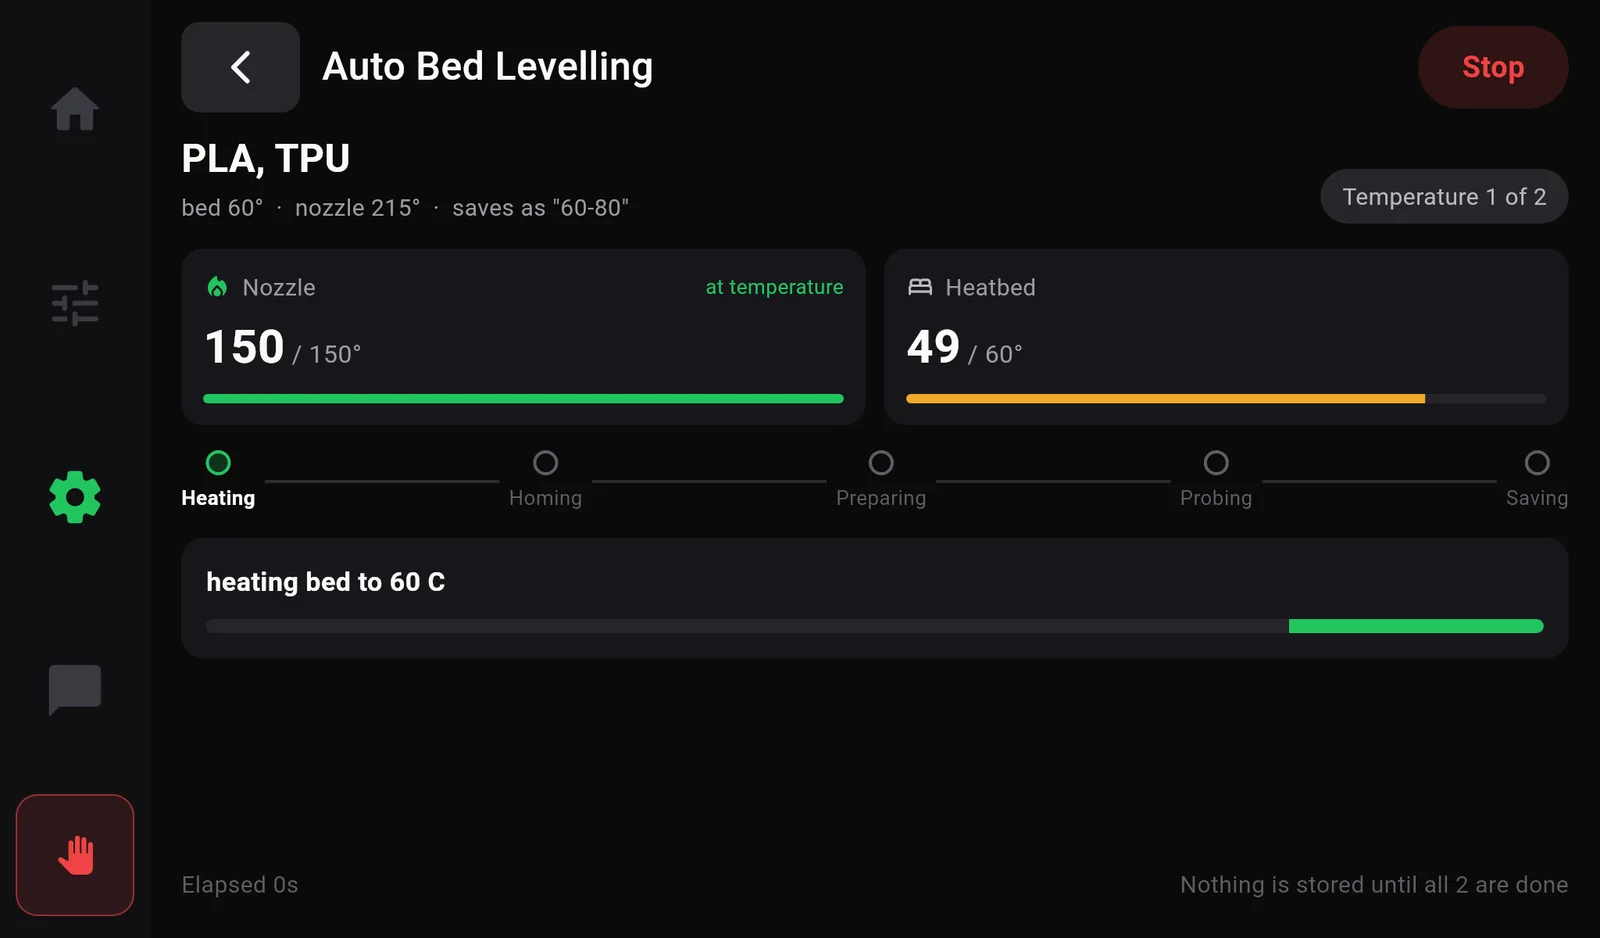
- Nothing is stored until every ticked temperature is done (Nothing is stored until all 2 are done). Leave the page open until the end.
- Stop switches the heaters off; the measurement in progress finishes and nothing is saved (Stopped — Heaters off. Meshes already measured were not saved.).
- If one temperature fails, the page shows Bed mesh failed at <material> with the reason. When earlier temperatures were measured successfully, the message offers Keep 1 to keep them.
- If the message says The meshes were measured but NOT saved, run Auto Bed Levelling again without leaving the page.
Chapter 06
Power-loss recovery
While it prints, the printer keeps a record of where it is. If the power goes off in the middle of a print, it can pick up from the same place when the power comes back.
- Switch the printer back on and wait for Home to show Ready.
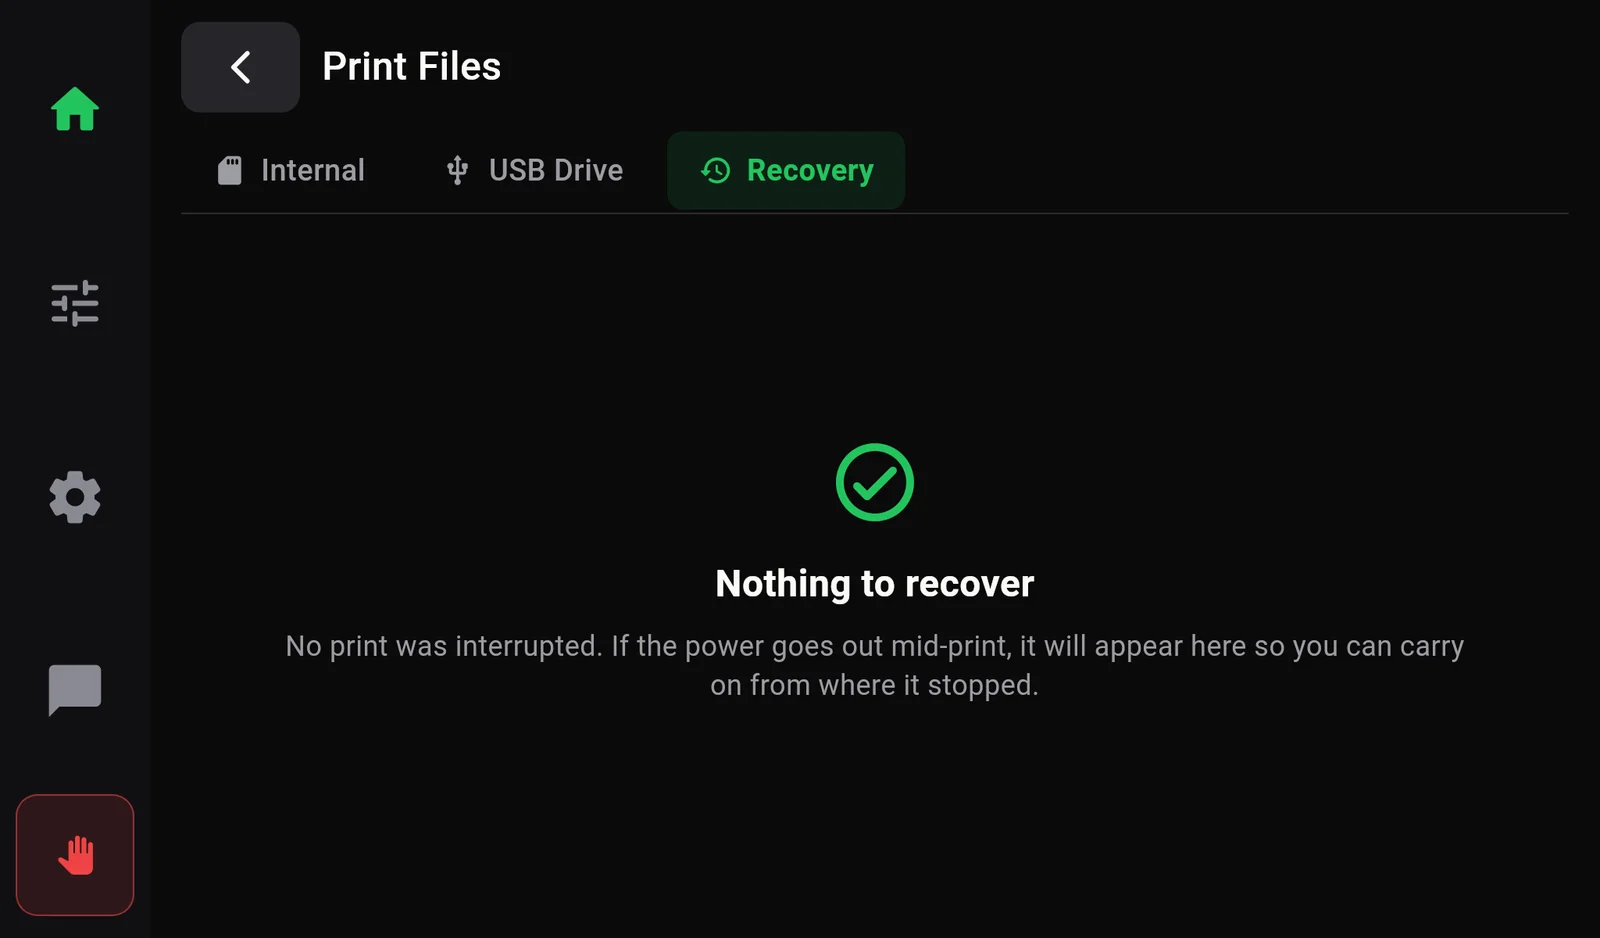
- Open Print Files›Recovery. An amber dot on the tab means an interrupted print is waiting.
- Check the card: the file, where it stopped, the temperatures it will reheat to, and the bed map it used.
- Check the machine (see below), then press Resume this print.
- Leave the printer alone while it reheats, homes and moves back to the exact spot. The screen shows Picking up where it stopped with the steps Heating › Homing › Positioning › Printing. When printing starts, the normal print screen appears.
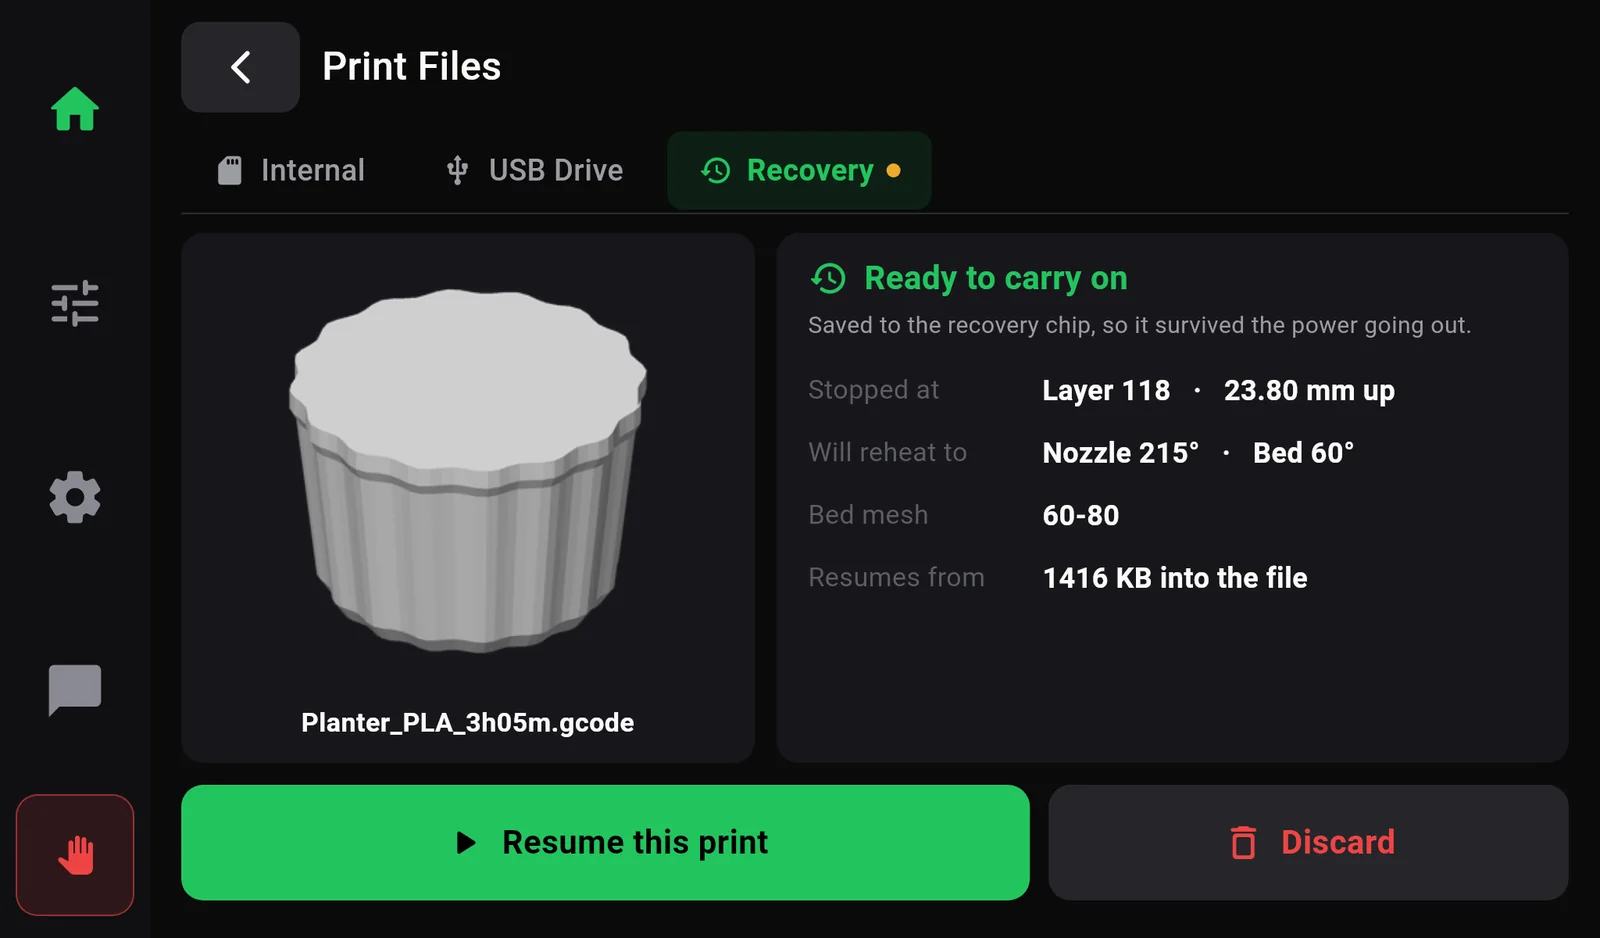
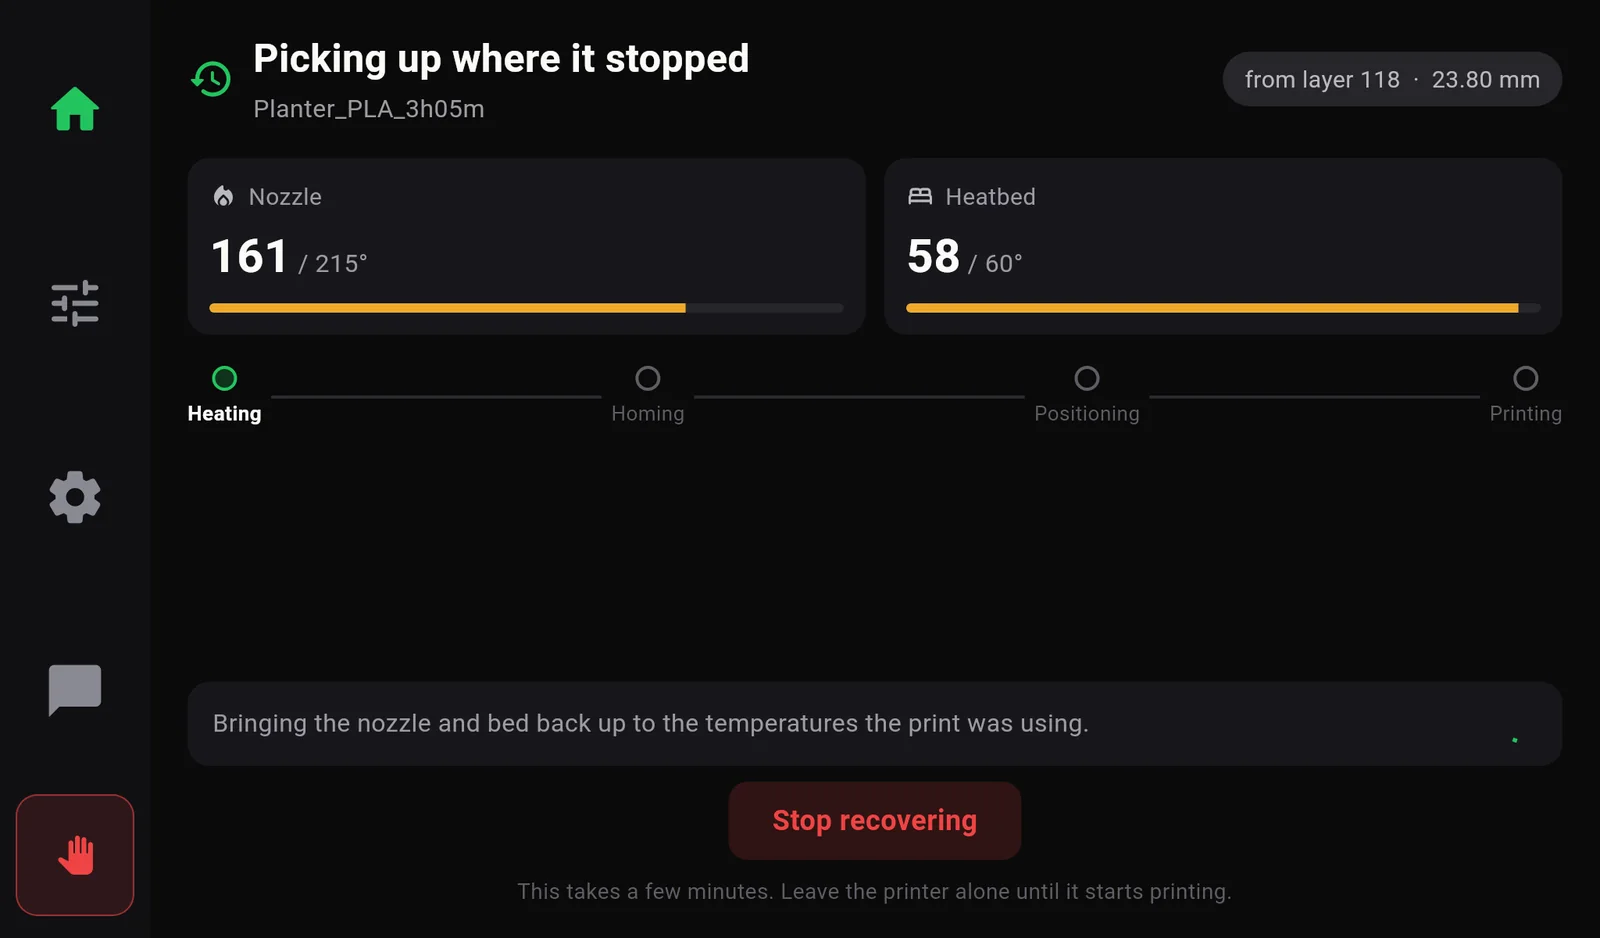
- The part must still be stuck firmly to the bed, exactly where it was. If it has moved or come loose, discard and start again.
- Do not move the print head or the bed by hand.
- Make sure the filament is still loaded and nothing has fallen onto the part.
- If the card says This stopped on the first layer — starting again from scratch will usually give a better part., start the file again instead.
- Stop recovering (while it reheats, homes or moves back) is an emergency stop: the heaters and motors go off at once and the printer restarts, which takes about a minute. The screen says Recovery stopped once the printer is back, and whether the saved print was kept.
- Discard asks Discard the saved print? — It can no longer be picked up after this. The file itself is not deleted — you can always start it again from the beginning.
- With nothing waiting, the tab says Nothing to recover.
- The first line of the card says where the record was kept. Saved to the recovery chip, so it survived the power going out. is the most reliable kind.
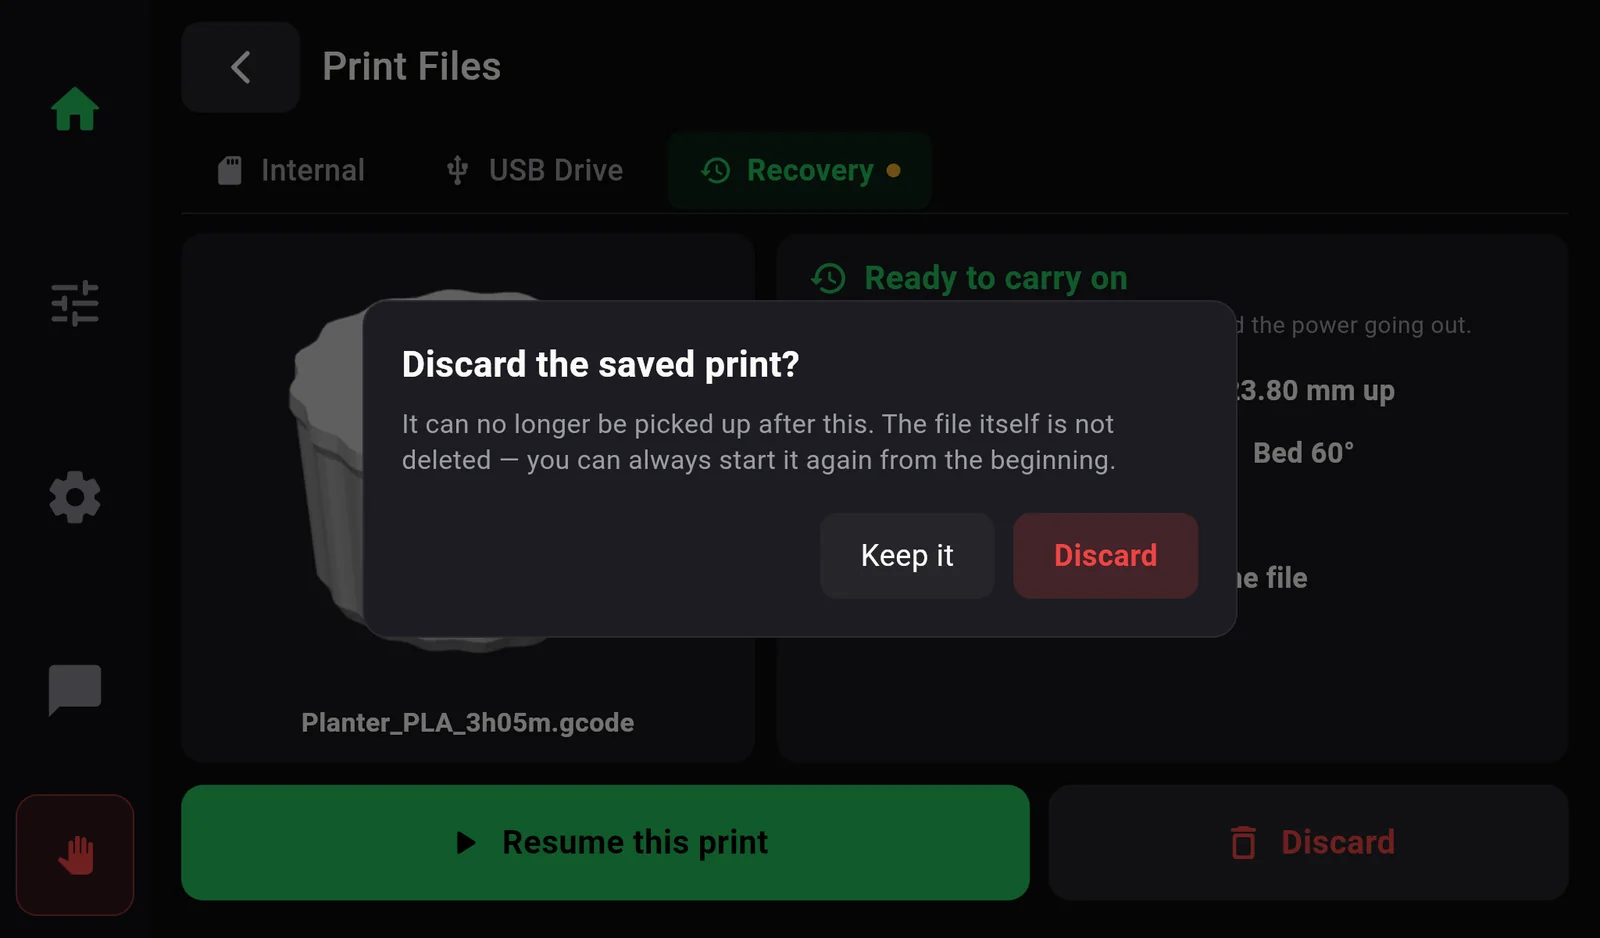
Chapter 07
Glossary
- Bed map (bed mesh)
- A measured map of the bed's height at many points, so the printer can follow its shape. Made by Auto Bed Levelling.
- Filament
- The plastic wire the printer melts, on a spool. PLA, PETG, ABS, ASA, TPU and PC are common materials.
- First layer
- The first sheet of plastic laid on the bed. If it is right, the rest of the print usually is too.
- Flow
- How much plastic comes out compared with what the file asks for. 100 % is normal.
- G-code
- The instruction file the printer runs, made by the slicer. Files end in .gcode.
- Gantry
- The frame that carries the print head across the machine.
- Homing
- The printer moving each axis to its end to find out where it is. Needed after switching on or releasing the motors.
- Input shaping (Vibration Compensation)
- Tuning that cancels the machine's vibrations, removing ripples next to sharp corners and allowing faster printing.
- Klipper
- The software that runs the printer's motors and heaters.
- Label objects
- A slicer setting that names each part in the file, so single parts can be skipped during a print.
- PID tuning
- Teaching a heater how to hold its temperature steadily.
- Pressure advance
- A correction for the delay between pushing filament and plastic coming out, which sharpens corners.
- Slicer
- A computer program (OrcaSlicer) that turns a 3D model into G-code.
- Z offset
- A small correction to the nozzle's height above the bed. Negative is closer to the bed.