Chapter 01
Getting to know the screen
The screen has a narrow sidebar on the left and a large content area. The sidebar is always there; the content area changes as you tap.
The Home screen
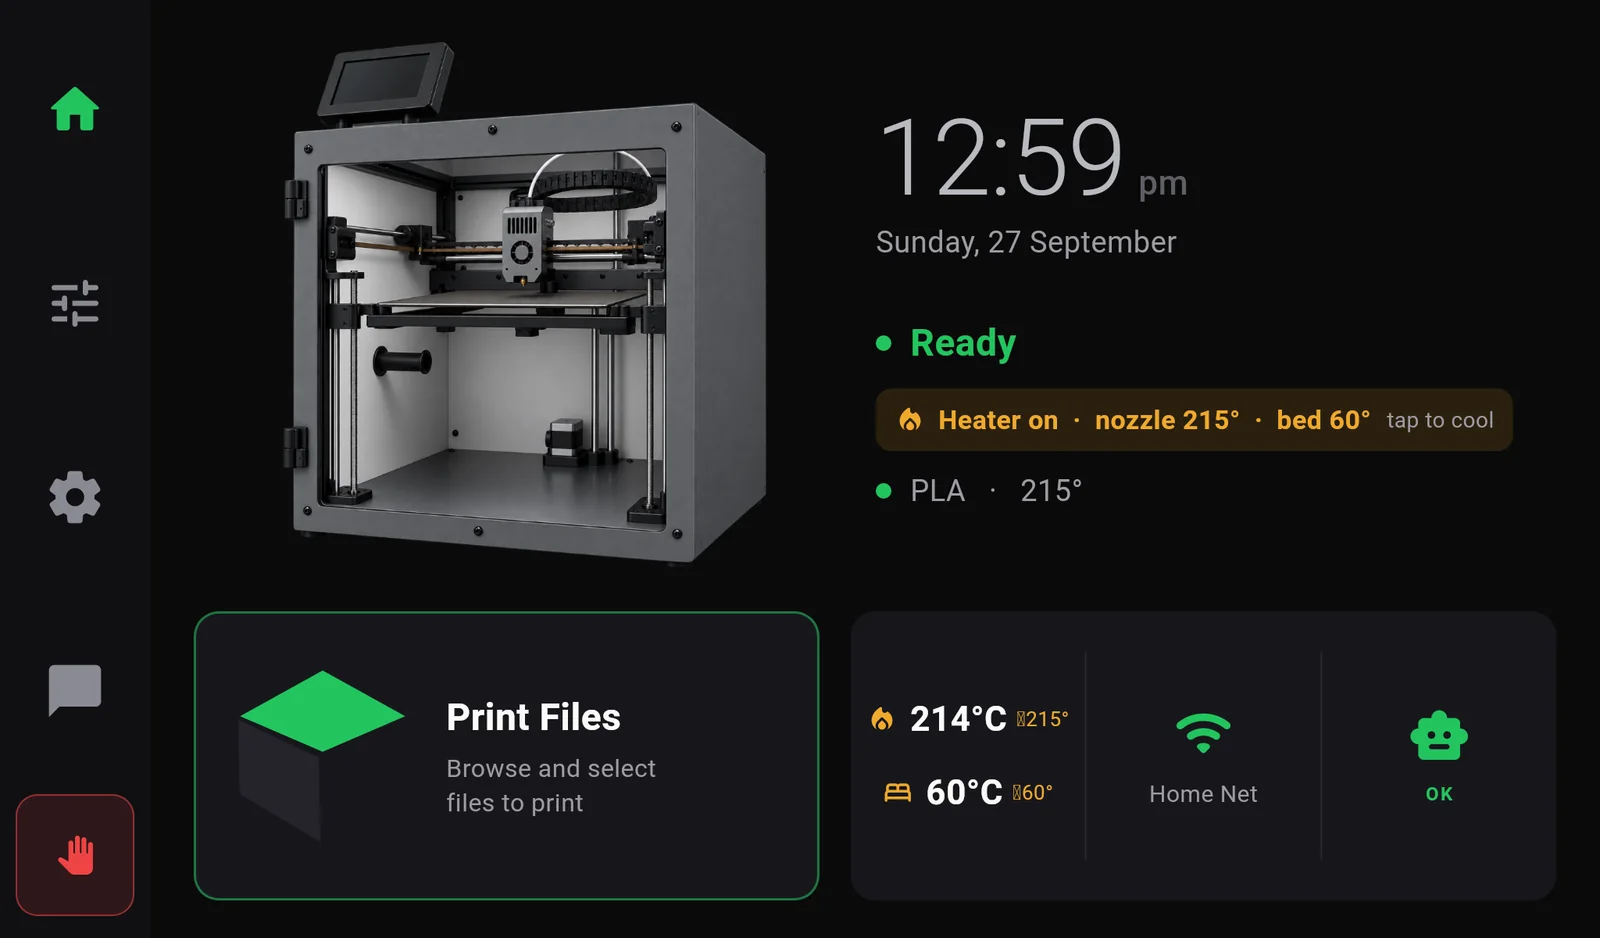
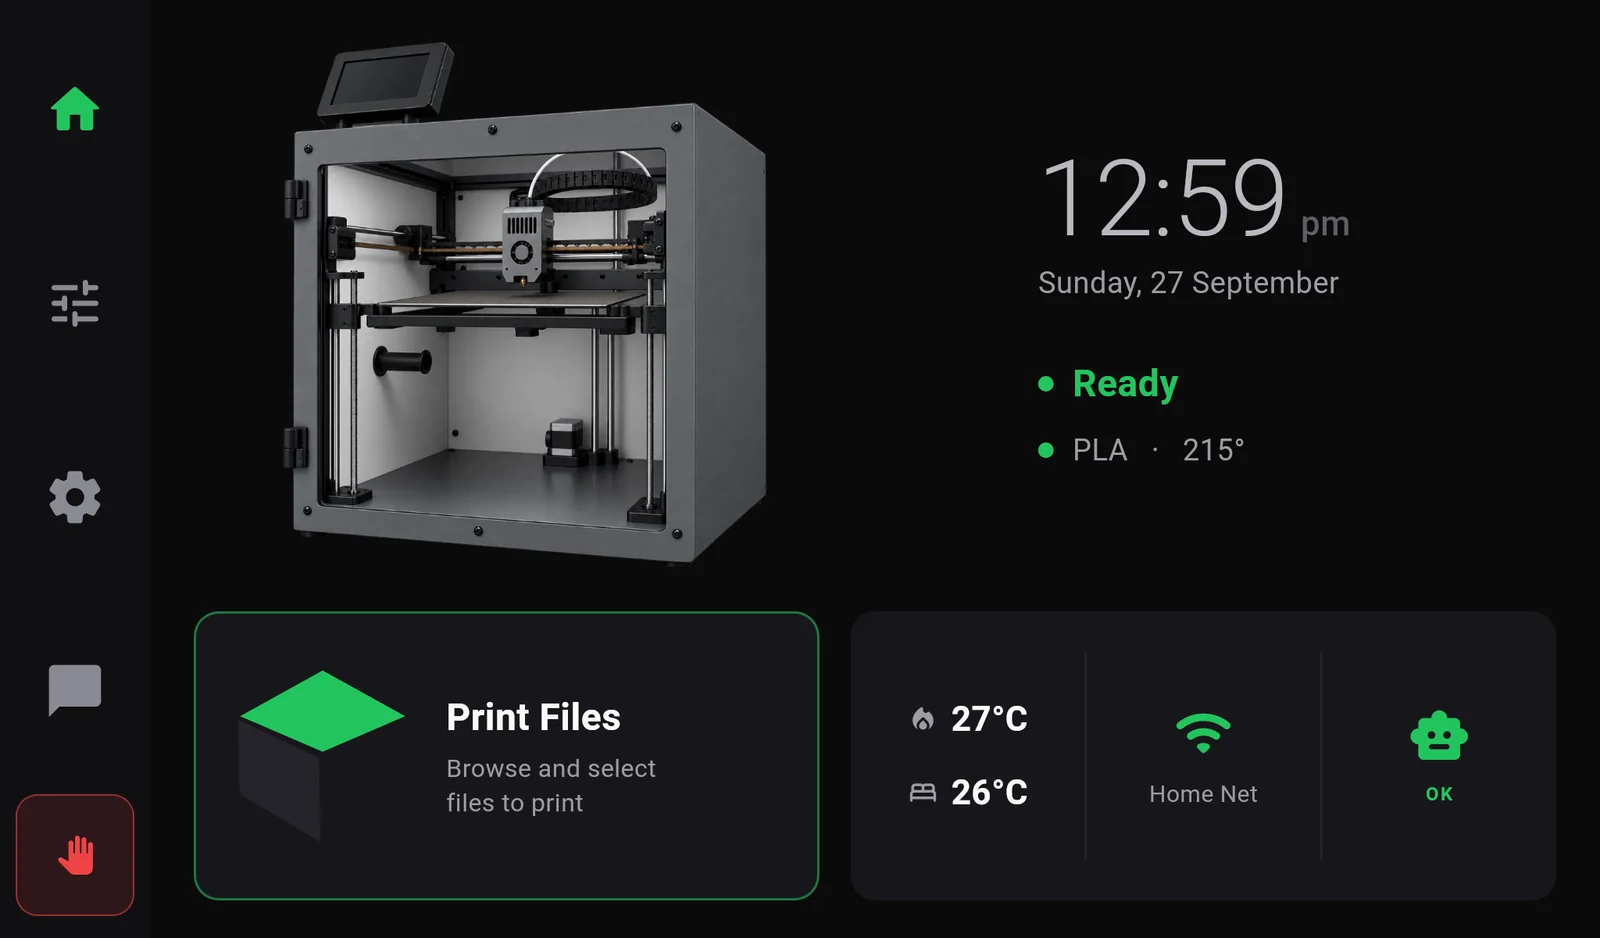
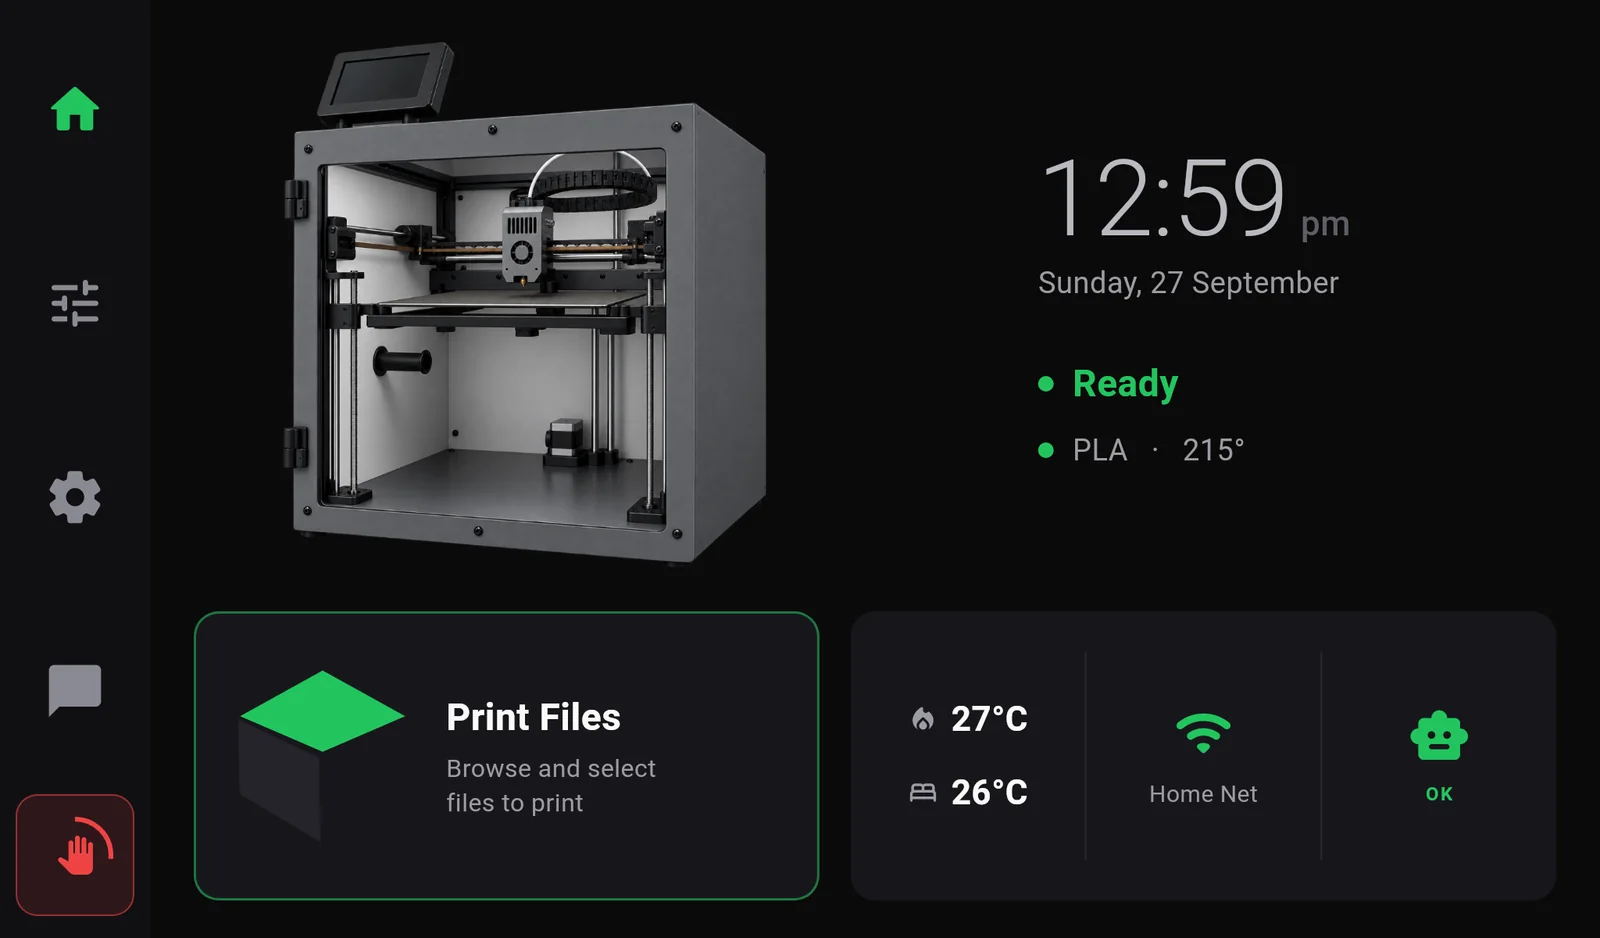
When the printer is idle, Home shows the machine, the time, whether the printer is ready, the filament you have loaded, and quick links to your files, temperatures and Wi‑Fi.
 1
2
3
4
5
6
7
8
9
10
11
12
1
2
3
4
5
6
7
8
9
10
11
12
- Home. This screen. While a print is loaded it shows the print instead.
- Controls. Move the axes, heat the nozzle and bed, fans, filament, light.
- Settings. Wi‑Fi, 3DISM Remote, storage, calibration and the toolbox.
- Info. Machine information: model, serial, IP address, versions, usage.
- Emergency stop. Press and hold to stop everything.
- Clock and date.
- Printer status. Ready in green means you can print. Not ready in amber means the printer is still starting.
- Loaded filament and its temperature, from the filament profile (Controls › Filament).
- Print Files. Everything you can print. This is where every print starts.
- Temperatures. Nozzle (flame) and bed. Tap either one to set a temperature.
- Wi‑Fi. The network the printer is on. Tap to open the Wi‑Fi page.
- The robot. OK in green when all is well, PROBLEM in red when the printer has reported something. Tap it when it is red to see what happened.
 HomeHome screen, or the print while one is loaded
 ControlsMotion, heaters, fans, filament, light
 SettingsWi‑Fi, Remote, calibration, toolbox
 InfoMachine Information
 Emergency stopHold ¾ s. Never locked
The sidebar icons have no labels. The green icon is the section you are in. A very dark icon is locked (see below).
How the touchscreen responds
- Buttons act the moment your finger touches them. There is no need to press hard, and no double-tap anywhere. Rest your finger on a button only when you mean it.
- In lists (files, Wi‑Fi networks, settings rows) an item acts when you lift your finger, so you can scroll by dragging without opening anything.
- Back. The grey arrow button at the top-left of a page goes back one step. Tapping a sidebar icon closes everything and returns to the start of that section.
- Panels from the right. Keypads and settings panels slide in from the right over a darkened screen. Tapping the dark area closes the panel without saving. Keypads send nothing until you press Confirm.
- Confirmations. Anything that cannot be undone (cancelling a print, deleting a file, restarting the printer) asks first in a box in the middle of the screen. Tapping outside the box keeps things as they are.
When the sidebar is locked
| Situation | What is locked | What the screen says if you tap |
|---|---|---|
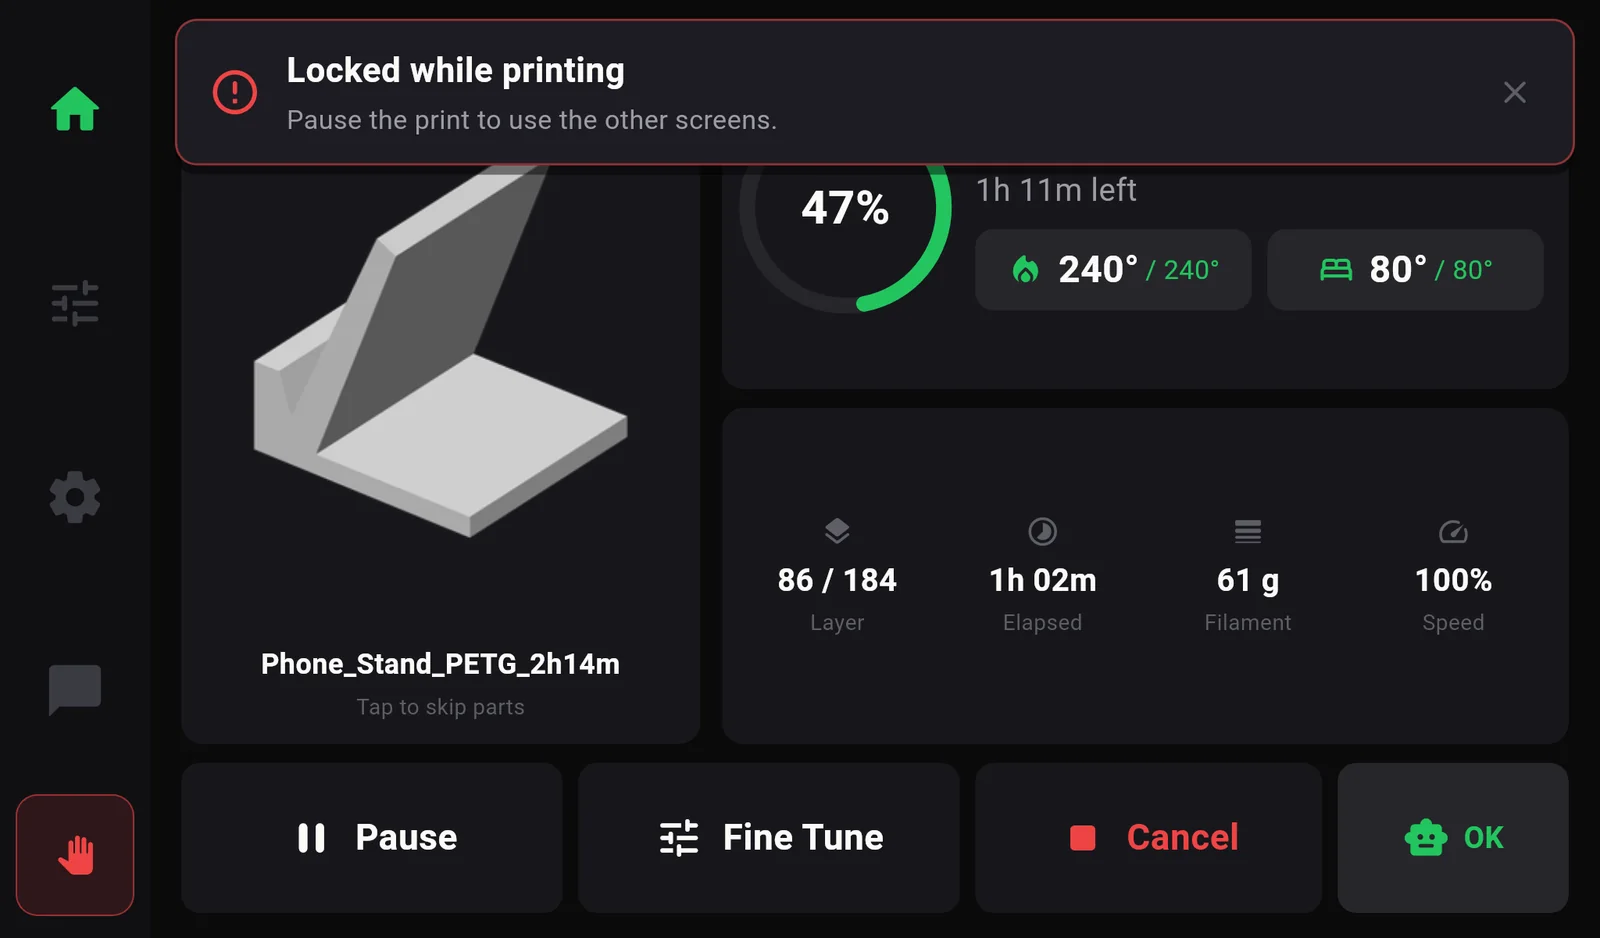
| A print is running | Controls, Settings and Info. Home stays available: it is the print. | Locked while printing — Pause the print to use the other screens. Pausing unlocks them. |
| A calibration is running | Everything, Home included, so the measurement is not lost | Calibration in progress — Leaving now would throw away the measurement. Press Stop to end it early. |
| The printer has stopped with a fault | Controls only. Settings and Info stay open, because the fix is there. | The printer has stopped — It cannot be moved or heated until the fault is cleared. |
The emergency stop is never locked.
Messages at the top of the screen
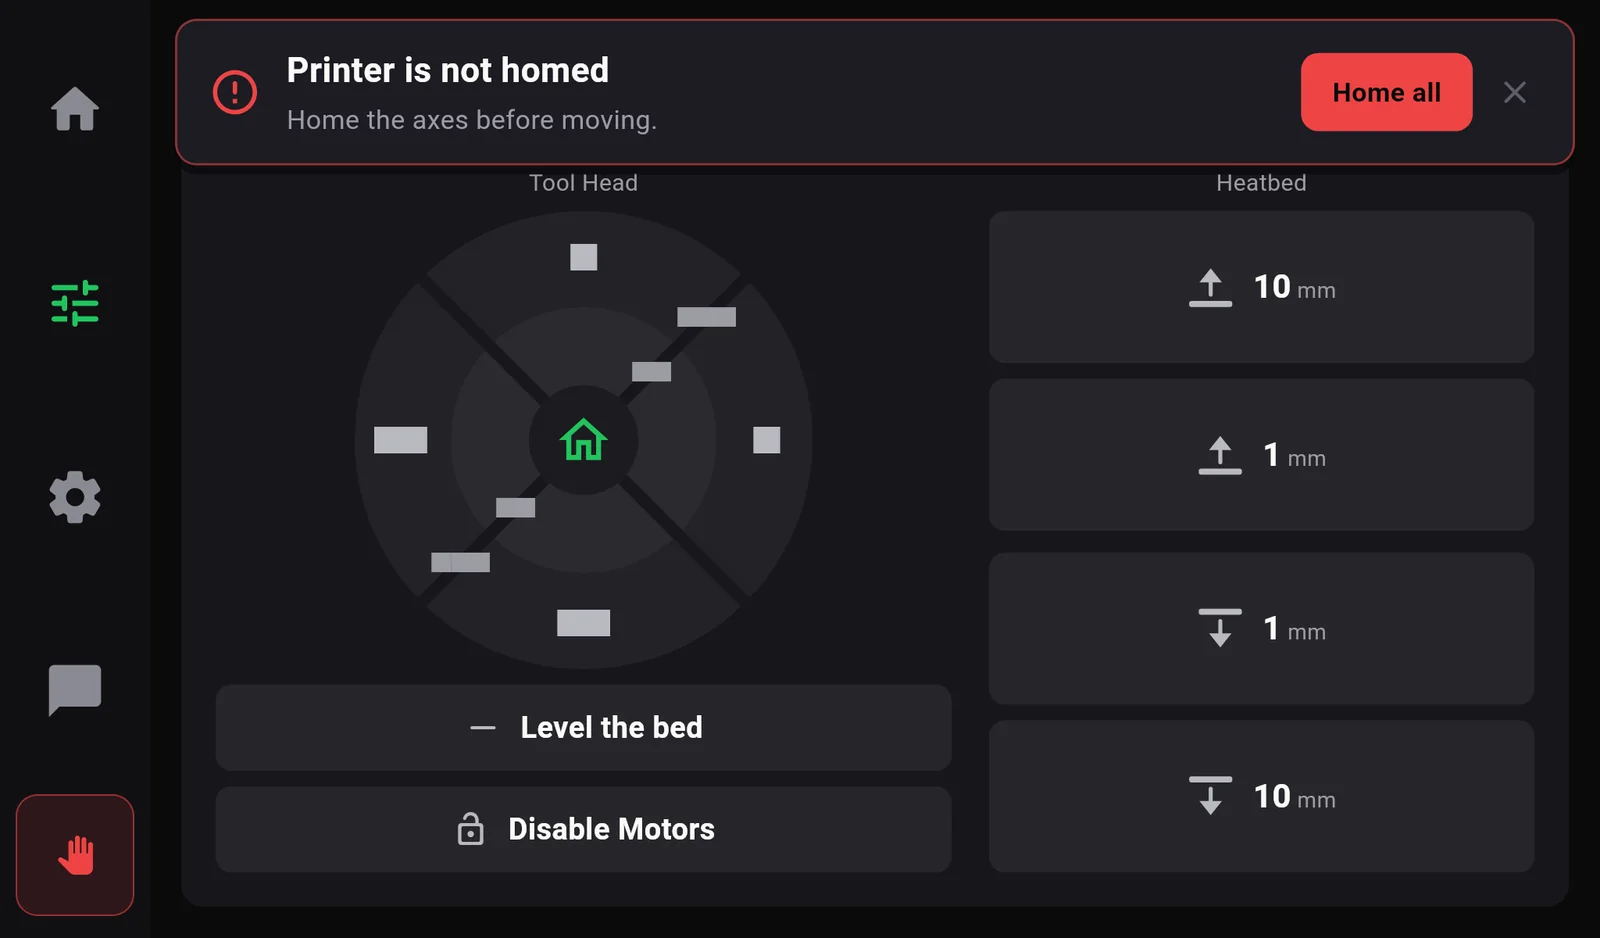
Short messages drop in at the top of the screen. A red border means something was refused or went wrong; it stays about 8 seconds. A green border is for information; it stays about 5 seconds. The ✕ closes a message at once. Many messages carry a button that fixes the problem in one tap.
Switching on
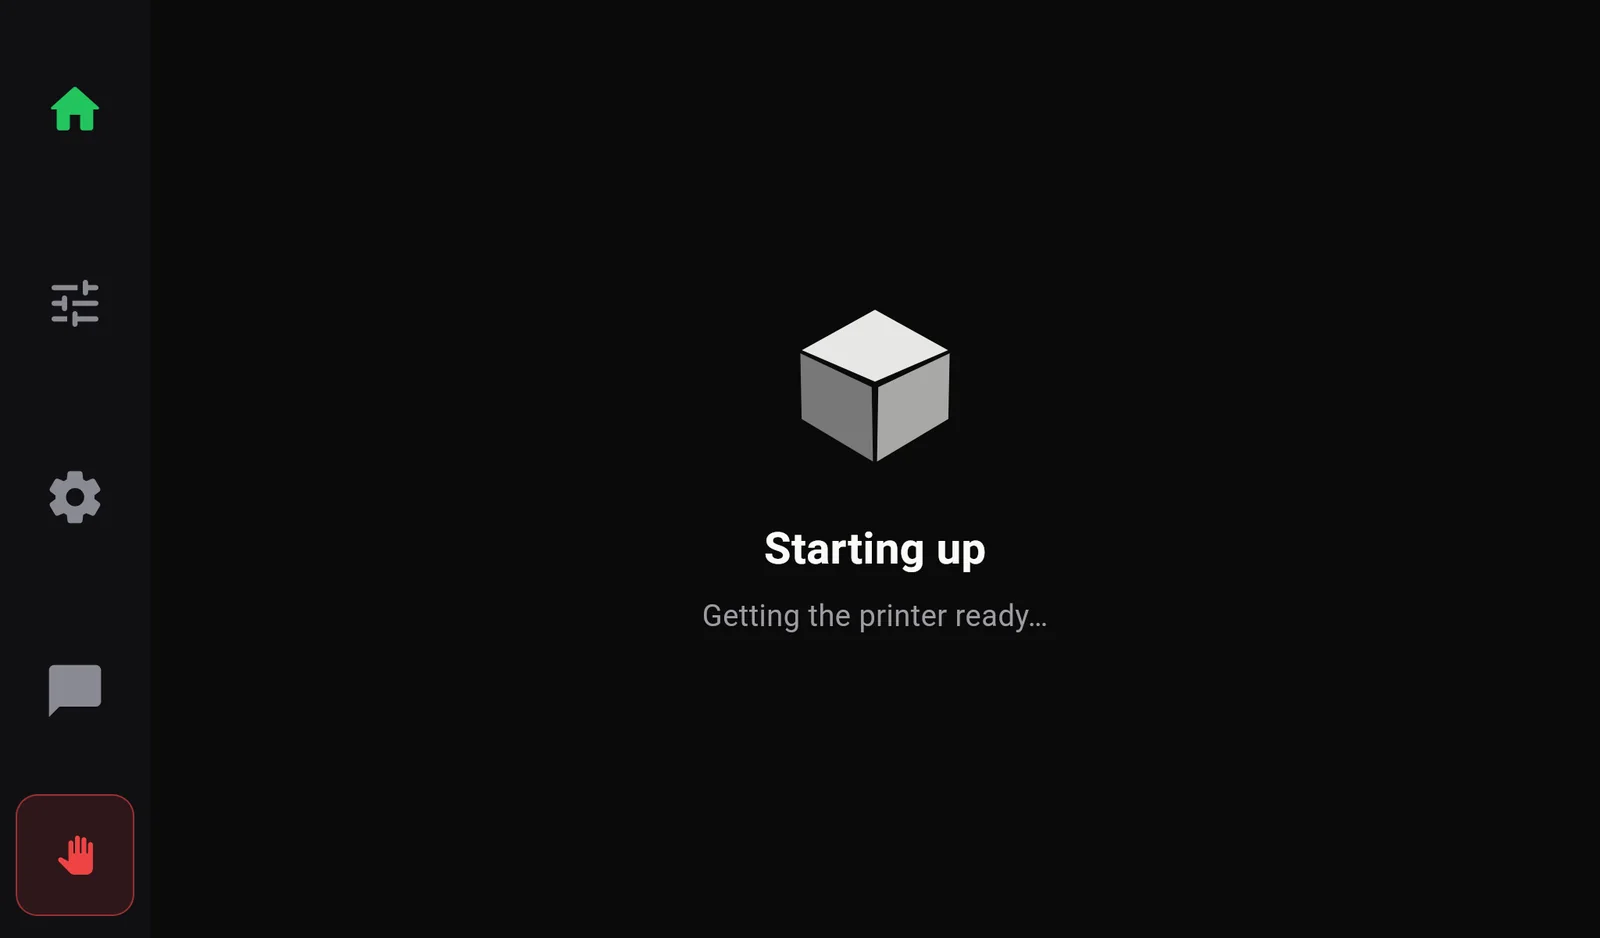
The screen comes on before the printer software is ready, so for the first half minute or so it shows Starting up — Getting the printer ready…. Then Home appears with the status Ready.
If the printer is still not answering after about 40 seconds, the screen says The screen has lost the printer. See troubleshooting.
Emergency stop
Use it when something is about to crash, burn or break. It works on every screen and is never locked.
- Press and hold the red hand at the bottom of the sidebar. A red ring fills around it.
- Keep holding for about ¾ second, until the ring is full. Letting go early cancels: nothing happens.
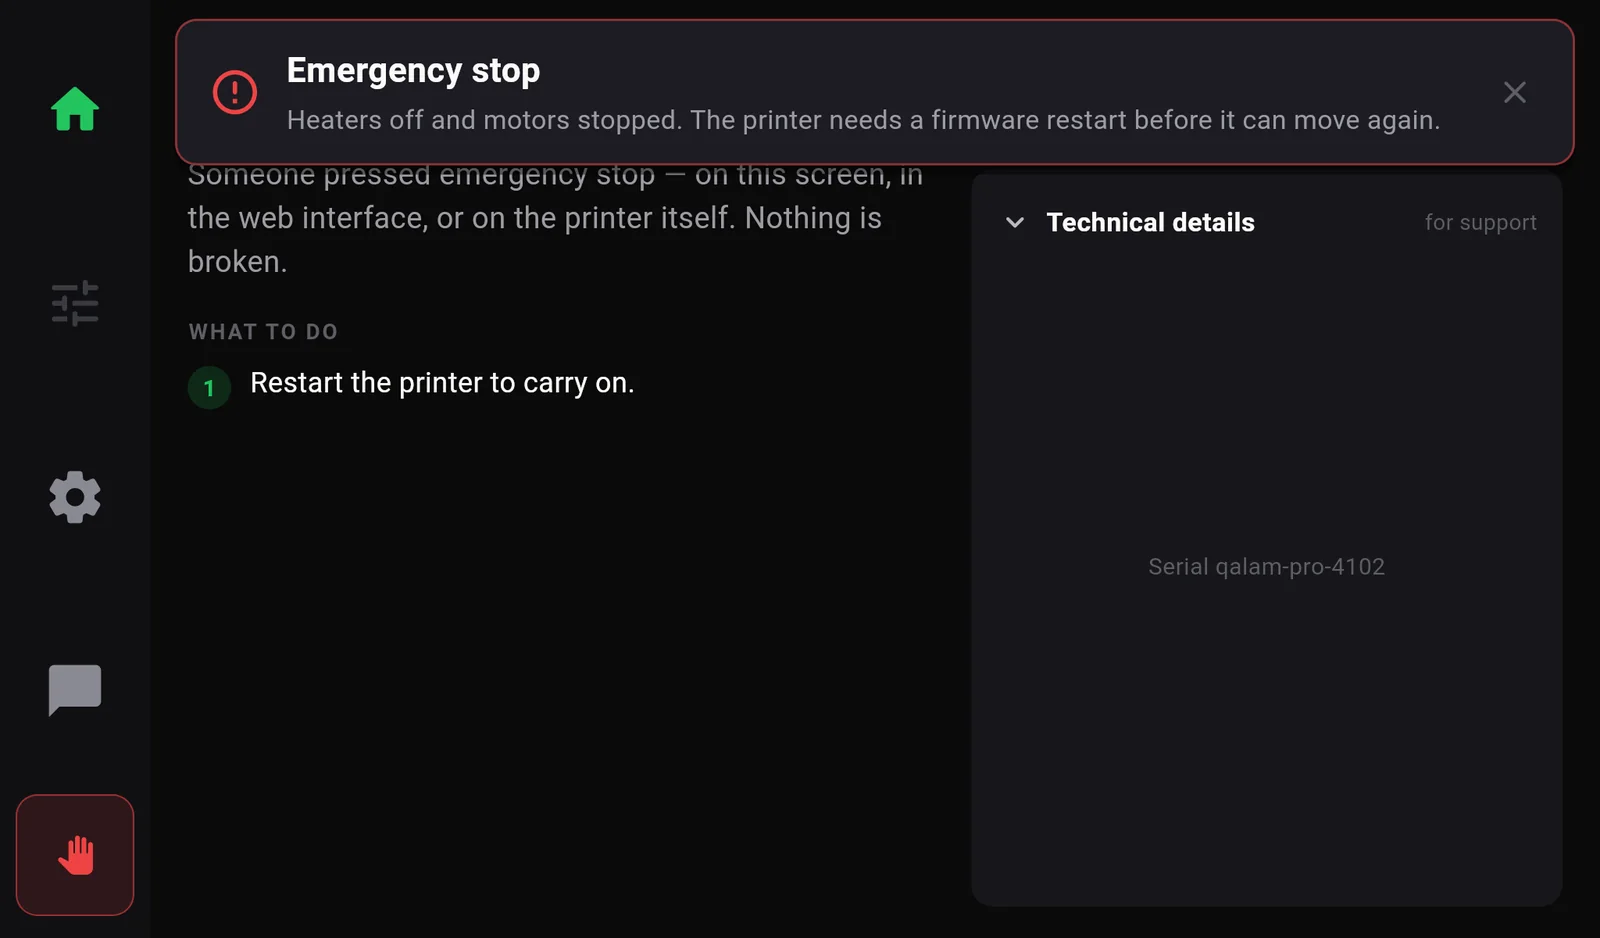
- The printer stops at once. Heaters switch off and the motors stop. The message Emergency stop — Heaters off and motors stopped appears and Home shows Emergency stop was used.
- When it is safe, press Restart the printer on that screen. The printer restarts in a few seconds and returns to Home. The stopped print cannot be continued.
If the screen shows THE STOP DID NOT REACH THE PRINTER — Switch the printer off at the wall and the button turns solid red, do exactly that: switch the printer off at the power switch or the wall socket.
Chapter 02
Fine tuning a print while it runs
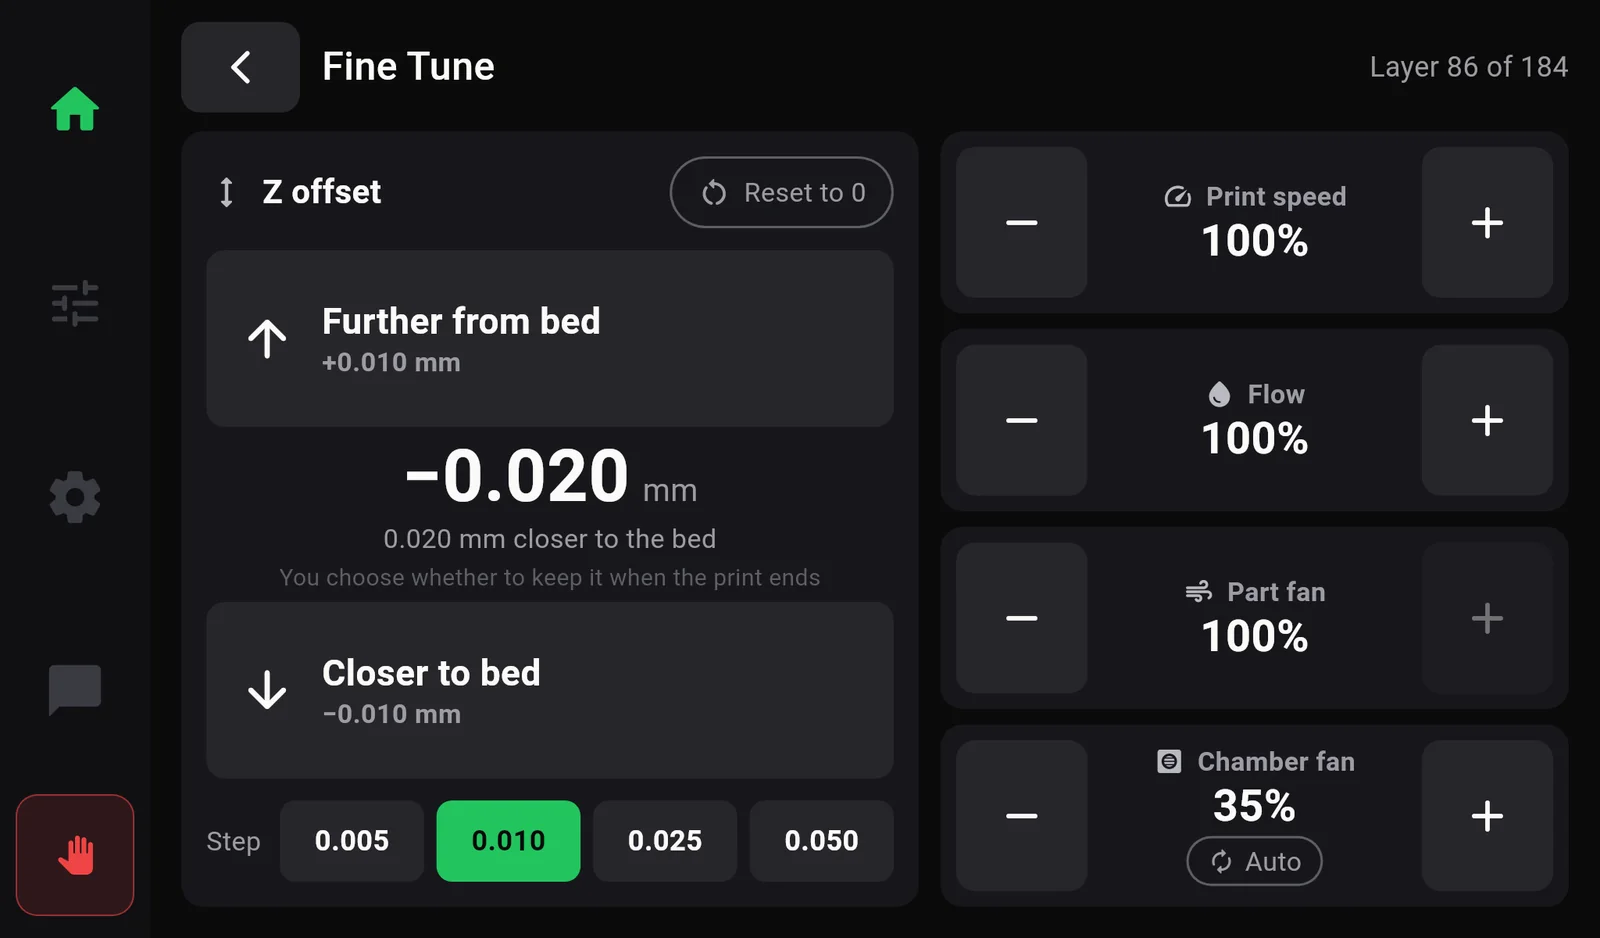
Fine Tune adjusts the print that is running now: the height of the first layer, speed, flow and fans. Open it with Fine Tune on the print screen.
 1
2
3
4
5
6
7
8
9
10
1
2
3
4
5
6
7
8
9
10
- Reset to 0. Back to the saved height. Asks first.
- Further from bed. Raises the nozzle by one step.
- Current Z offset. Minus means closer to the bed than the saved height.
- Closer to bed. Lowers the nozzle by one step.
- Step size: 0.005, 0.010 (default), 0.025 or 0.050 mm per press.
- Print speed, 10–300 %.
- Flow, 50–150 %.
- Part fan, 0–100 %.
- Chamber fan, 0–100 % or Auto.
- Progress, or a lock note when something cannot be changed right now.
Z offset: the height of the first layer
The Z offset is how far the nozzle sits above the bed when it prints. A few hundredths of a millimetre make the difference between a first layer that sticks and one that does not. The printer's saved height is 0.000; Fine Tune moves the nozzle relative to it.
- Each press moves the nozzle straight away by the selected step. Presses add up: three presses of Closer to bed at 0.010 give −0.030 mm.
- An amber number means the change has been sent but not confirmed yet (Applying…). It turns white within a couple of seconds.
- Change in small steps and watch a few lines print between presses. 0.010 mm is right for most adjustments; use 0.025 or 0.050 only when the layer is clearly far off.
- Use it on the first layer. Later layers print on top of plastic, not the bed, and are not affected by small changes.
Setting it during heat-up
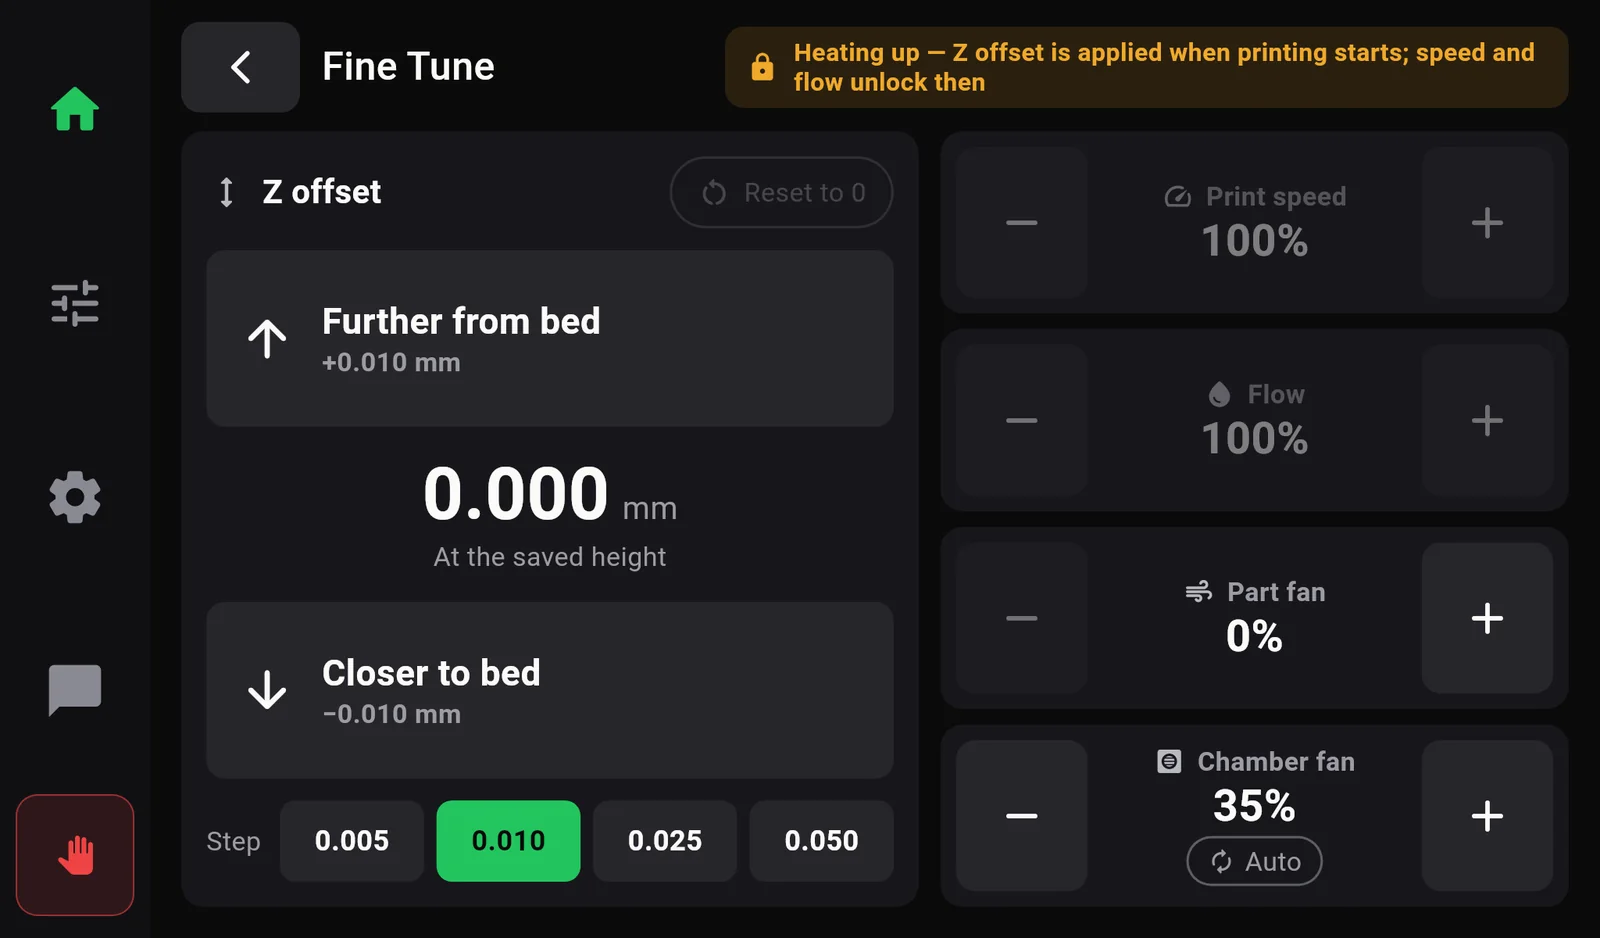
While the printer is still heating before the first line, Fine Tune says Heating up — Z offset is applied when printing starts; speed and flow unlock then. You can already set the Z offset: the value is held (Held — applied when printing starts) and applied in one go when printing begins, with the message Z offset applied.
Keeping the offset for future prints
When the print ends, if you changed the Z offset, the printer asks Keep this Z offset? and tells you how far you moved it, for example During that print you moved the nozzle 0.020 mm closer to the bed.
- Keep it stores the new height, so every print from now on starts there. The printer restarts to store it, which takes a few seconds, and shows Z offset saved.
- Discard does not store anything. Your saved height is unchanged for future prints.
After levelling the bed, print a small flat test (a single-layer square or a calibration cube). Adjust the Z offset until the first layer is smooth and gap-free, then press Keep it at the end.
Print speed and flow
| Control | Range and step | Use it for |
|---|---|---|
| Print speed | 10–300 %, steps of 5 | Slow a difficult section down (small details, a wobbly tall part), or speed up an easy one. 100 % is the speed in the file. |
| Flow | 50–150 %, steps of 1 | Small corrections to how much plastic comes out: raise it a few percent if lines look thin or have gaps, lower it if the surface looks over-full. Change it by 1–3 % at a time. |
When either is not 100 %, a small 100% button appears under it to reset it. These changes last for this print only.
Fans
- Part fan (0–100 %, steps of 10) cools the plastic just after it leaves the nozzle. The print file sets it too, so your value may be replaced at the file's next fan change.
- Chamber fan (0–100 %, steps of 10) moves hot air out of the chamber. Auto means the printer controls it from the temperature; pressing + or − switches to a fixed speed, and Auto hands it back.
When controls are locked
| Situation | Note at the top of Fine Tune | What still works |
|---|---|---|
| Printing | Layer 86 of 184 | Everything |
| Heating up before the first line | Heating up — Z offset is applied when printing starts; speed and flow unlock then | Z offset (held), fans |
| Paused | Paused — Z offset, speed and flow unlock when you resume | Fans only. A change made while paused would be undone on resume, so the screen does not allow it. |
| No print running | No print is running | Nothing |
| Printer not ready | The printer is not ready | Nothing |
Temperatures during a print
The nozzle and bed temperatures on the print screen are buttons. Tap one to open the keypad and set a new target, for example to raise the nozzle by 5 °C for a material that is not flowing well. The temperature in the print file applies again at the next change the file makes.
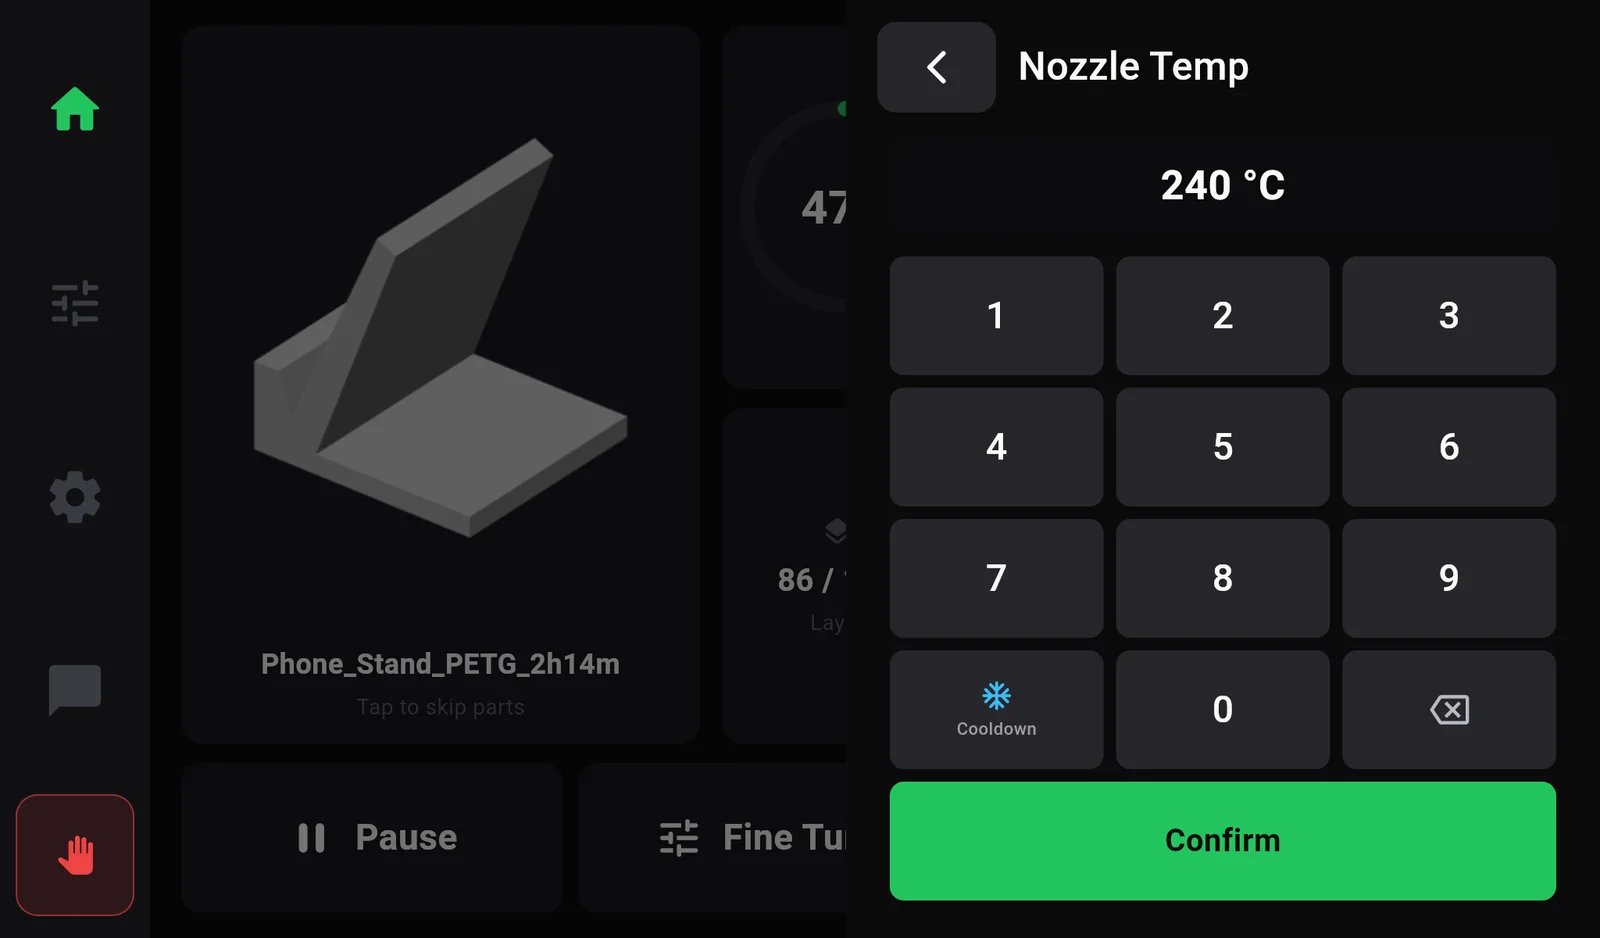
A target of 0 switches that heater off, and the print fails. The Cooldown key is blocked while a print is loaded (Not available with a print loaded), but typing 0 and pressing Confirm is not.
Skipping a failed part
When several parts print together and one fails (it came loose, or has turned into spaghetti), you can stop printing just that part and let the others finish.
- On the print screen, tap the picture card on the left. It reads Tap to skip parts when the file supports it.
- The Objects page shows the bed from above: the part printing now in green, the others in grey, skipped parts in red with a cross.
- Tap the failed part. The printer asks Stop printing this part? … will be skipped for the rest of the print. This cannot be undone.
- Press Skip part.
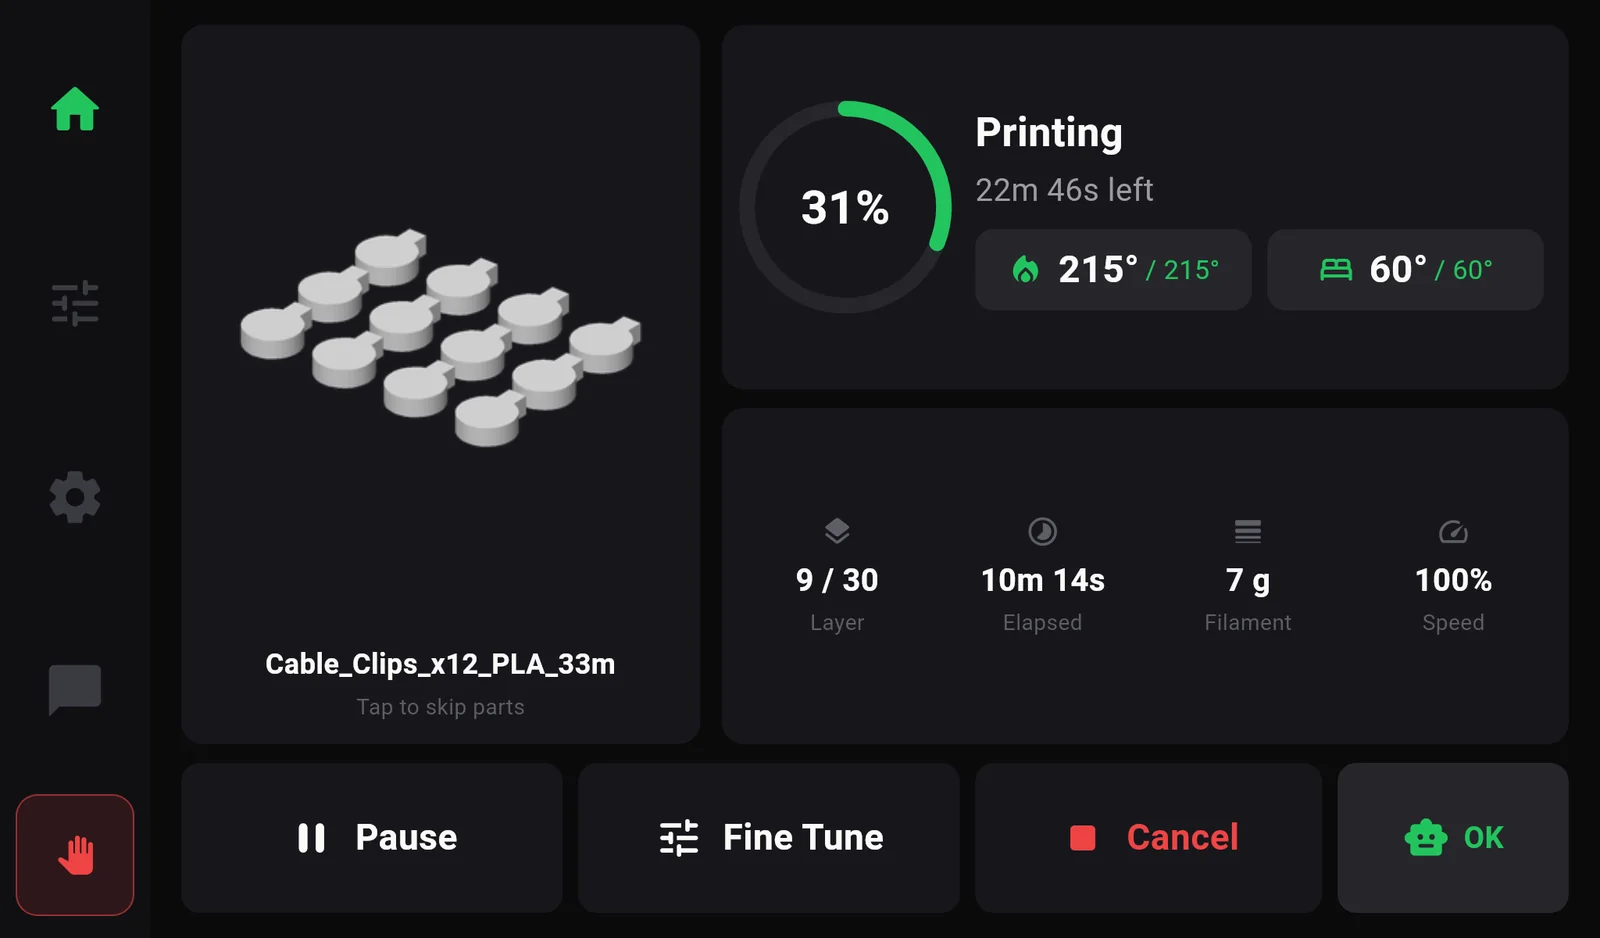
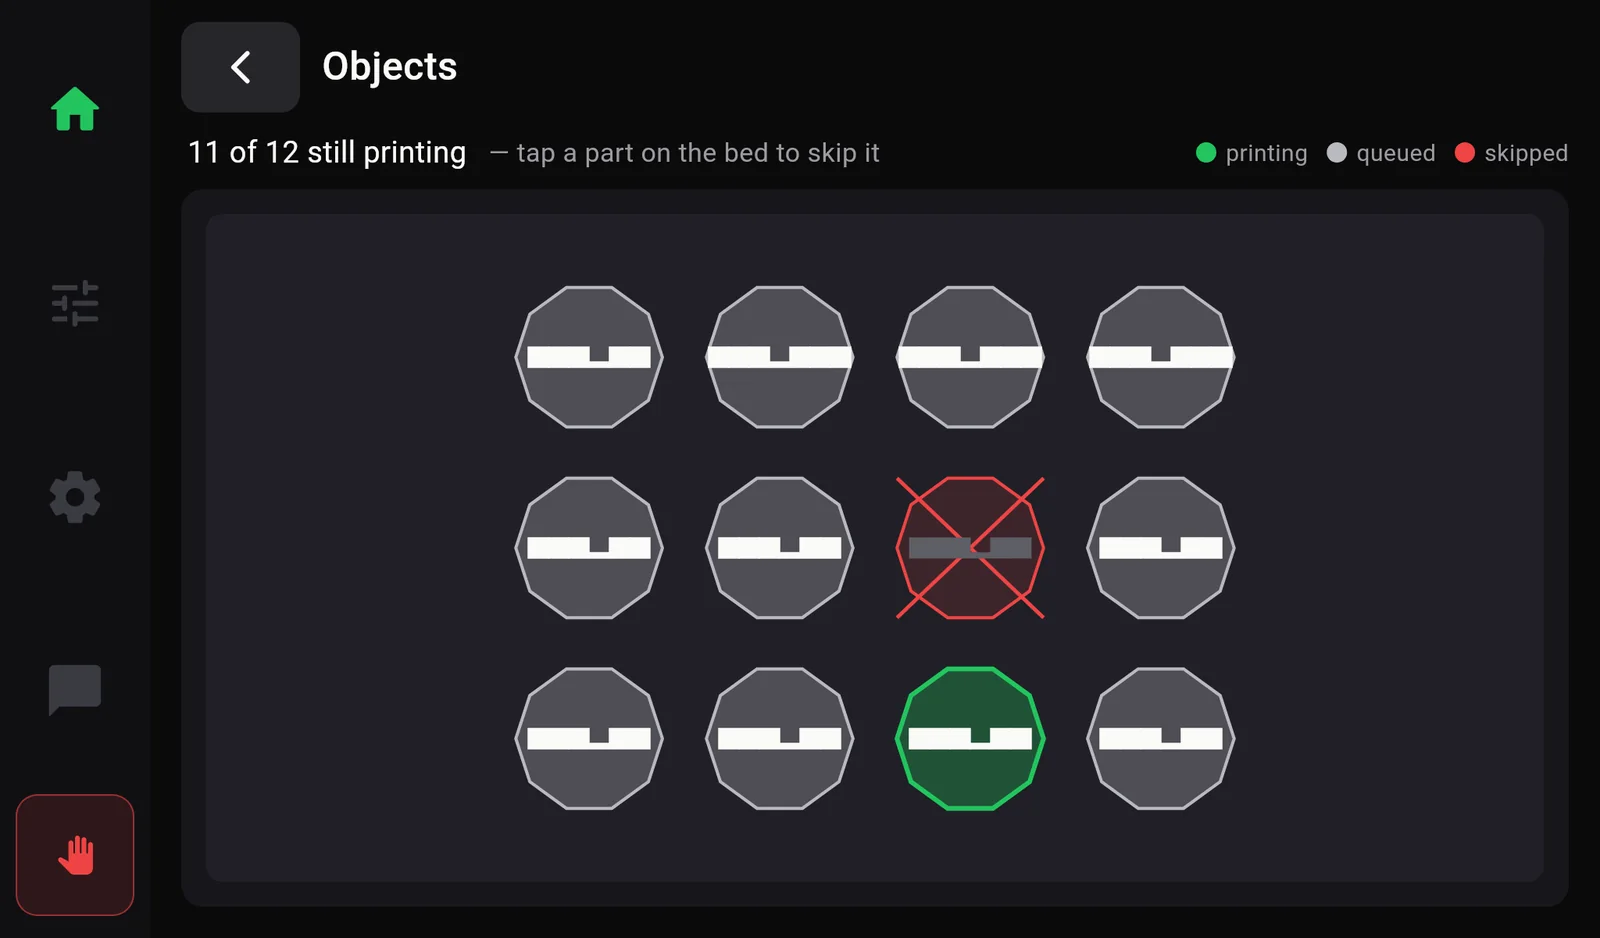
This needs Label objects switched on in OrcaSlicer (slicer settings).
Chapter 03
The print screen
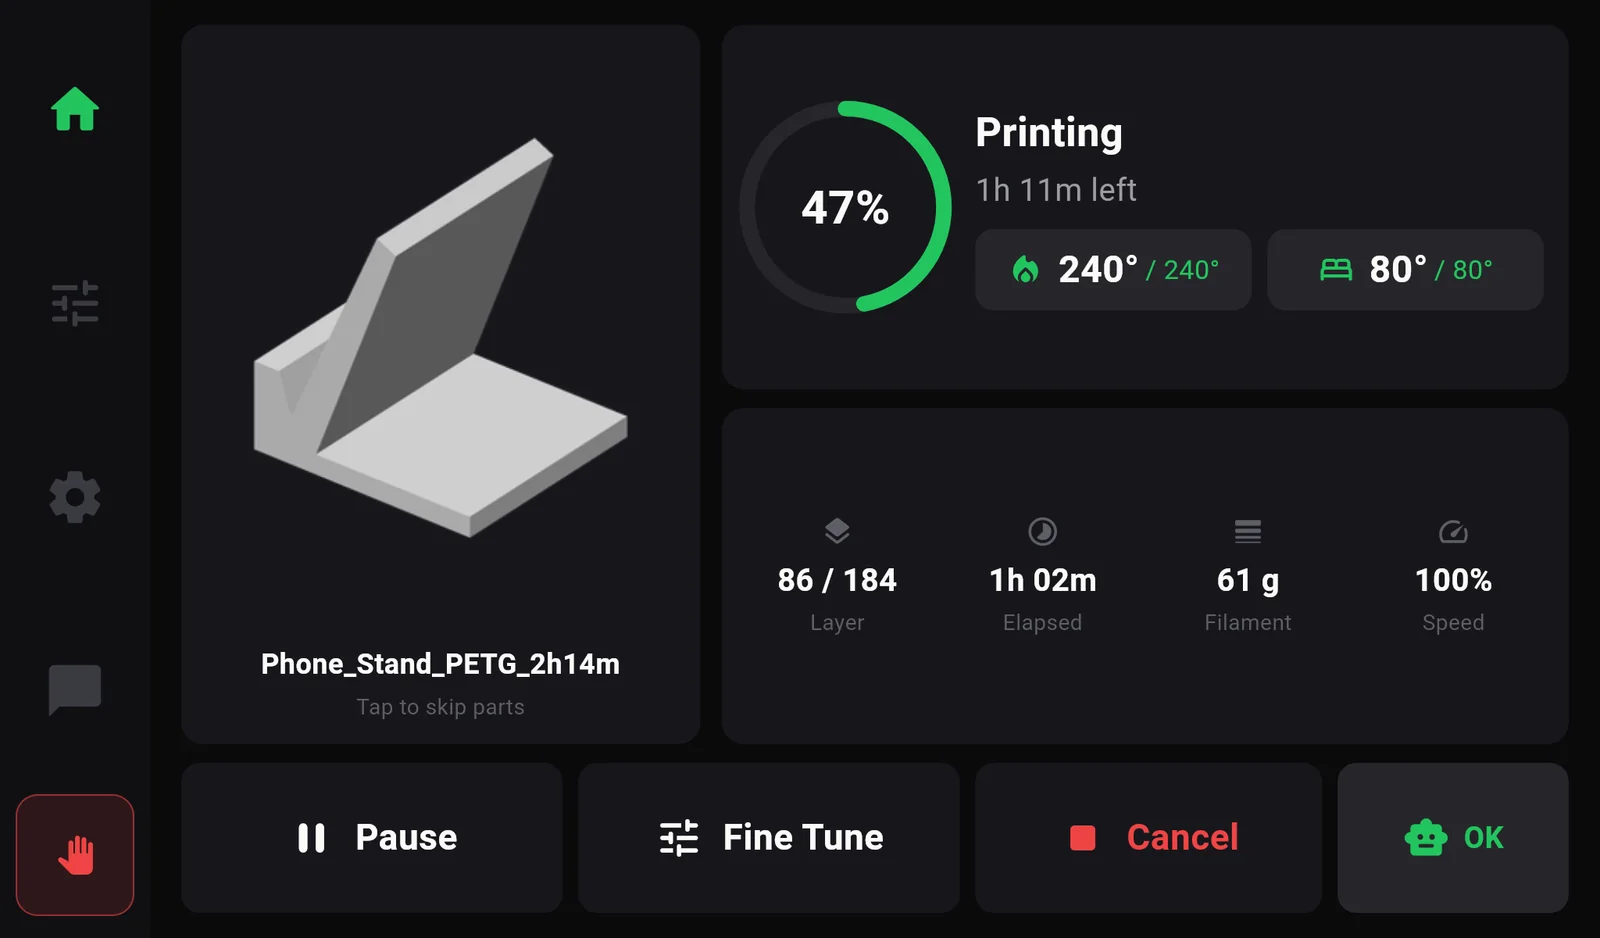
While a print is loaded, the Home icon shows the print. It stays until you clear the finished job.
 1
2
3
4
5
6
7
8
9
10
1
2
3
4
5
6
7
8
9
10
- The part and file name. Tap to skip parts (how).
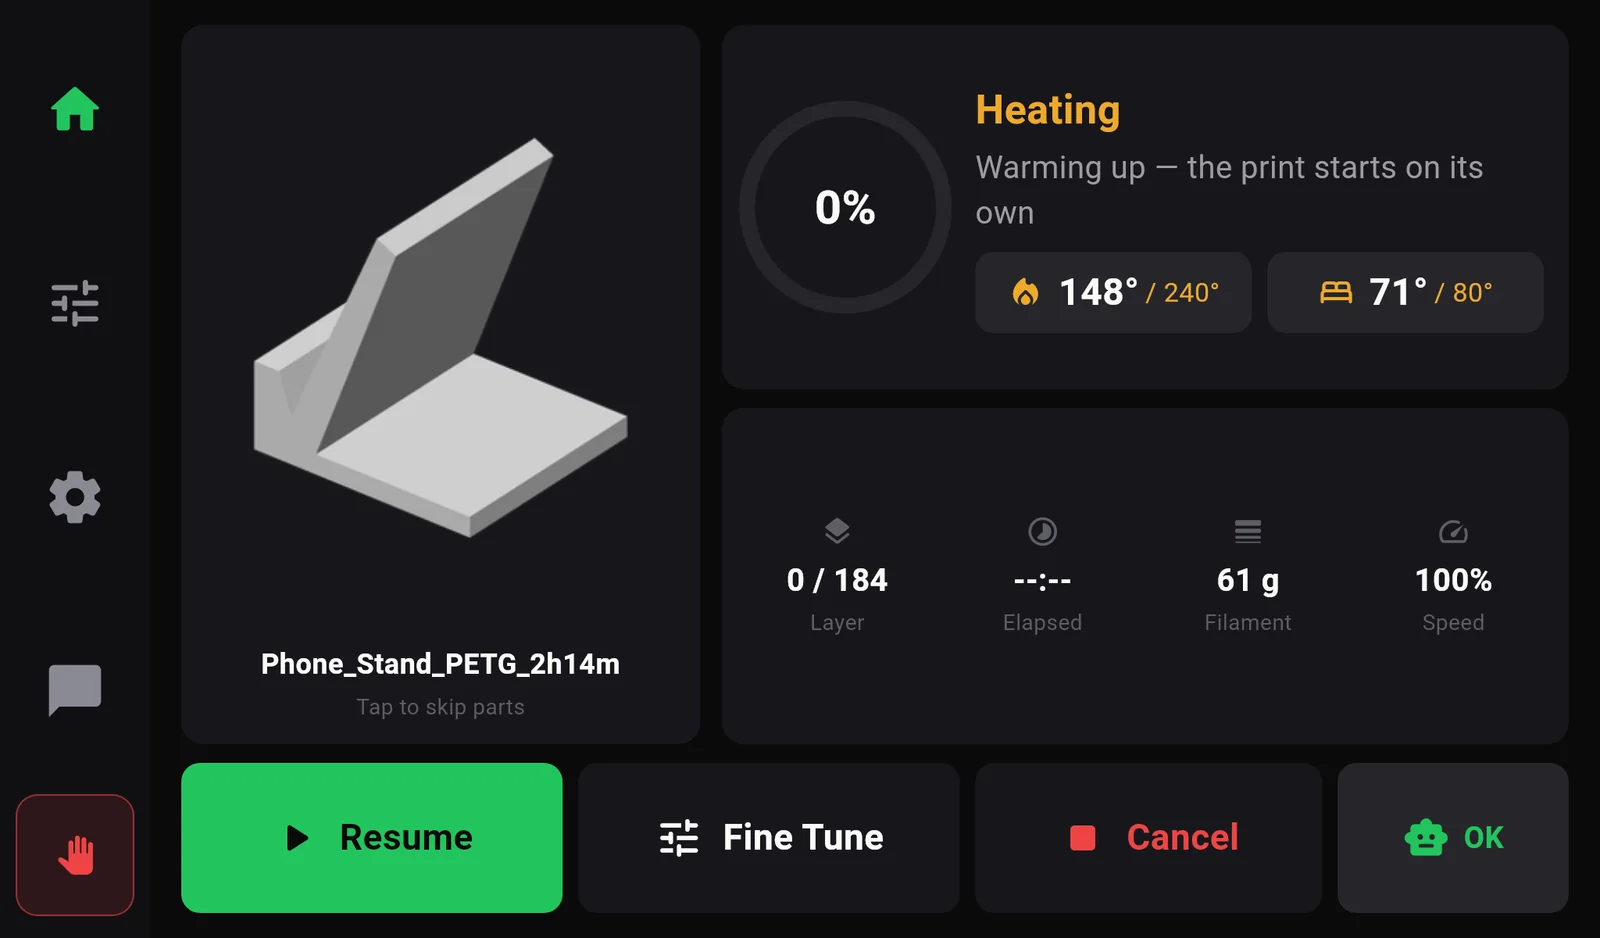
- Progress. Green while printing, amber while paused or heating.
- Status and time left. Estimating… at the very start.
- Nozzle temperature: current / target. Green at temperature, amber while heating, grey when off. Tap to change.
- Bed temperature, the same way.
- Layer (current / total), Elapsed printing time, Filament for the whole print, Speed, and Flow rate: the plastic going through the nozzle right now, in mm³/s.
- Pause, or Resume when paused.
- Fine Tune: Z offset, speed, flow, fans (chapter 6).
- Cancel. Asks first.
- The robot: OK, or Problem when the printer reported something. Tap it.
What the print screen can say
| Headline | Meaning | Buttons |
|---|---|---|
| Heating Warming up — the print starts on its own | The printer is heating before the first line. It starts printing by itself. | Resume · Fine Tune · Cancel |
| Printing 1h 11m left | Printing normally. | Pause · Fine Tune · Cancel |
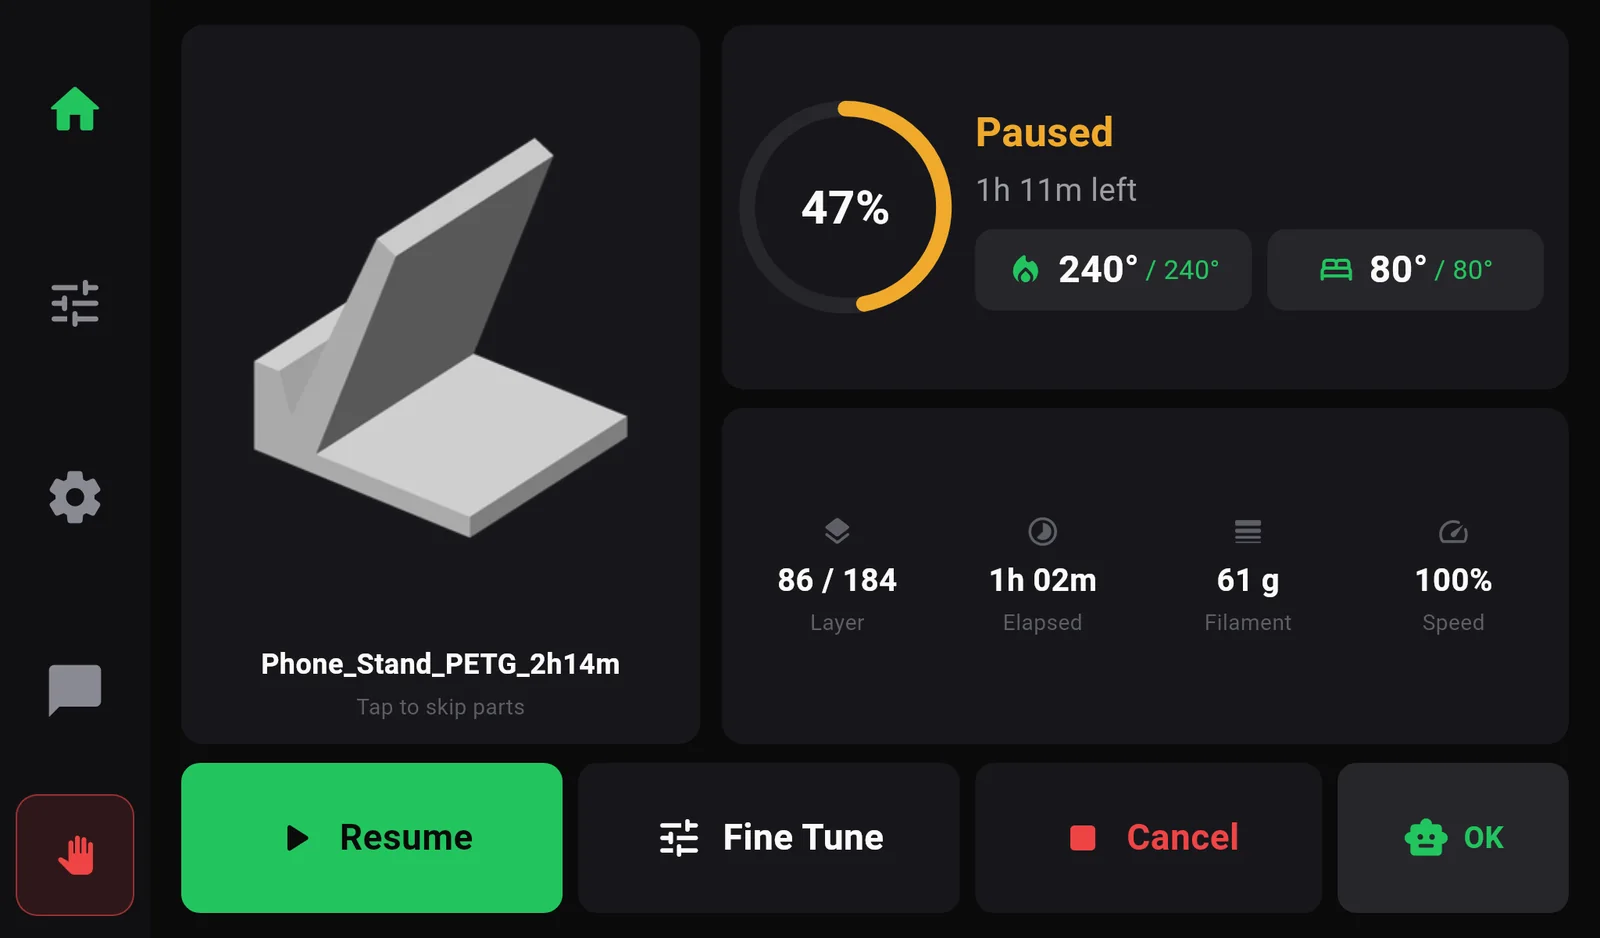
| Paused | Paused by you, by the print file (colour change) or from the web. | Resume · Fine Tune · Cancel |
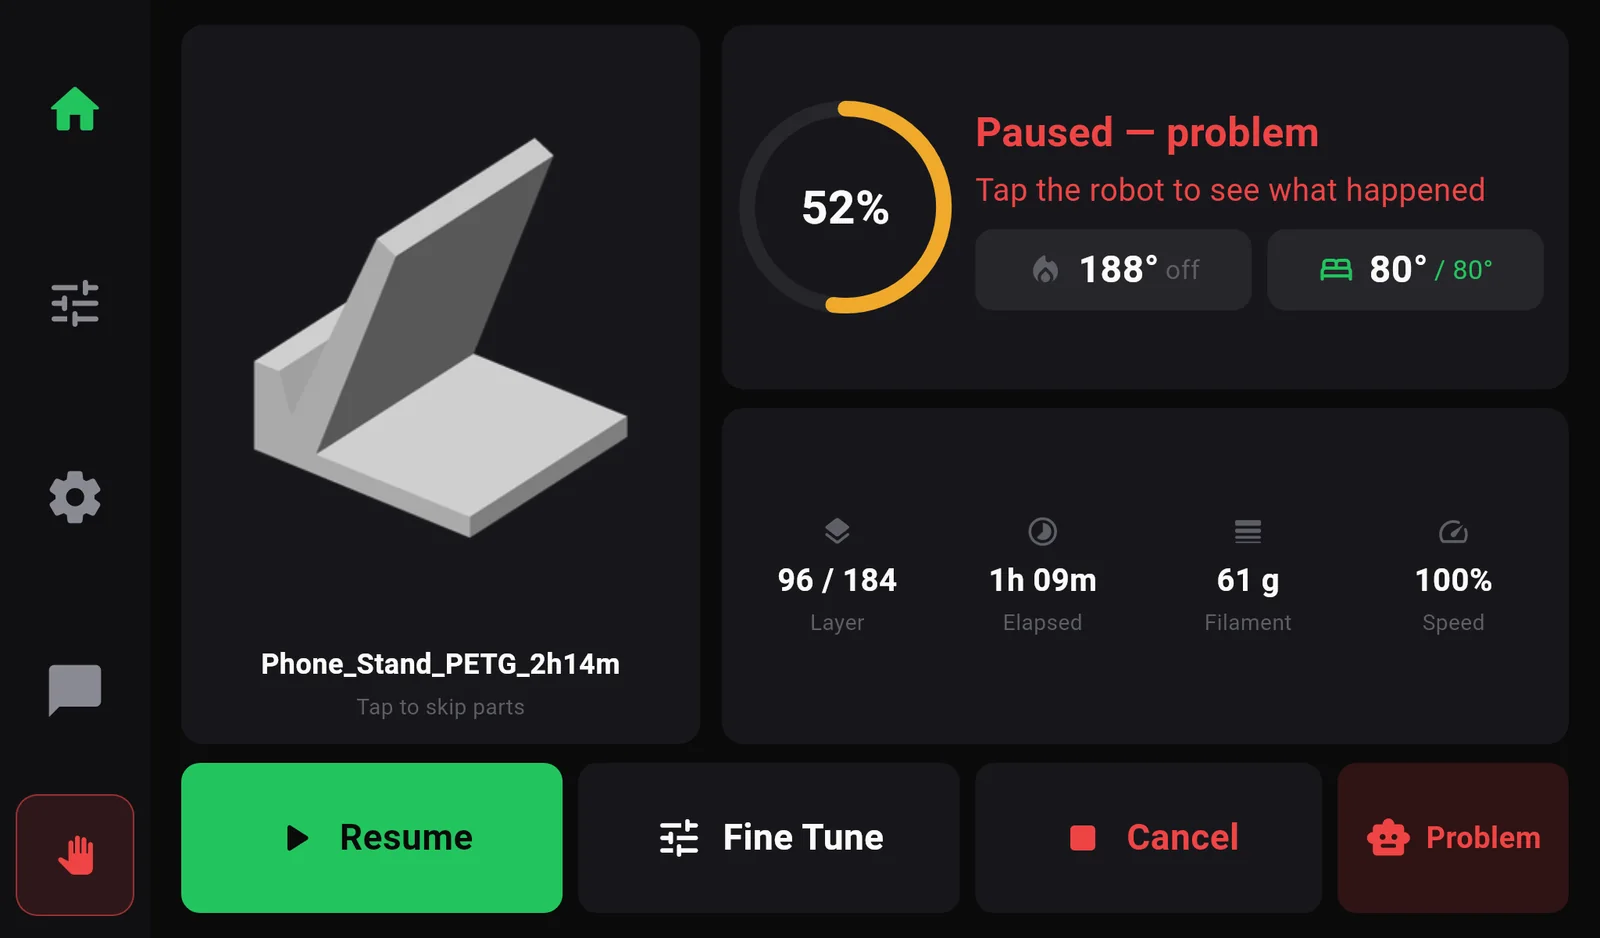
| Paused — problem Tap the robot to see what happened | The printer paused itself because of a problem. | Resume · Fine Tune · Cancel · Problem |
| Print complete | Finished. | Done |
| Print stopped The print did not finish | Cancelled, or ended by an error. | Clear |
| Stopped — problem | Ended because of a problem the printer reported. | Clear · Problem |
Pausing and resuming
- Pause stops the print where it is. The printer keeps its place in the file.
- While paused, the other sections unlock, so you can, for example, change filament in Controls›Filament. Homing and moving the bed are blocked, because they would run into the part: Not with a print on the bed.
- Resume continues from the same point.
Cancelling
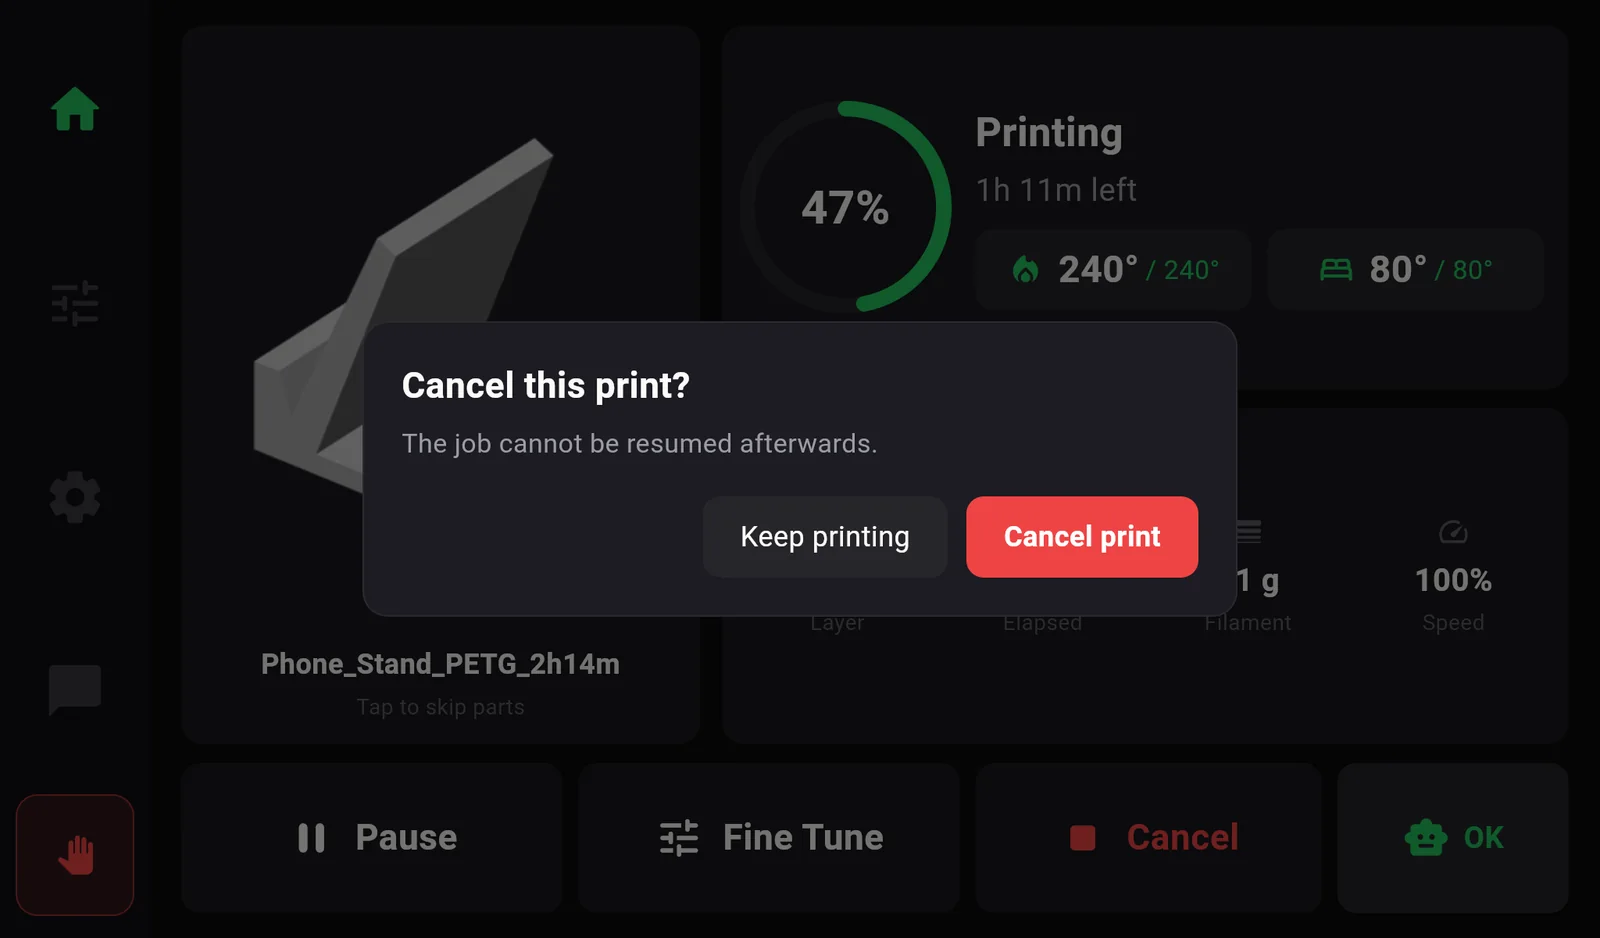
Cancel asks Cancel this print? — The job cannot be resumed afterwards. Press Keep printing to go back, or Cancel print to stop. A cancelled print cannot be continued.
When the robot turns red
Some problems do not stop the printer but pause the print: filament running out, a loose sensor wire, a heater that cannot keep up. The headline then says Paused — problem and the robot shows Problem. Tap the robot to open What happened: a plain explanation, numbered steps, and the printer's own message for 3DISM support.
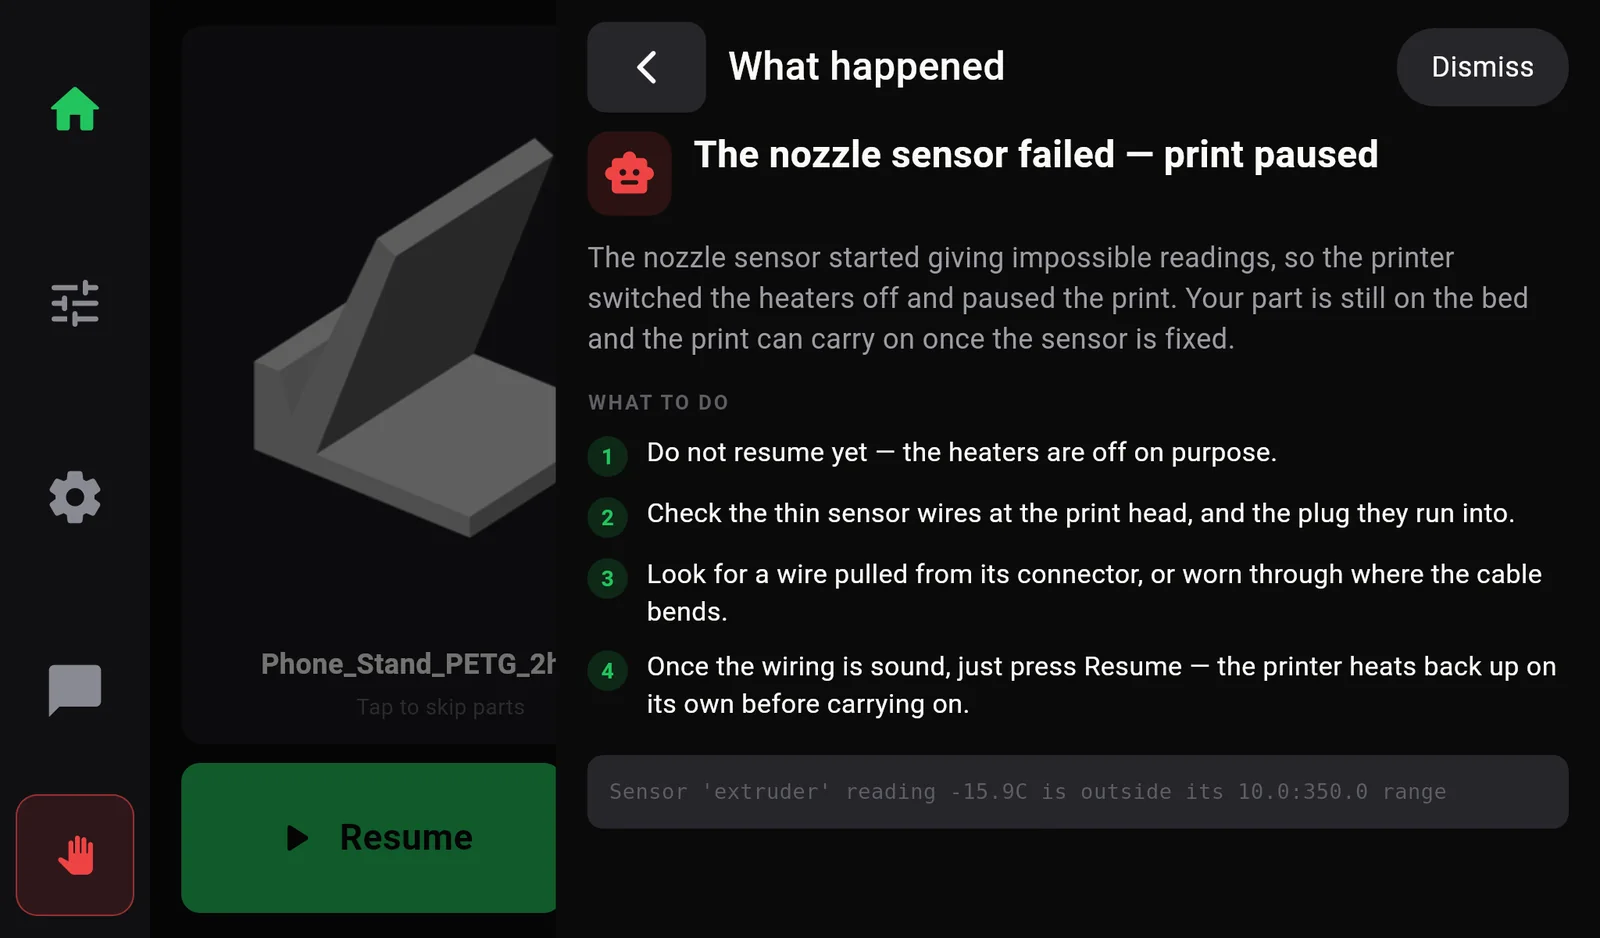
Dismiss turns the robot green again once you have read it. If the printer still reports a faulty sensor, the warning stays (Still showing a fault) until it is fixed. The full list of these messages is in chapter 13.
Chapter 04
Print Files
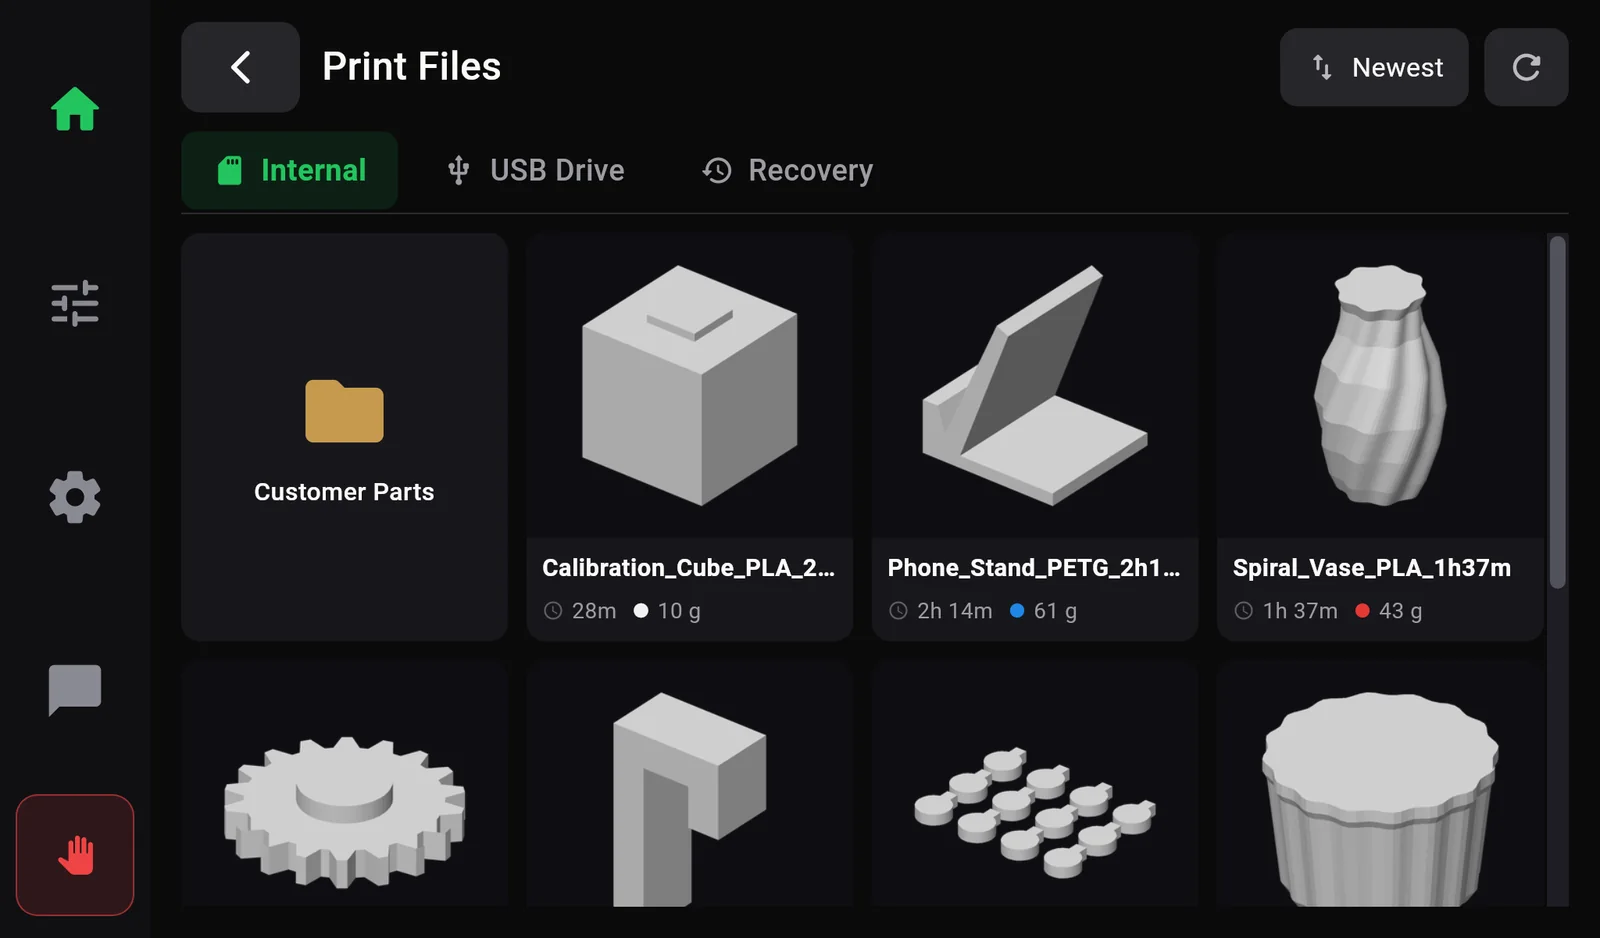
Every print starts here. Open it with the Print Files card on Home.
Tabs
| Tab | Shows |
|---|---|
| Internal | Files stored on the printer, including everything sent from OrcaSlicer. |
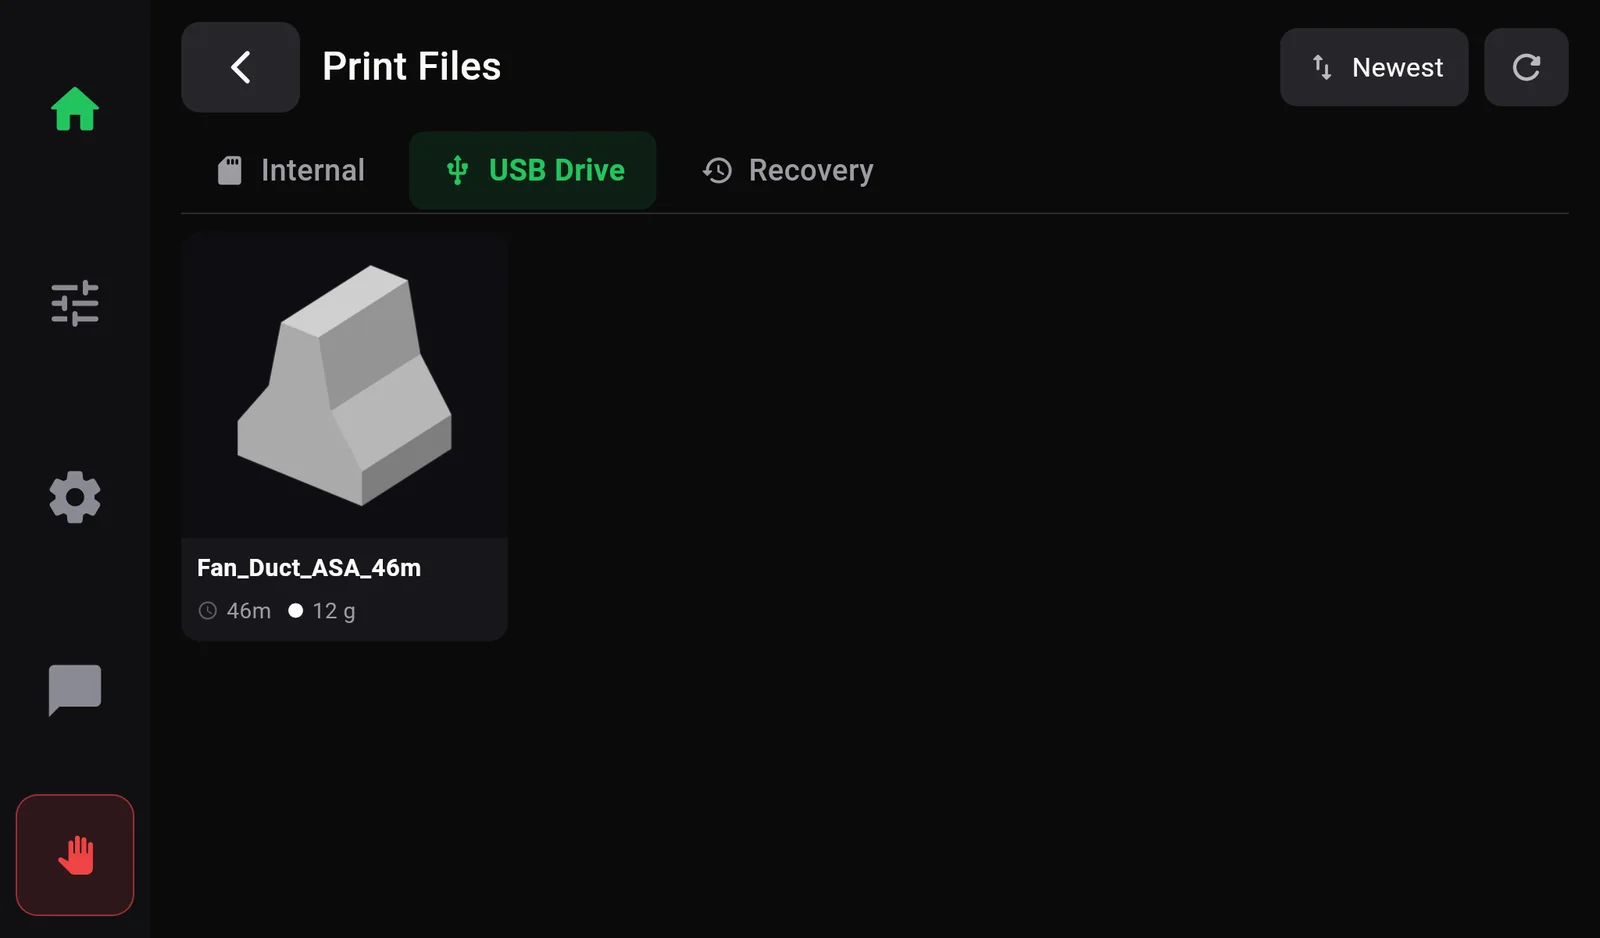
| USB Drive | Files on a USB stick plugged into the printer. Grey when no stick is plugged in (tapping it says No USB drive — Plug a stick in and it appears here.). A stick appears within about 5 seconds of plugging it in. |
| Recovery | A print interrupted by a power cut, ready to continue. An amber dot on the tab means one is waiting (chapter 12). |
Finding a file
- Sort with the button at the top right: Newest → Name → Size.
- Folders (brass folder icons) come first. Tap one to open it; the button with the folder name at the right of the tabs goes back up.
- Each card shows a picture of the part, the name, the estimated print time and the filament weight. The dot is the filament colour set in the slicer.
- The list refreshes by itself every few seconds, so a file sent from OrcaSlicer appears without doing anything.
File details
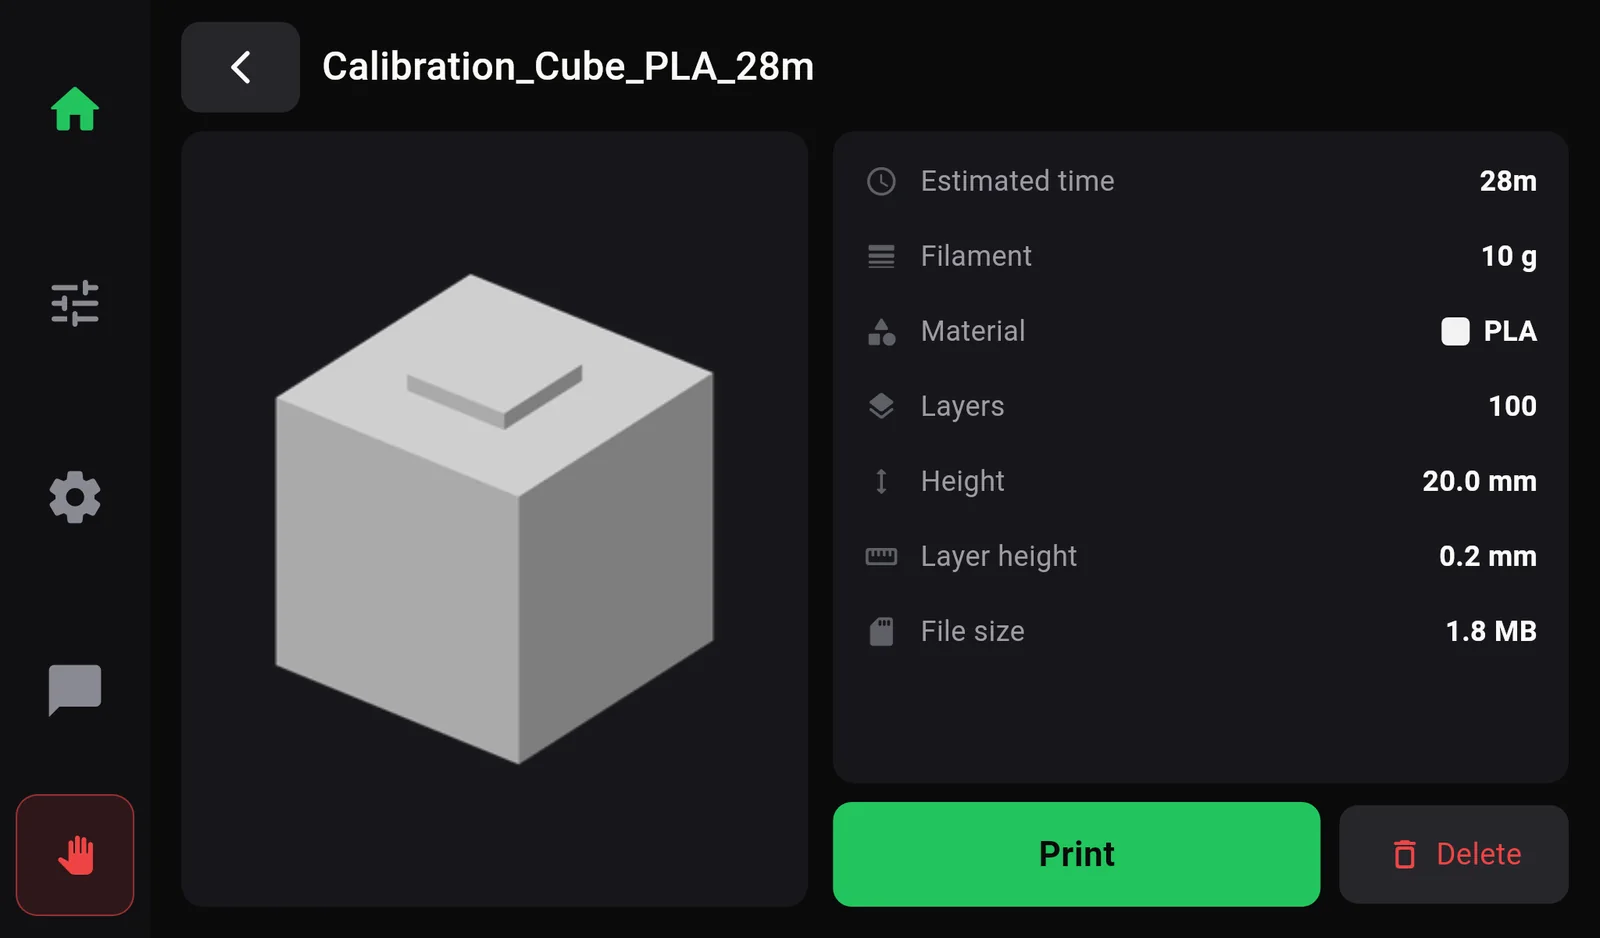
Tapping a file shows Estimated time, Filament (weight), Material, Layers, Height, Layer height and File size, taken from the slicer. A dash (—) means the slicer did not record that value.
- Print starts the print immediately. If another print is already loaded (printing or paused), it refuses: A print is already loaded — Finish or cancel it before starting another.
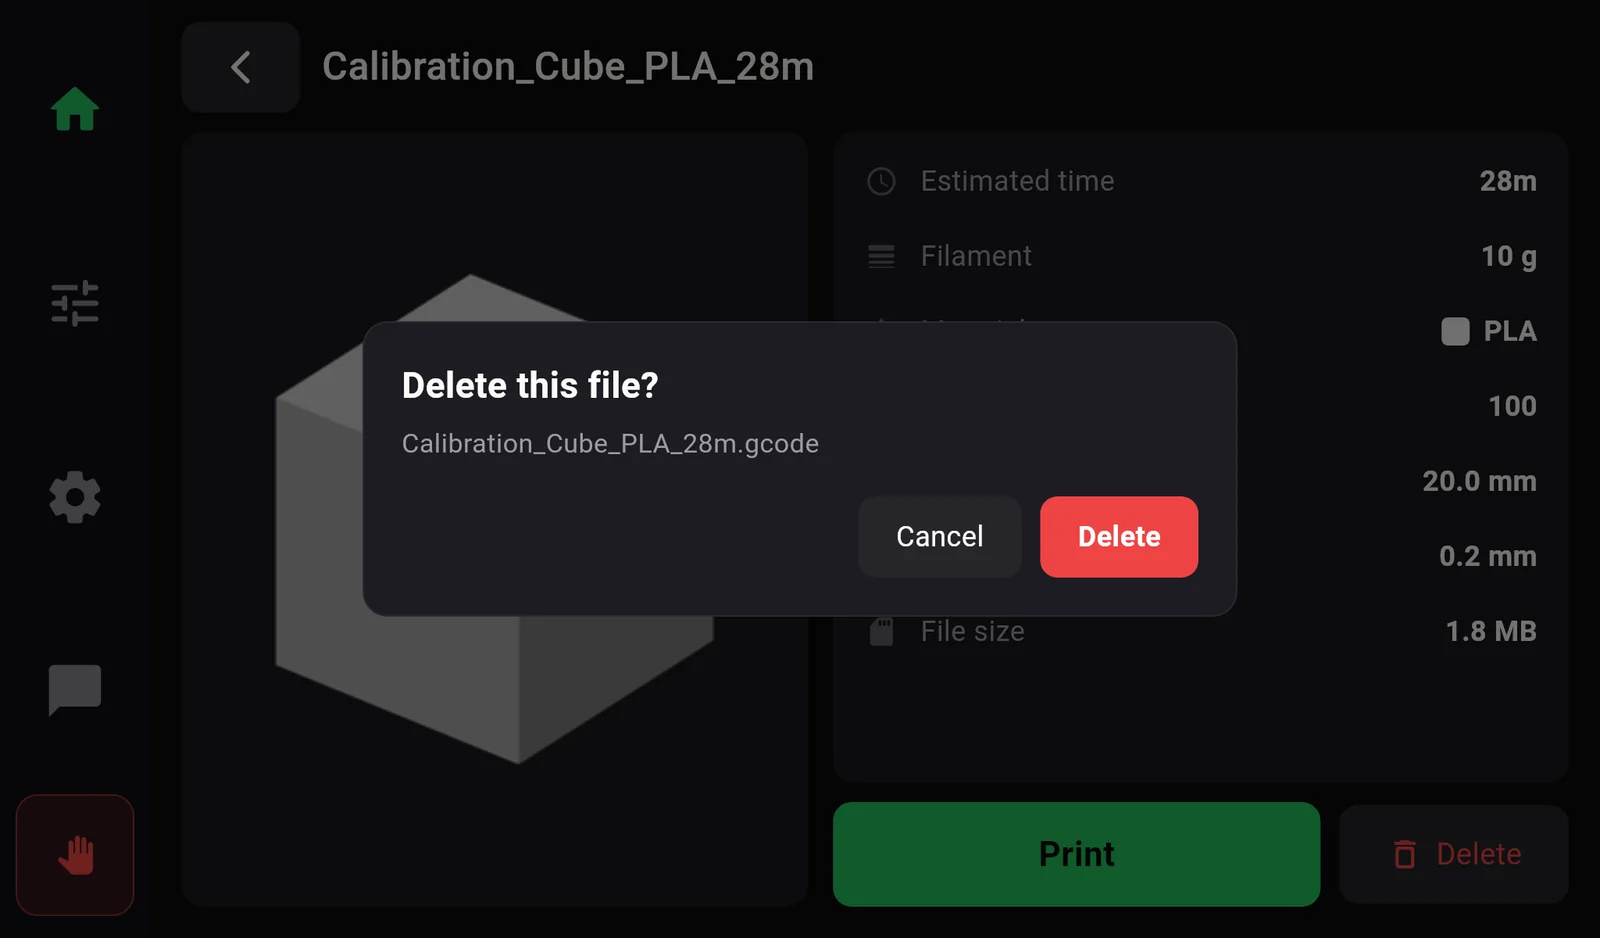
- Delete asks Delete this file? first. The file being printed cannot be deleted (This file is printing).
The slicer did not save a thumbnail in the file. Keep thumbnails switched on in the printer profile (they are on in the 3DISM profile).
Chapter 05
Controls
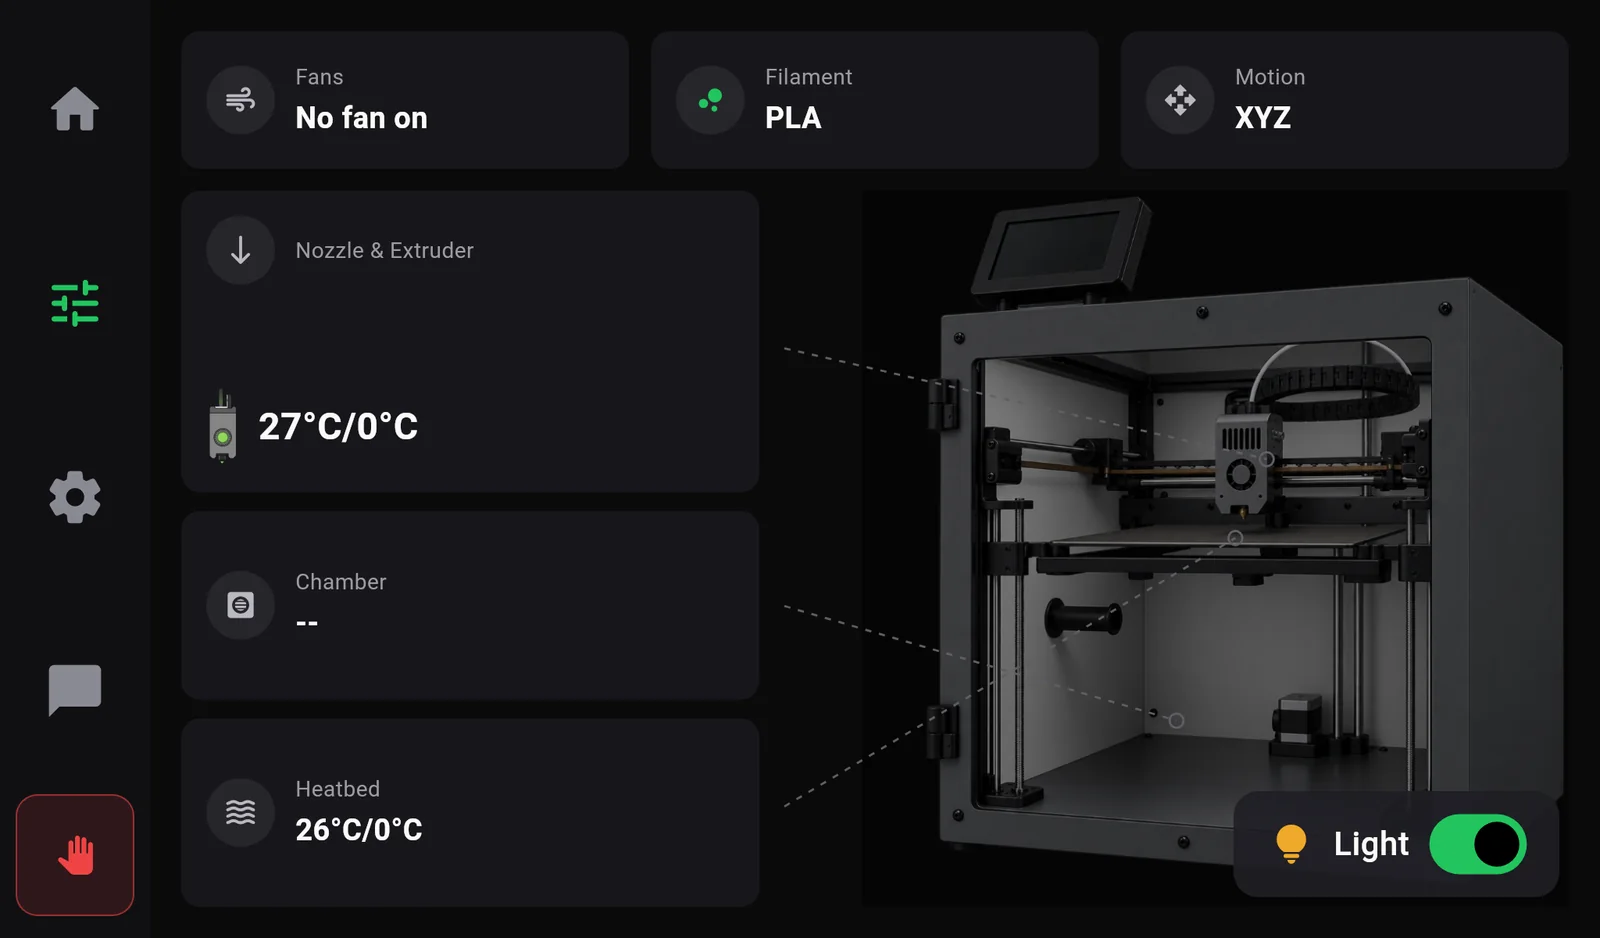
Controls is where you move the printer, heat it, run the fans, handle filament and switch the light. Open it with the icon. It is locked while a print is running; pause the print to use it.
 1
2
3
4
5
6
7
1
2
3
4
5
6
7
- Fans: part cooling fan speed. Tap for all fans.
- Filament: the loaded material, or Loading… / Unloading…. Tap to load, unload or edit.
- Motion: home and move the axes.
- Nozzle & Extruder: current / target nozzle temperature. The small print head lights up when filament is detected.
- Chamber: chamber temperature. Shows -- on machines without a chamber sensor.
- Heatbed: current / target bed temperature. Tap to set it.
- Light: switches the chamber light on and off.
Motion
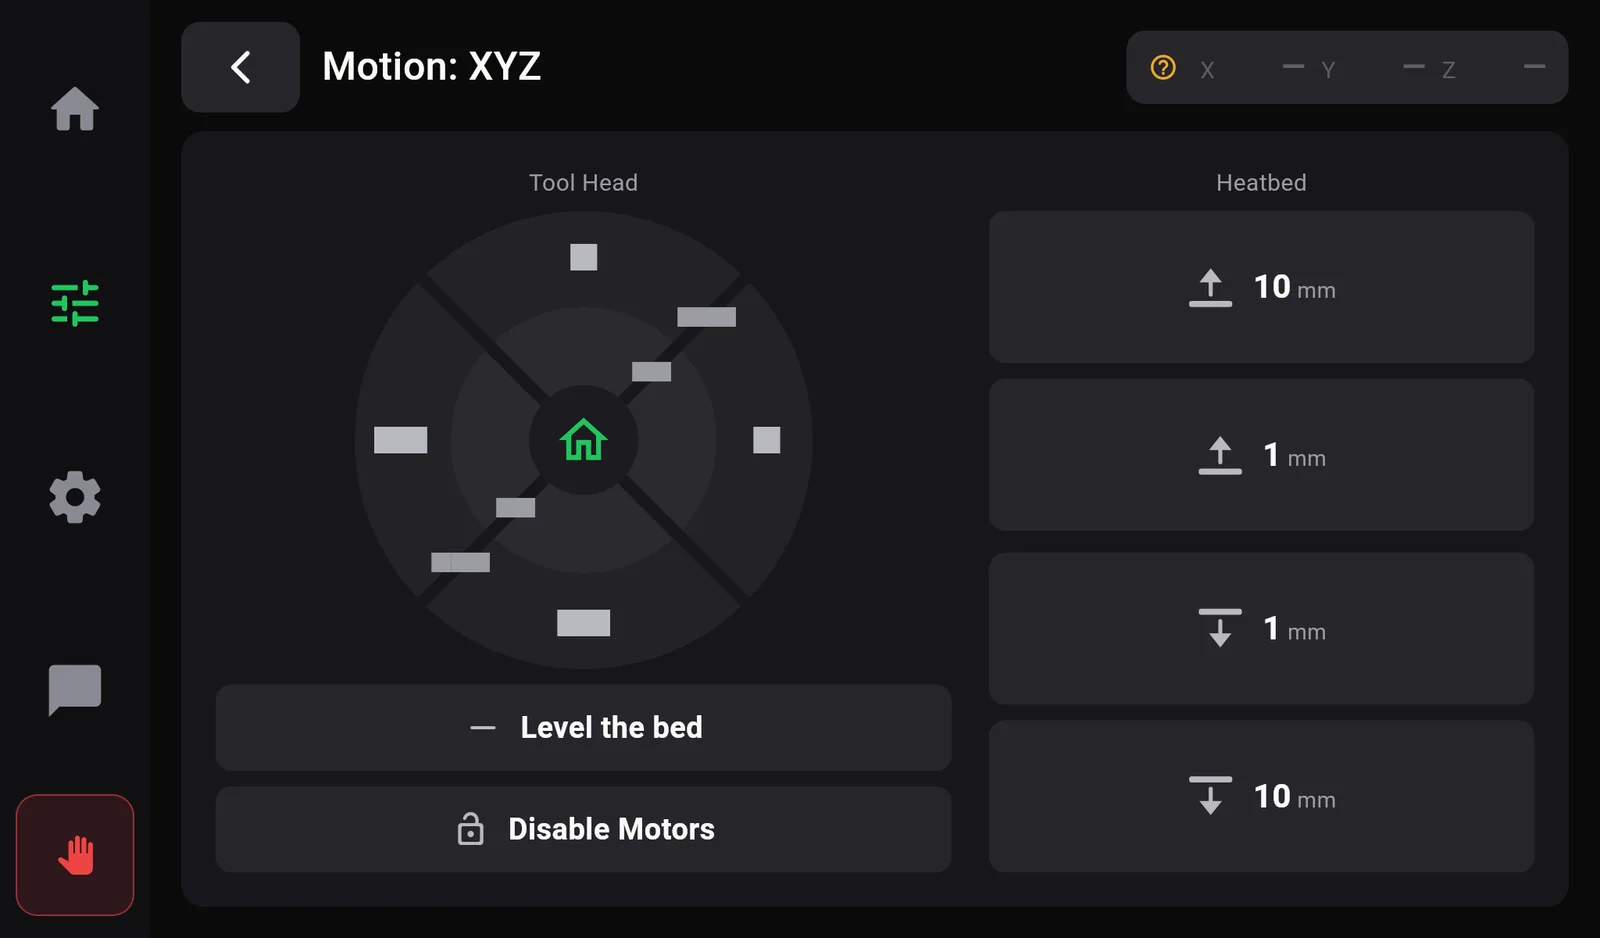
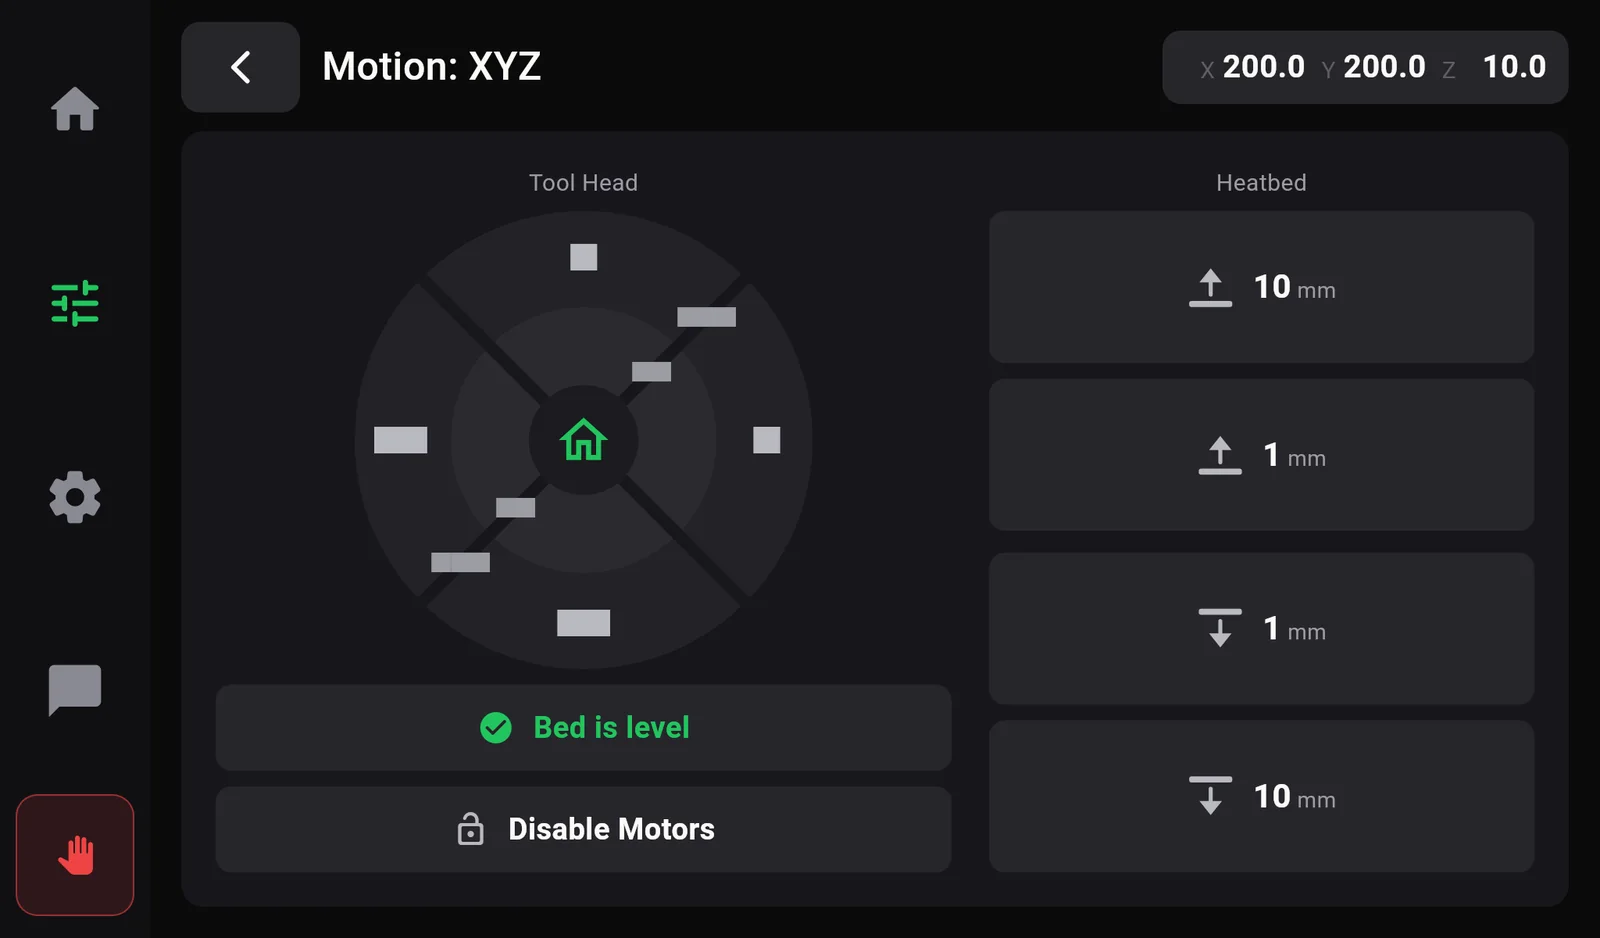
| Control | What it does |
|---|---|
| Position (top right) | Where the nozzle is, in millimetres. A dash means that axis has not been homed, so its position is unknown. |
| House in the middle of the pad | Home all. The printer finds the end of each axis. Do this before moving anything. |
| Inner ring of the pad | Move the print head 1 mm. Top = Y, bottom = −Y, right = X, left = −X. |
| Outer ring of the pad | Move the print head 10 mm in that direction. |
| Heatbed ↑ 10 mm, ↑ 1 mm | Move the bed up, towards the nozzle. |
| Heatbed ↓ 1 mm, ↓ 10 mm | Move the bed down, away from the nozzle. |
| Level the bed (Pro 400) | Homes if needed, then drives the two Z motors until the gantry is level with the bed (Homing…, Levelling…). Shows Bed is level until the next time the printer homes. |
| Disable Motors | Releases the motors so the print head can be moved by hand. The printer then forgets its position and must home again. |
With a print loaded (for example while paused), homing and moving the bed are refused because they would crash into the part: Not with a print on the bed. Moving the print head sideways is allowed, so you can move it out of the way. Disable Motors is refused too: Releasing the motors loses the homed position, so the print could not resume.
Nozzle & Extruder
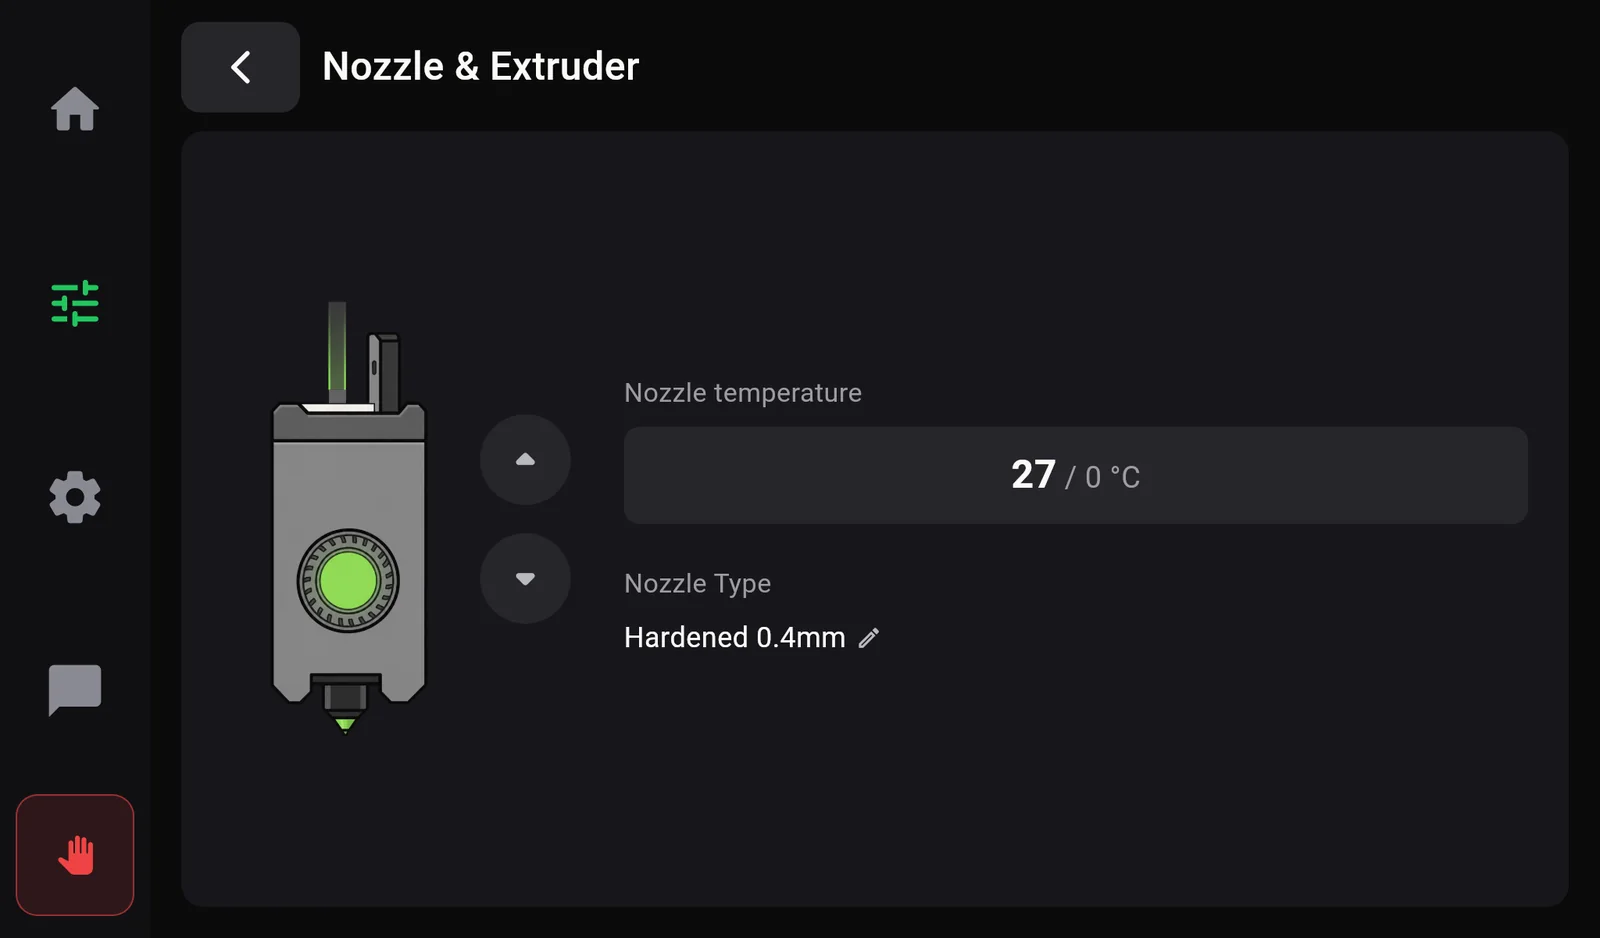
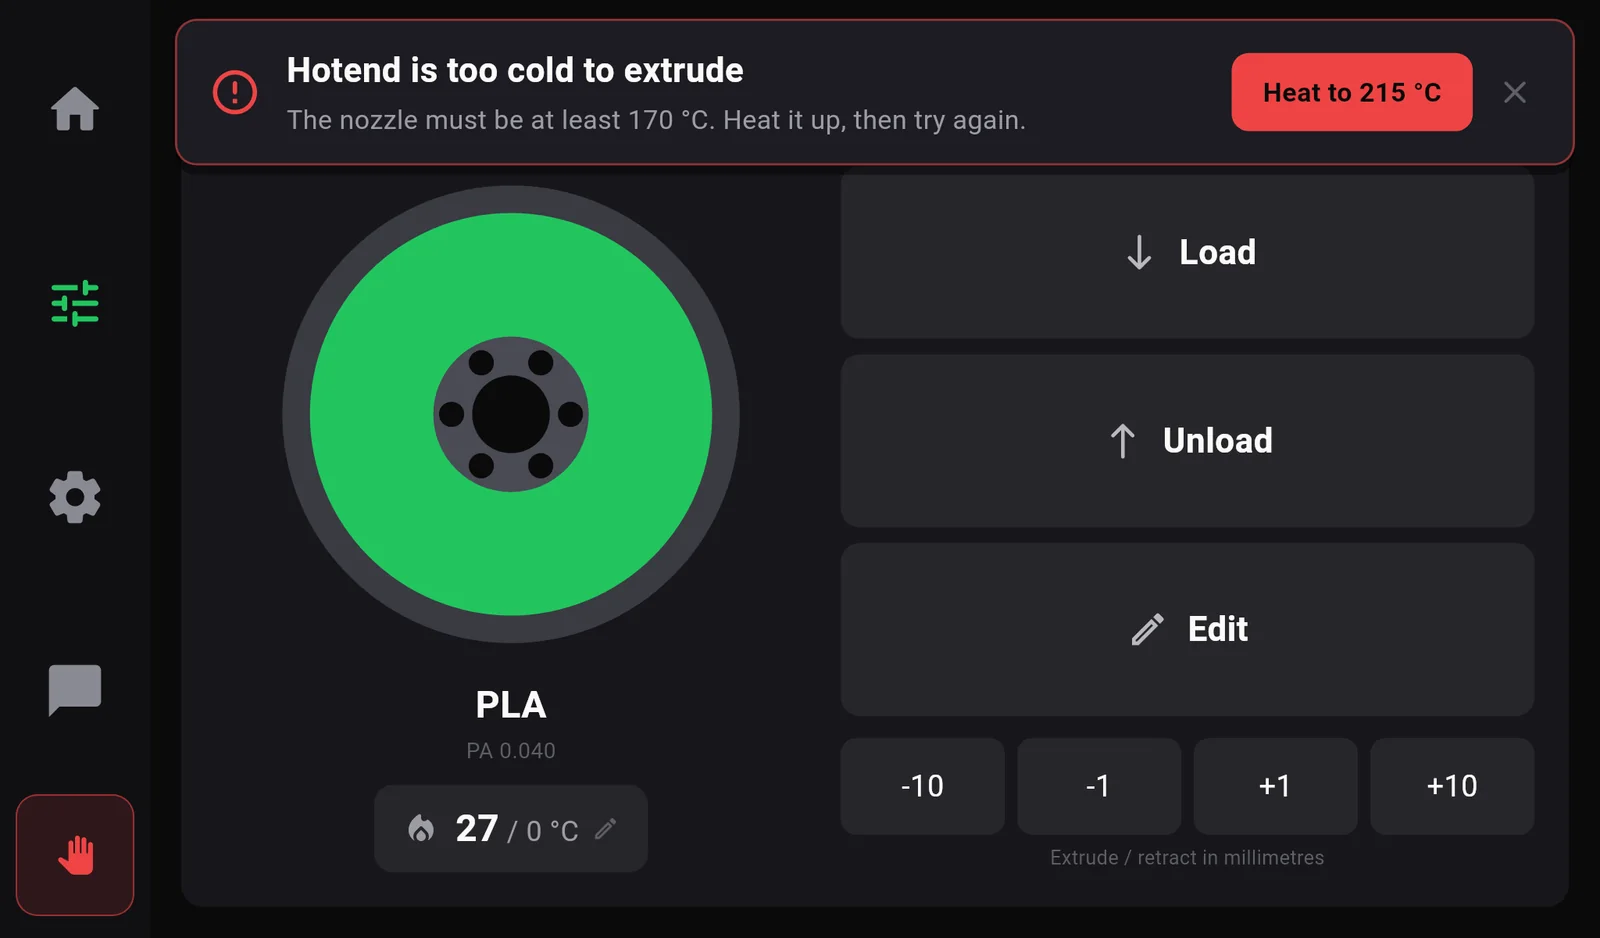
- ▲ / ▼ arrows pull the filament back or push it forward by 10 mm. The nozzle must be hot (at least 170 °C); otherwise the printer refuses with Hotend is too cold to extrude and offers to heat it.
- Nozzle temperature opens the keypad.
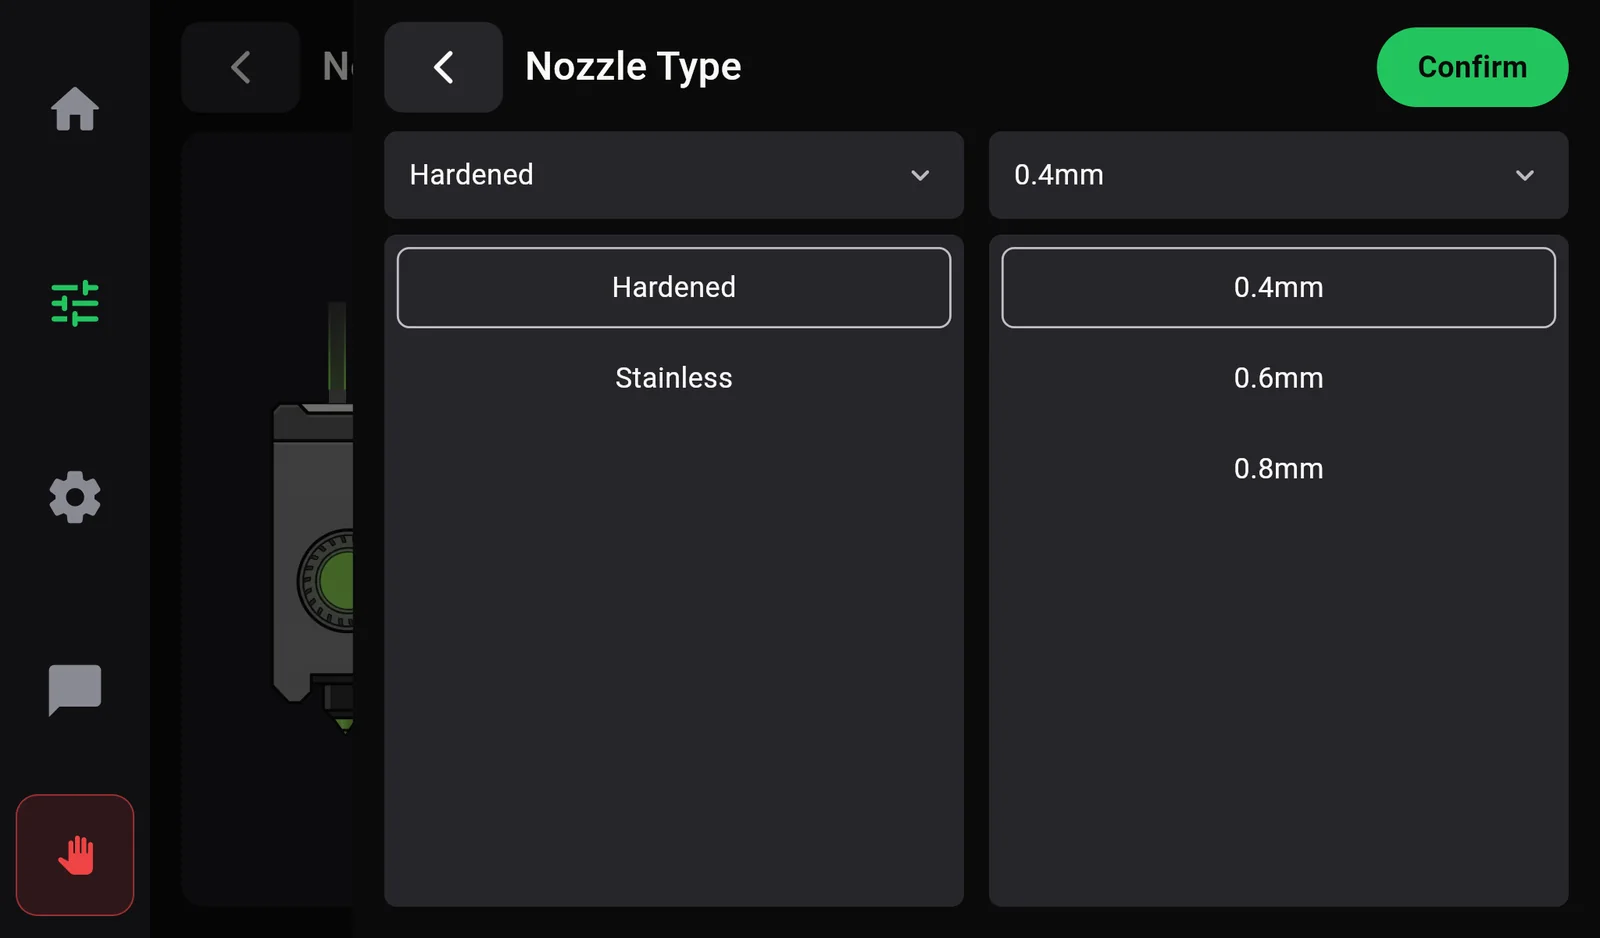
- Nozzle Type records which nozzle is fitted: Hardened or Stainless, 0.4mm, 0.6mm or 0.8mm. It is a label for your reference; it does not change how the printer prints and returns to Hardened 0.4mm after a restart. If you fit a different size, choose the matching printer profile in OrcaSlicer.
The temperature keypad
Every temperature on the screen opens the same keypad (nozzle, bed, and the temperatures on the print screen).
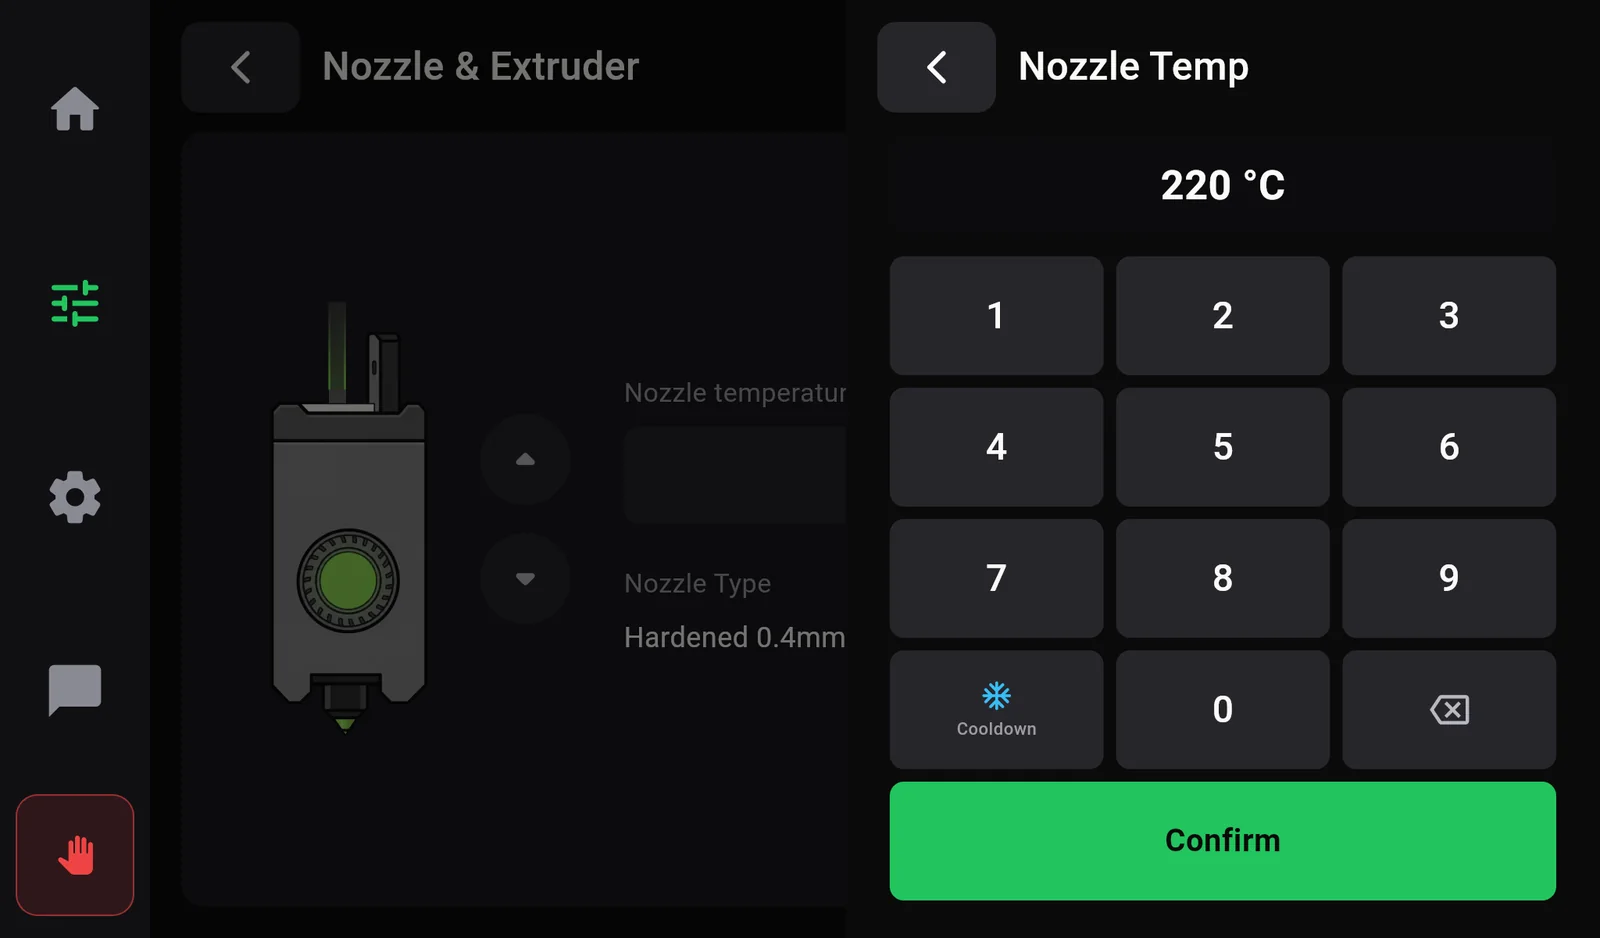
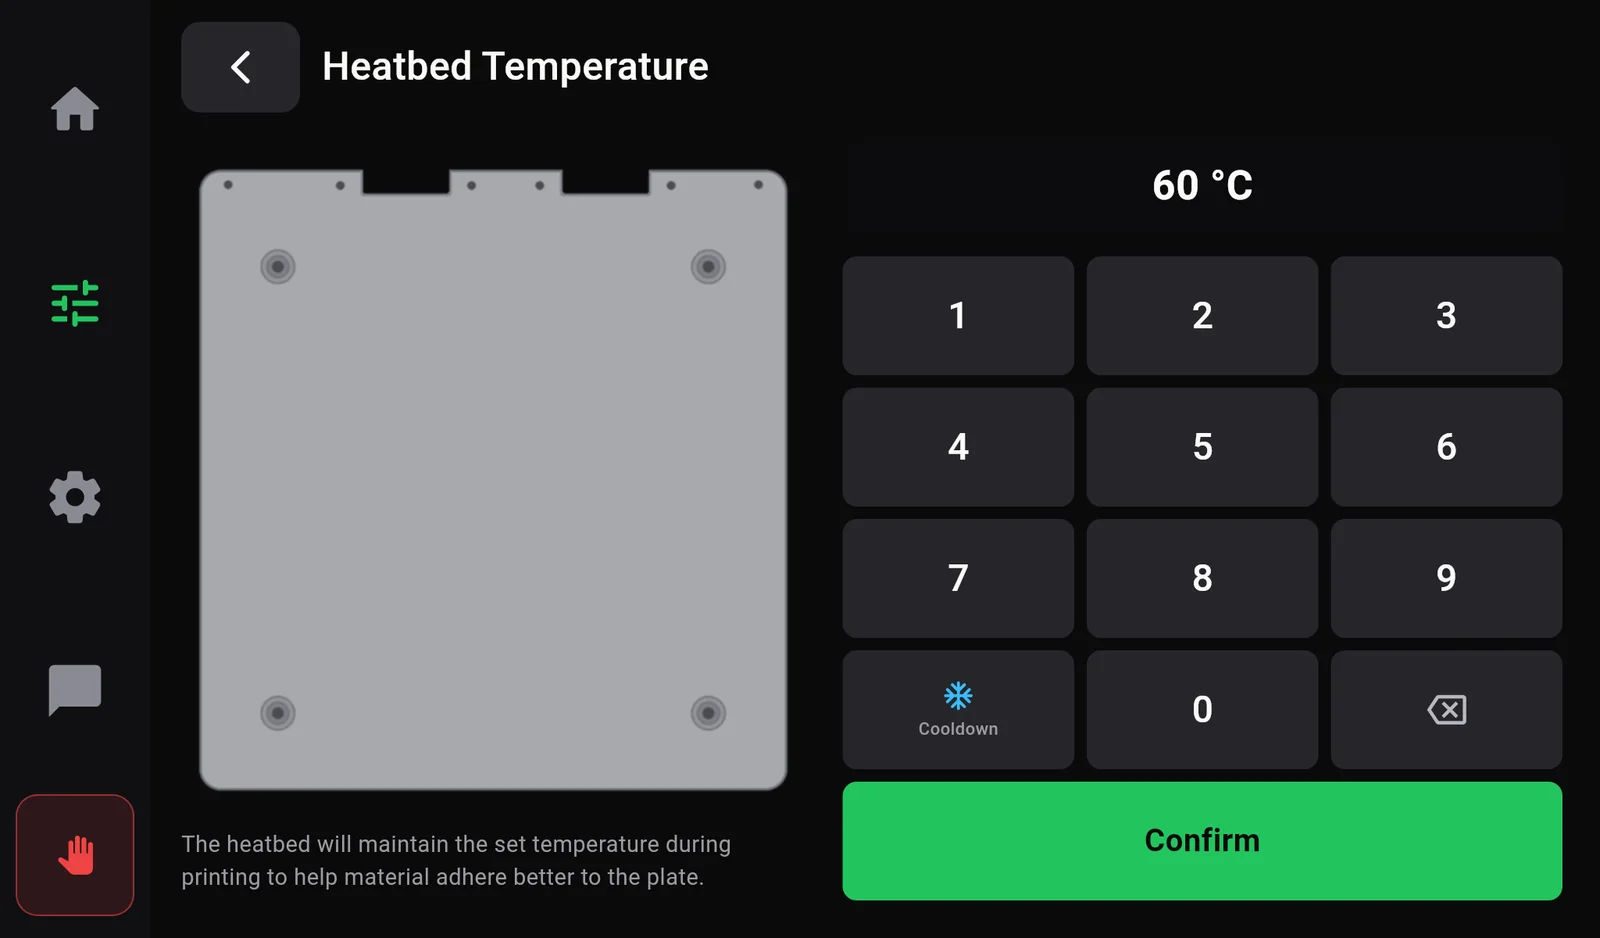
- The keypad opens with the current target. The first digit you press replaces it; then type up to three digits. ⌫ deletes the last digit.
- Confirm sets the temperature and closes the keypad. A value above the printer's limit is lowered to the limit.
- ❄ Cooldown switches that heater off. It is refused while a print is loaded.
- Closing the keypad without Confirm changes nothing.
Fans
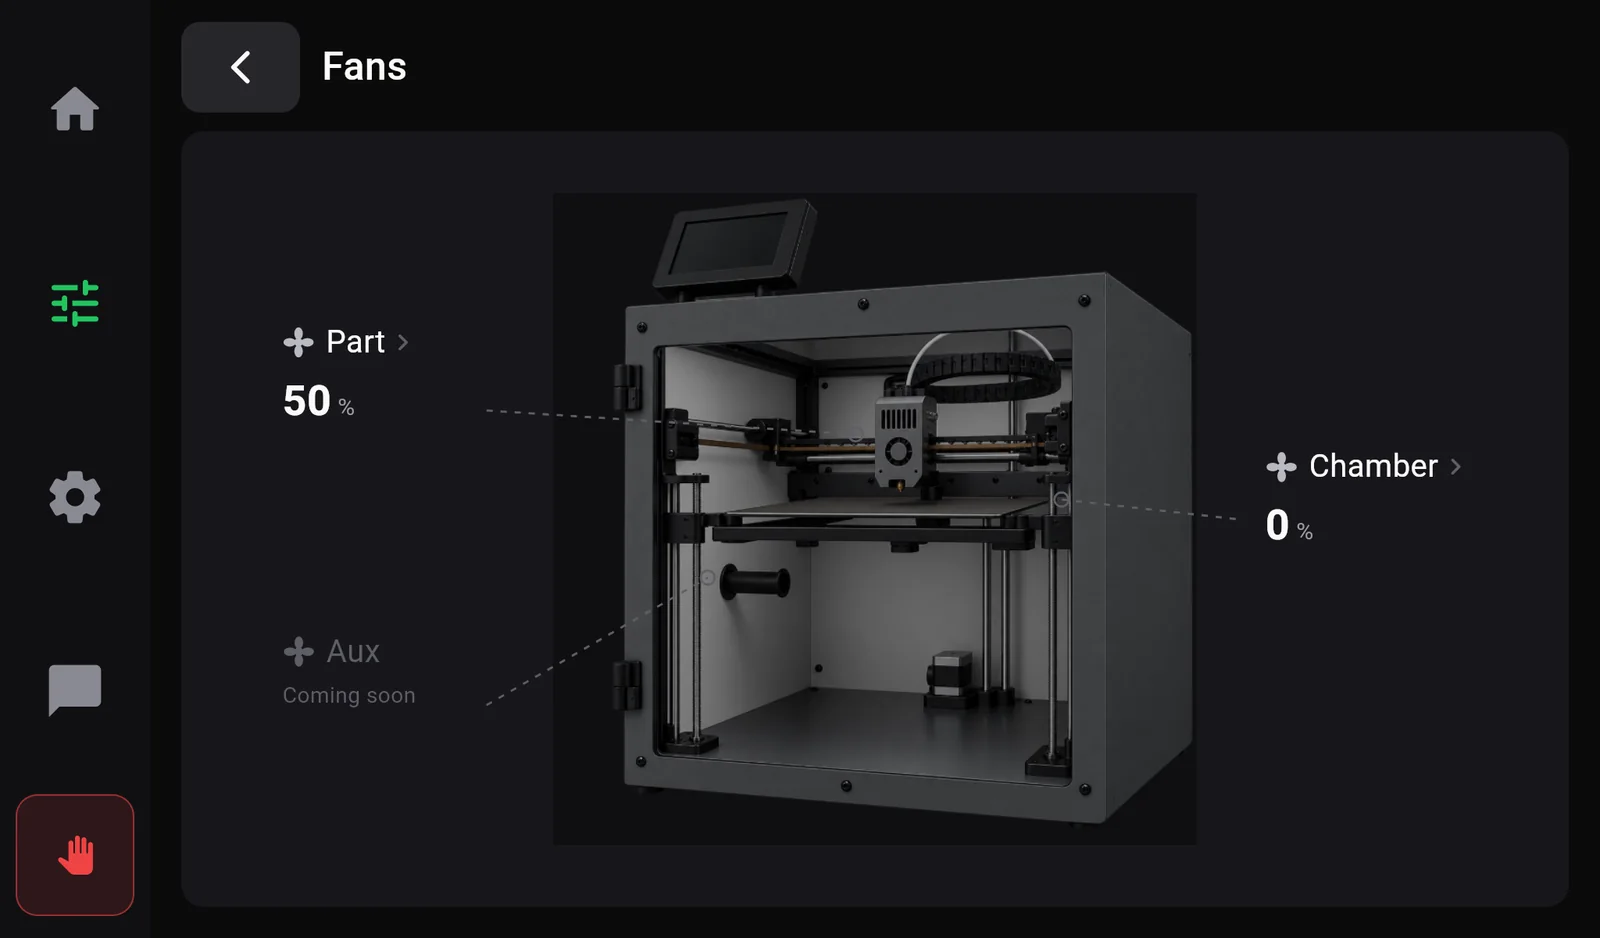
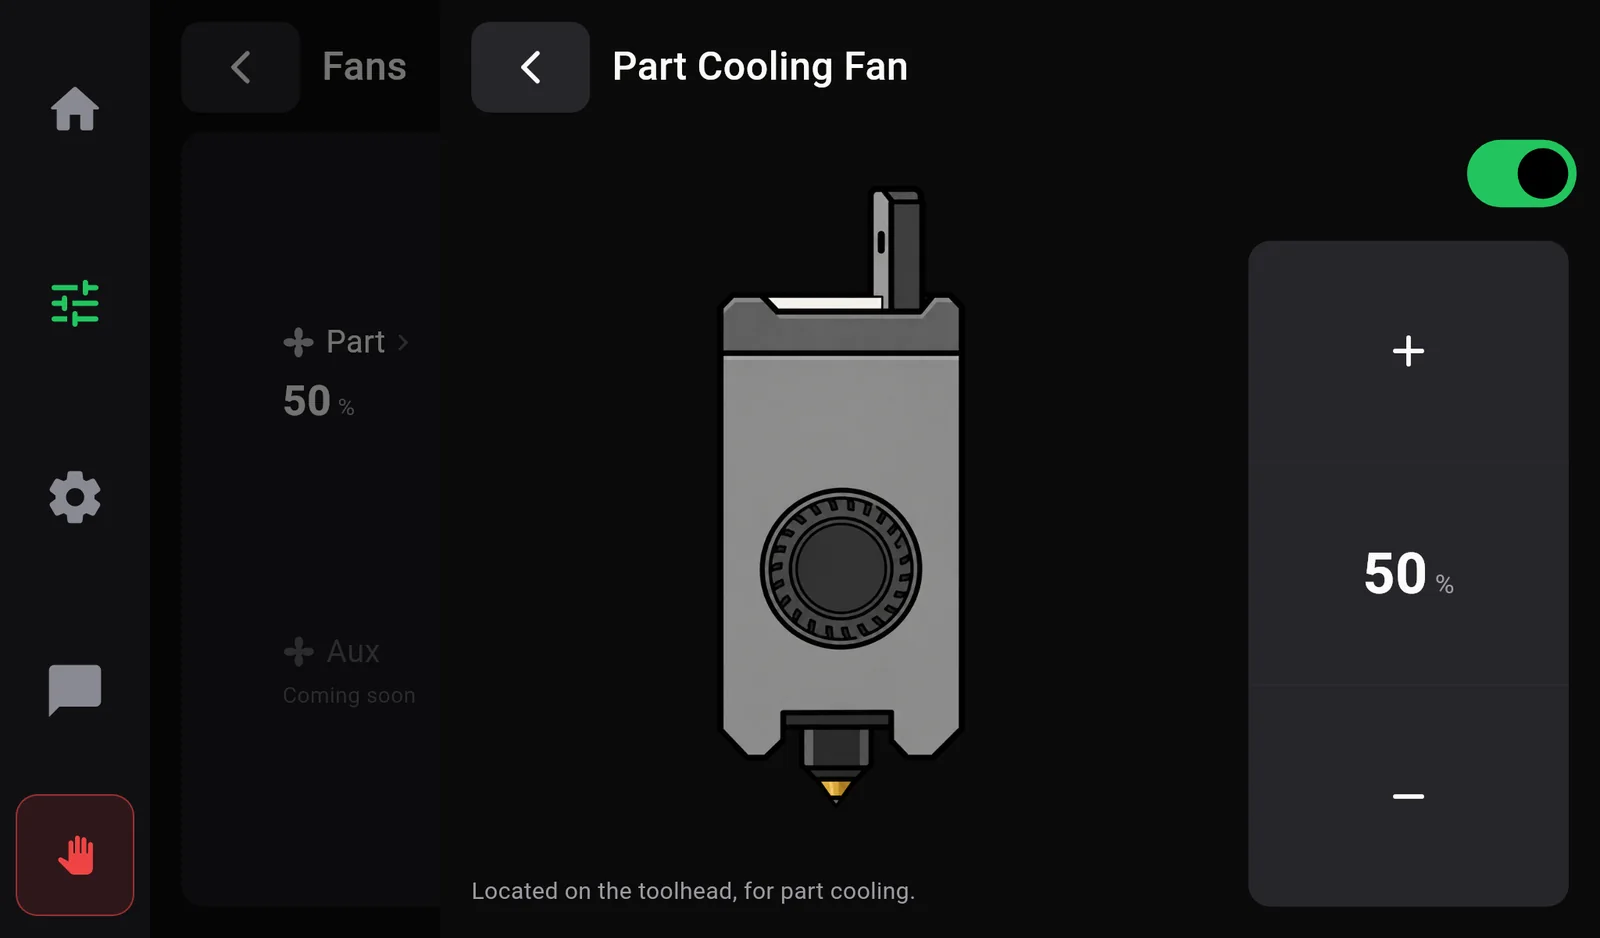
| Fan | What it does | Controls |
|---|---|---|
| Part | Located on the toolhead, for part cooling. Cools the plastic as it is laid down. | Switch: on = 100 %, off = 0 %. + / − in steps of 10 %. During a print the file also sets this fan. |
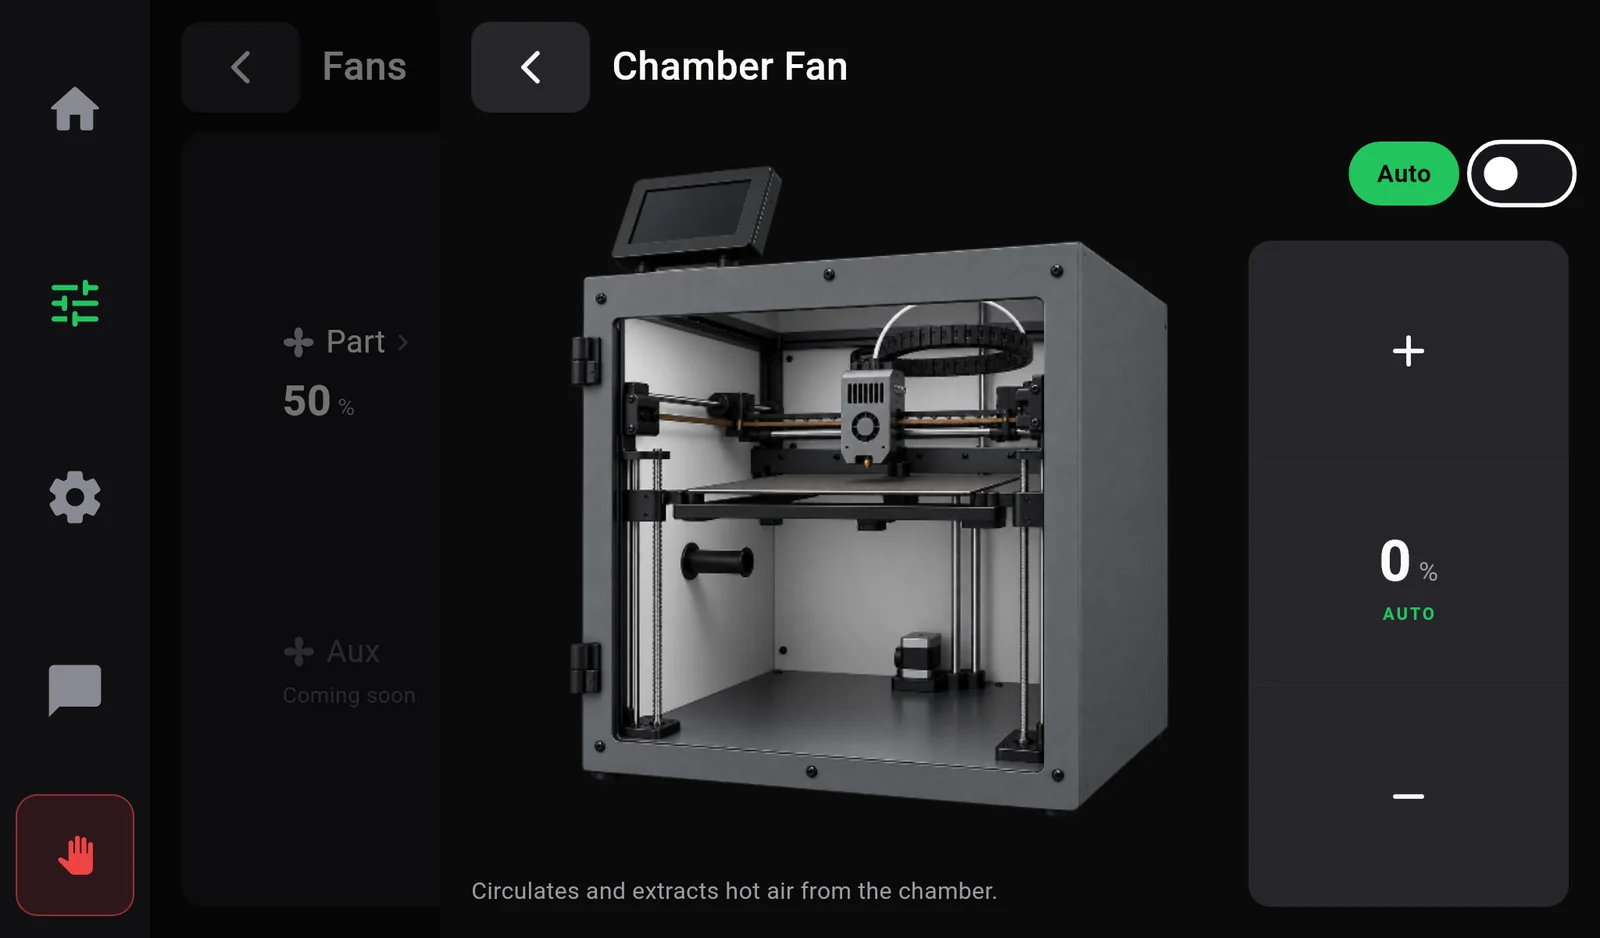
| Chamber | Circulates and extracts hot air from the chamber. | Auto: the printer runs it from the temperature. Any +, − or switch press sets a fixed speed (MANUAL); Auto hands it back. |
| Aux | Not in use yet (Coming soon). | — |
Filament
The Filament page loads and unloads filament and stores the filament profile: the material, its colour, the nozzle temperature used to load it, and its pressure advance.
- Load heats the nozzle to the profile temperature and pulls the filament in (step by step).
- Unload heats the nozzle and pushes the filament back out.
- −10 · −1 · +1 · +10 move the filament by that many millimetres: minus pulls it back, plus pushes it through the nozzle. The nozzle must be hot.
- The temperature pill under the spool heats the nozzle; its keypad starts at the profile temperature.
- While a print is running these buttons are greyed out: Filament actions are disabled while printing. Pause the print first.
Edit Filament
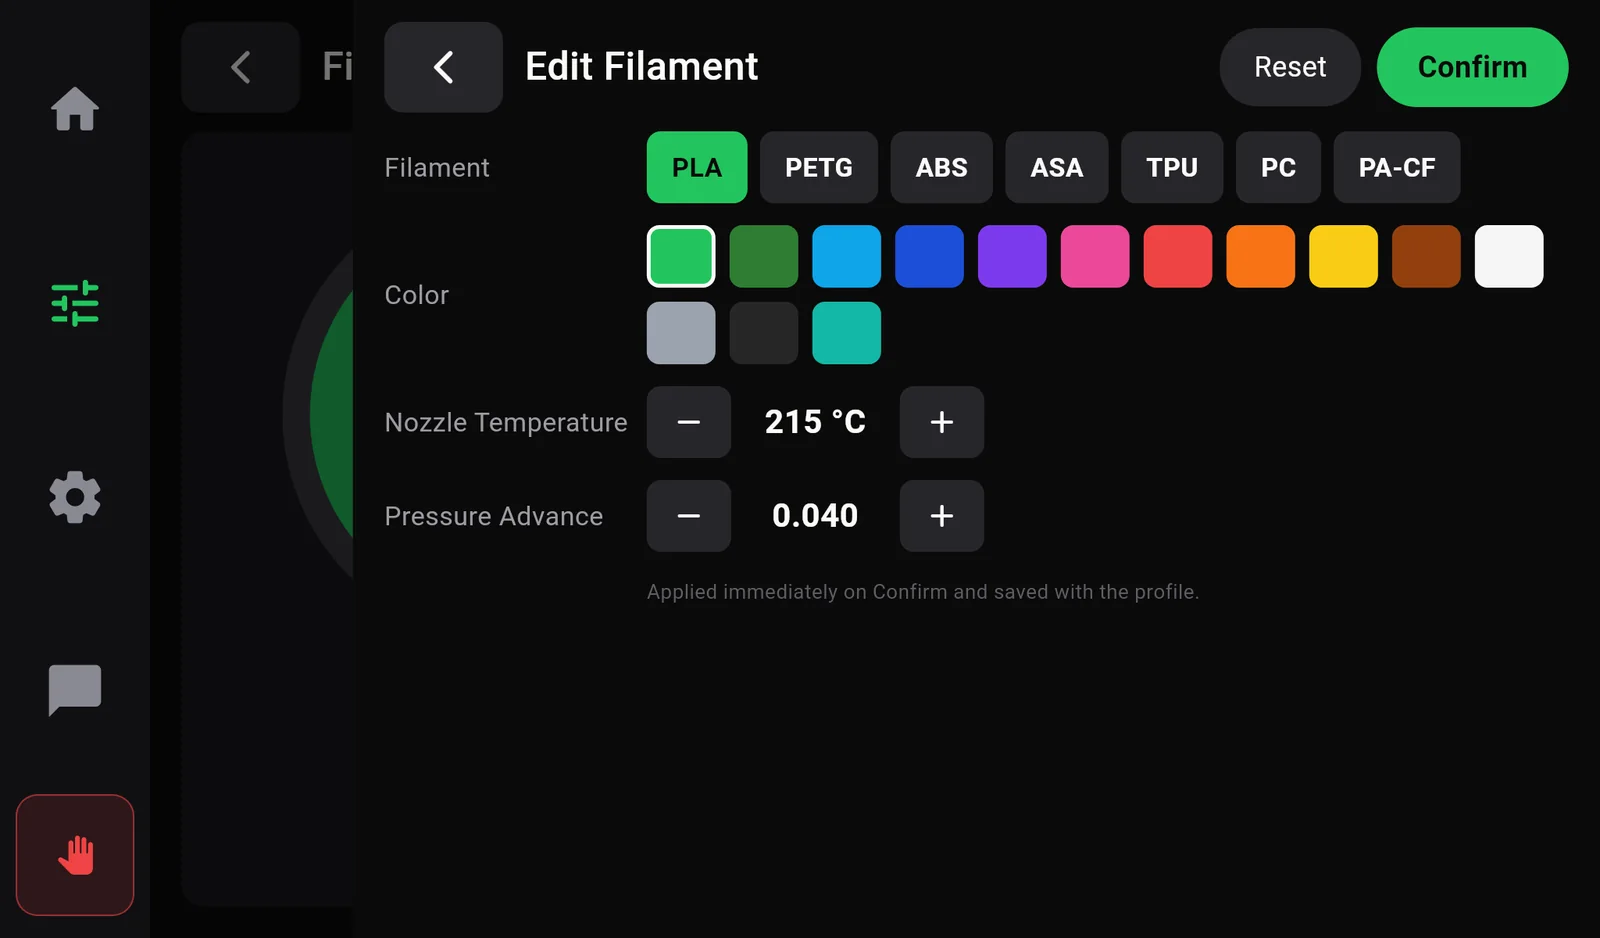
Choosing a material fills in its usual temperature and pressure advance. Reset restores those values for the selected material. Confirm saves the profile and sends the pressure advance to the printer at once. Closing without Confirm discards the changes.
| Material | Nozzle temperature | Pressure advance | Bed map measured at (Auto Bed Levelling) |
|---|---|---|---|
| PLA | 215 °C | 0.040 | PLA, TPU · bed 60 °C |
| PETG | 240 °C | 0.060 | PETG, ASA · bed 85 °C |
| ABS | 250 °C | 0.045 | ABS, PC · bed 105 °C |
| ASA | 255 °C | 0.045 | PETG, ASA · bed 85 °C |
| TPU | 230 °C | 0.900 | PLA, TPU · bed 60 °C |
| PC | 280 °C | 0.050 | ABS, PC · bed 105 °C |
| PA-CF | 270 °C | 0.060 | — |
The filament profile temperature is used for loading, unloading and the Heat to … °C button, and it is shown on Home. The print itself uses the temperatures in the sliced file, set in OrcaSlicer's filament profile.
Light
The Light switch on the Controls page turns the chamber light on and off.
Chapter 06
Settings, Toolbox and Machine Information
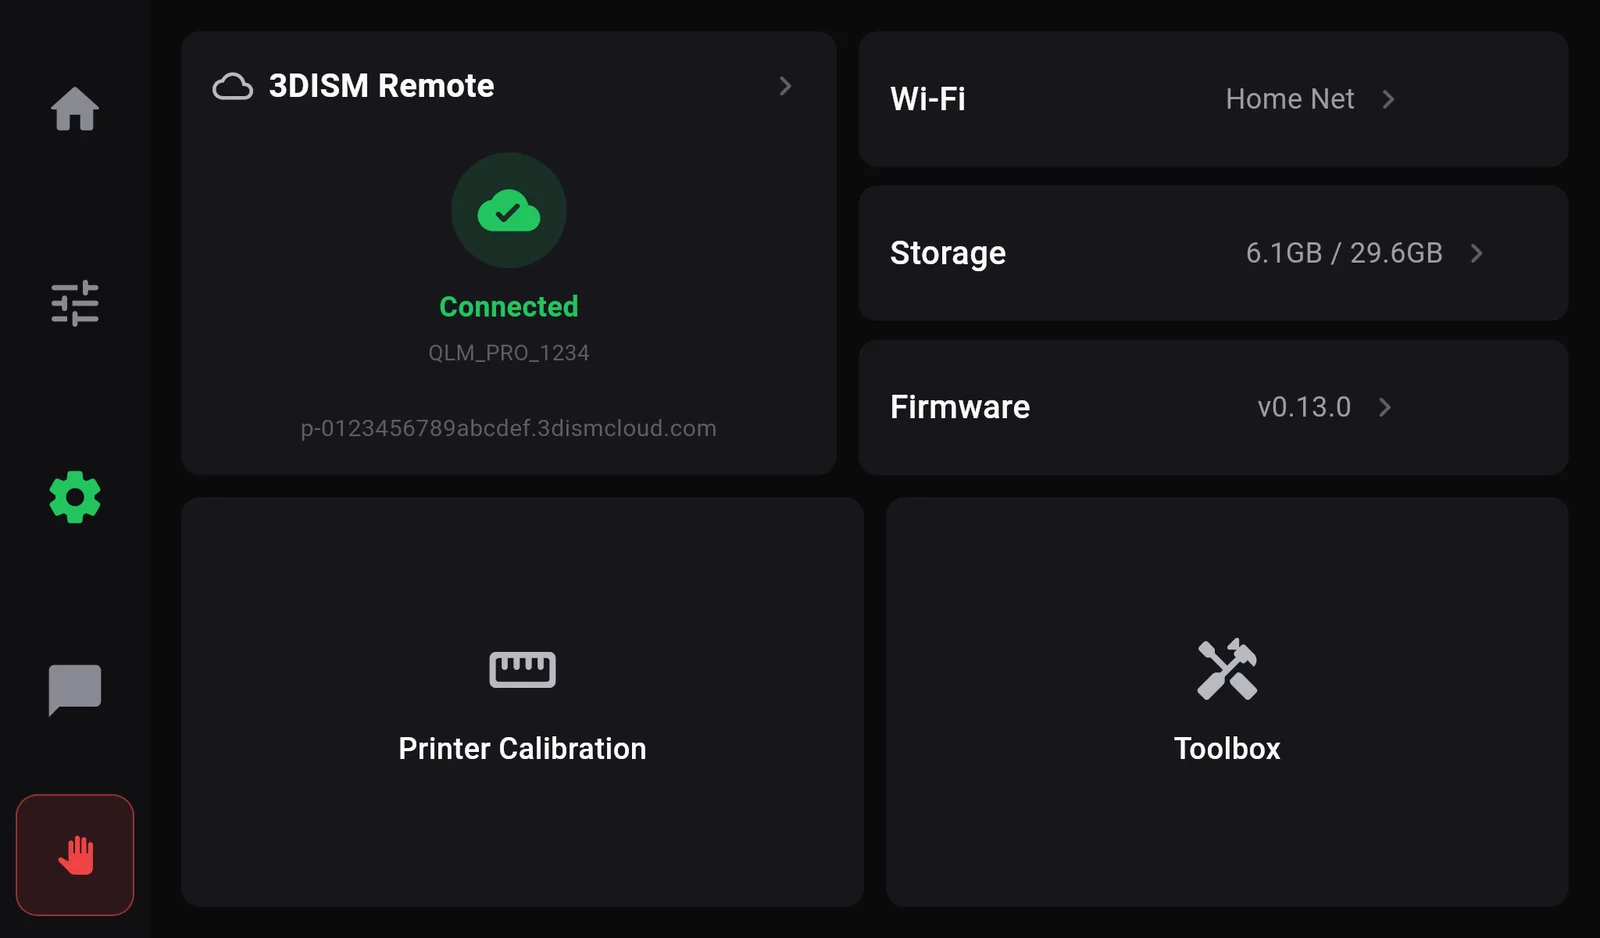
| Item | Shows / does |
|---|---|
| 3DISM Remote card | Connected, Installed, not connected or Not set up, with the serial number and remote address. Tap to pair (how). |
| Wi‑Fi | The current network. Tap to change it (how). |
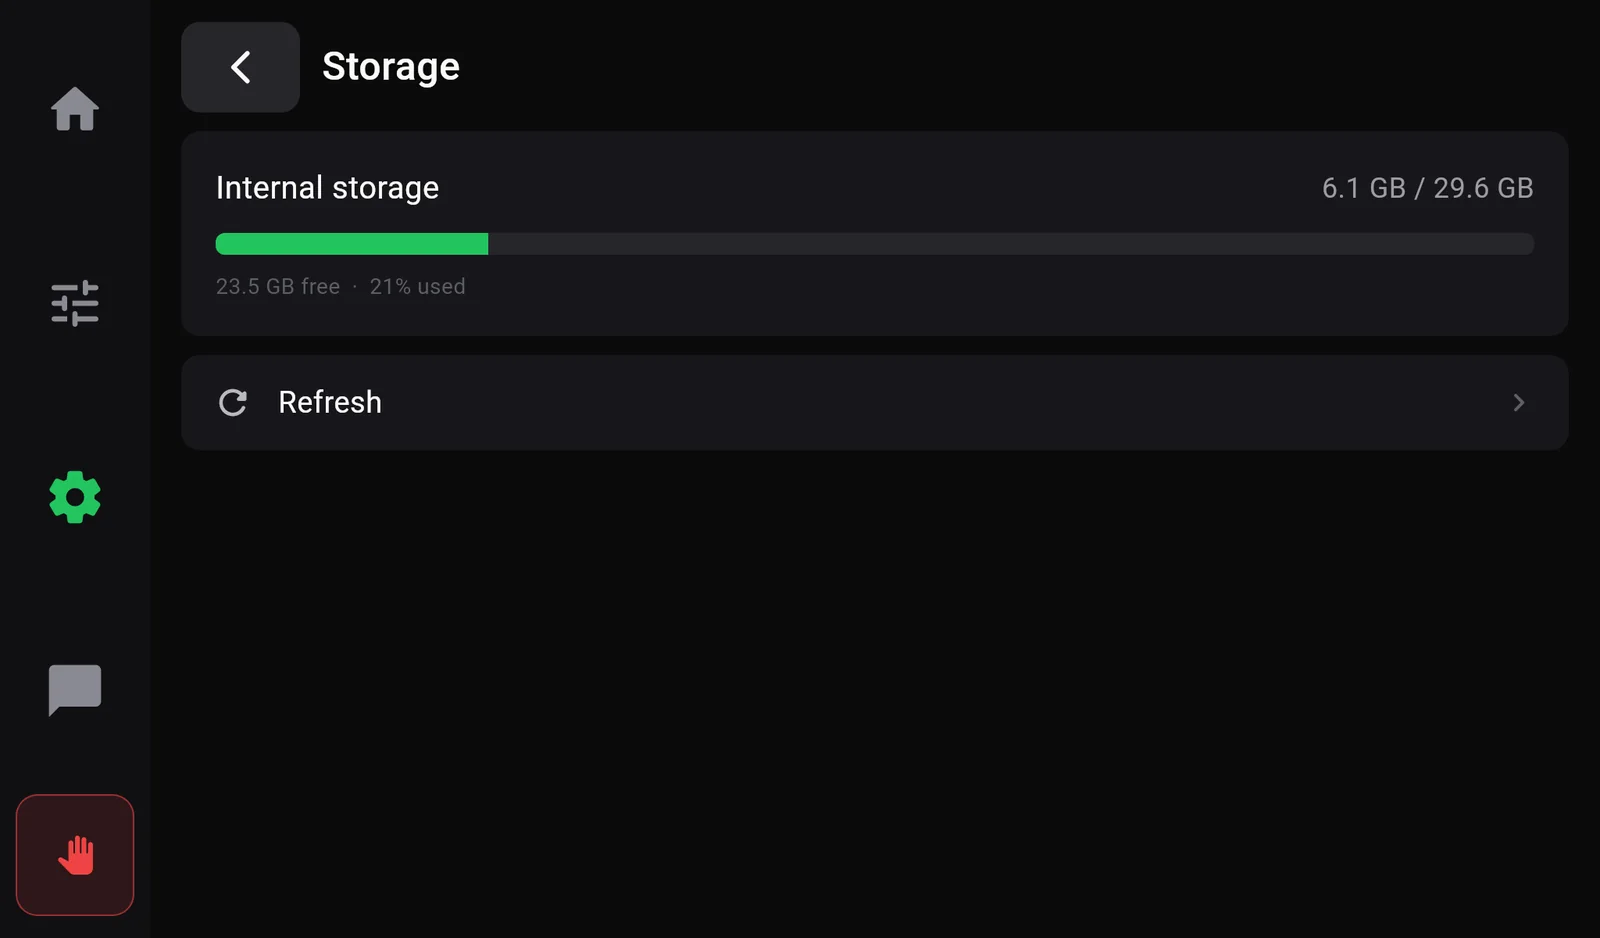
| Storage | Space used on the printer. |
| Firmware | Software versions, for 3DISM support. |
| Printer Calibration | Chapter 10. Not available while the printer is stopped by a fault. |
| Toolbox | Services, firmware restart, reboot. |
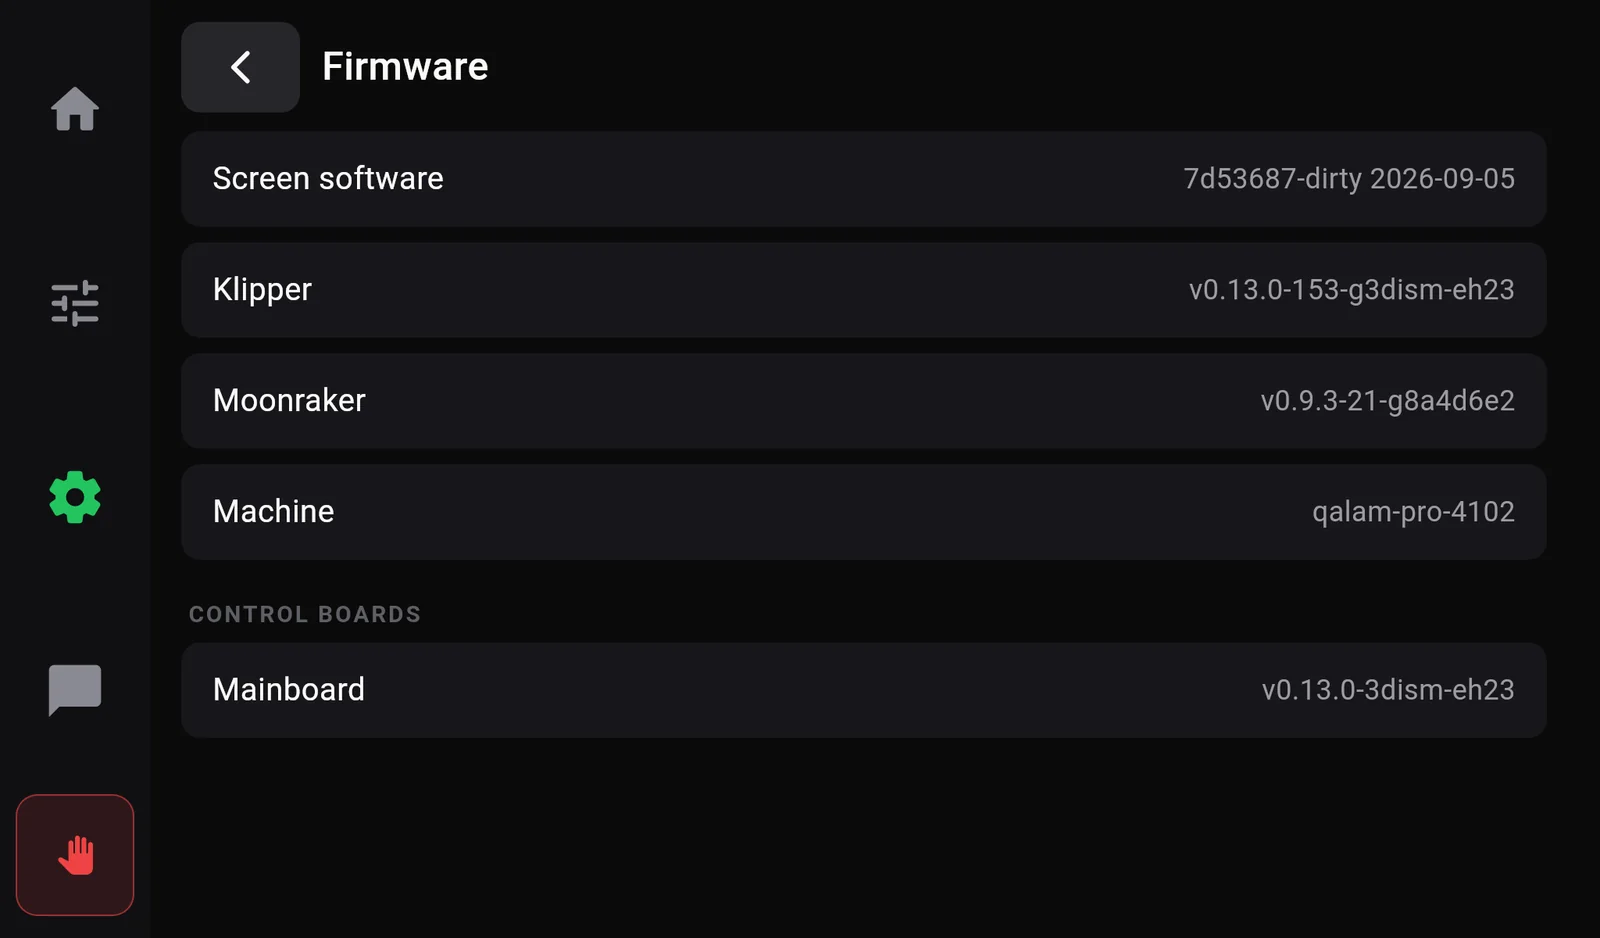
Software updates are installed by 3DISM; there is no update button on the screen.
Toolbox
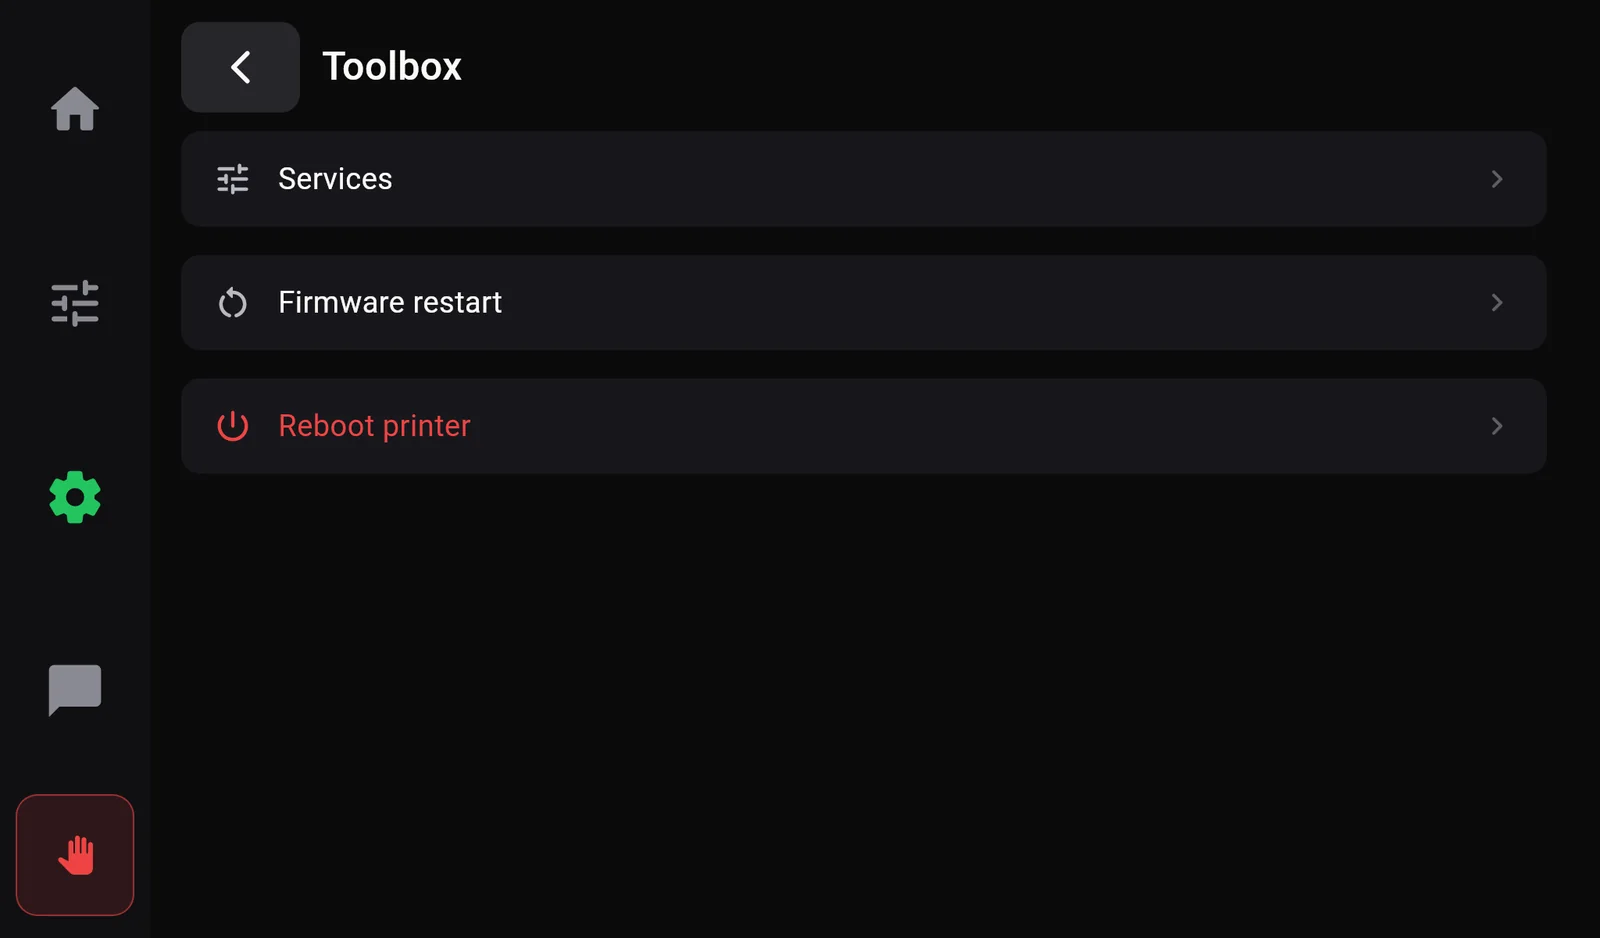
| Row | What it does | When to use it |
|---|---|---|
| Services | Lists the printer's background services and whether each is running. | Only when 3DISM support asks you to. |
| Firmware restart | Asks Firmware restart? — Klipper will reconnect to the control boards., then restarts the printer's control software. Reports Printer restarted when it is back. | After a fault, or when a message says Printer is shut down. |
| Reboot printer | Asks Reboot the printer? — The screen will restart., then restarts the whole printer, screen included. | When something is stuck and a firmware restart did not help. |
Both restarts are refused while a print is loaded (Not available with a print loaded), because they would end the job. They are allowed when the printer has already stopped with a fault.
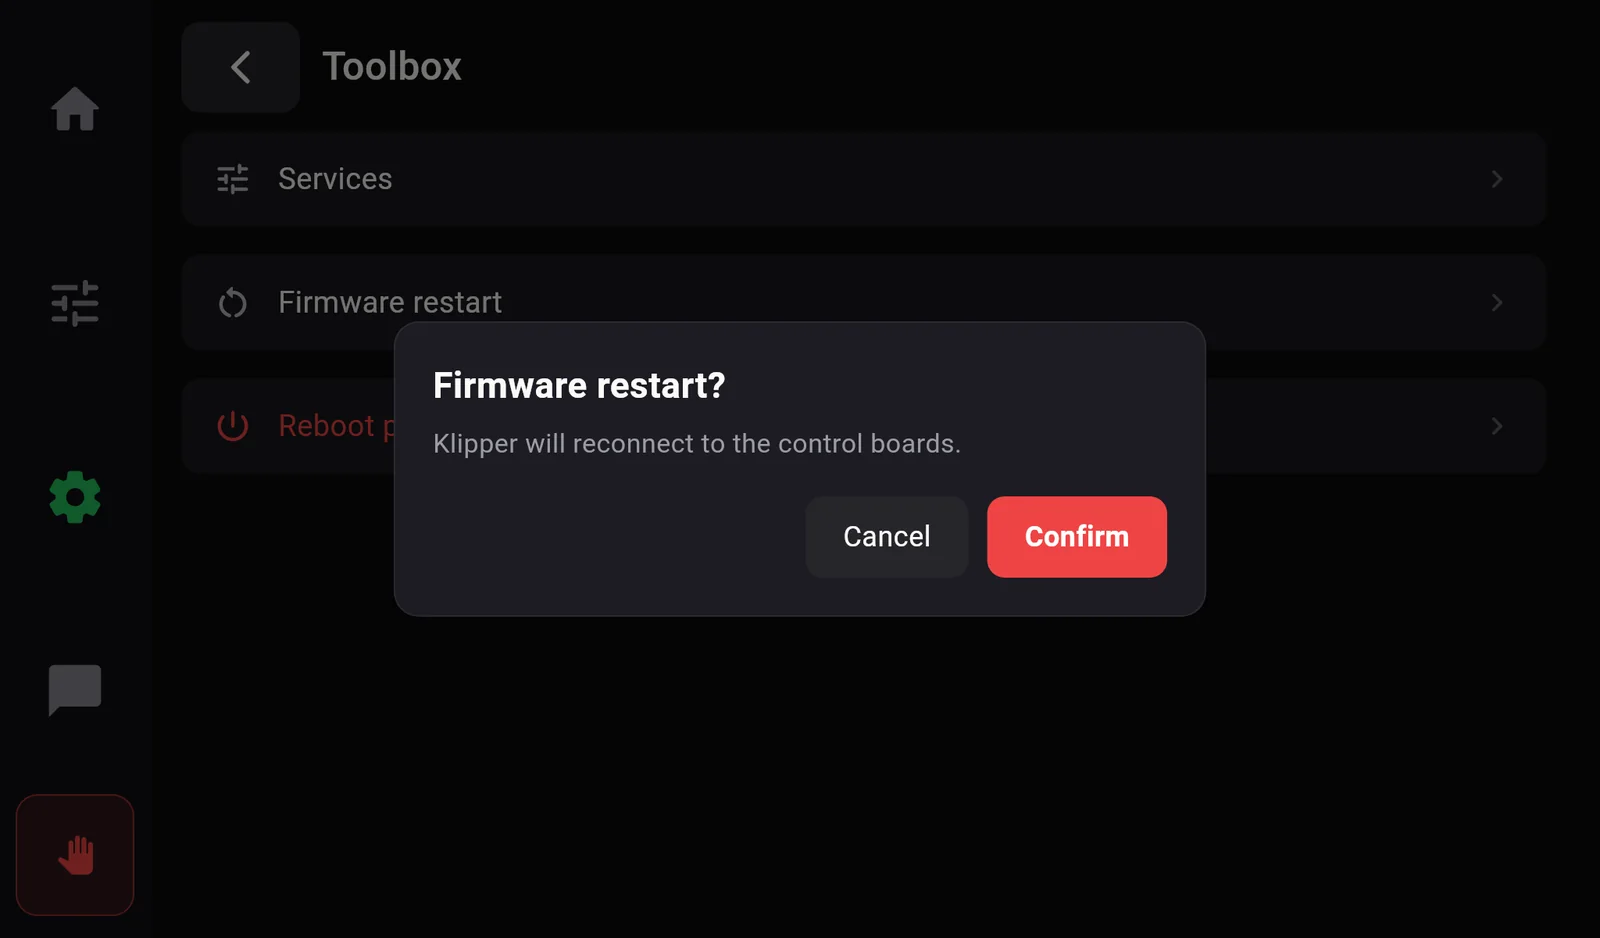
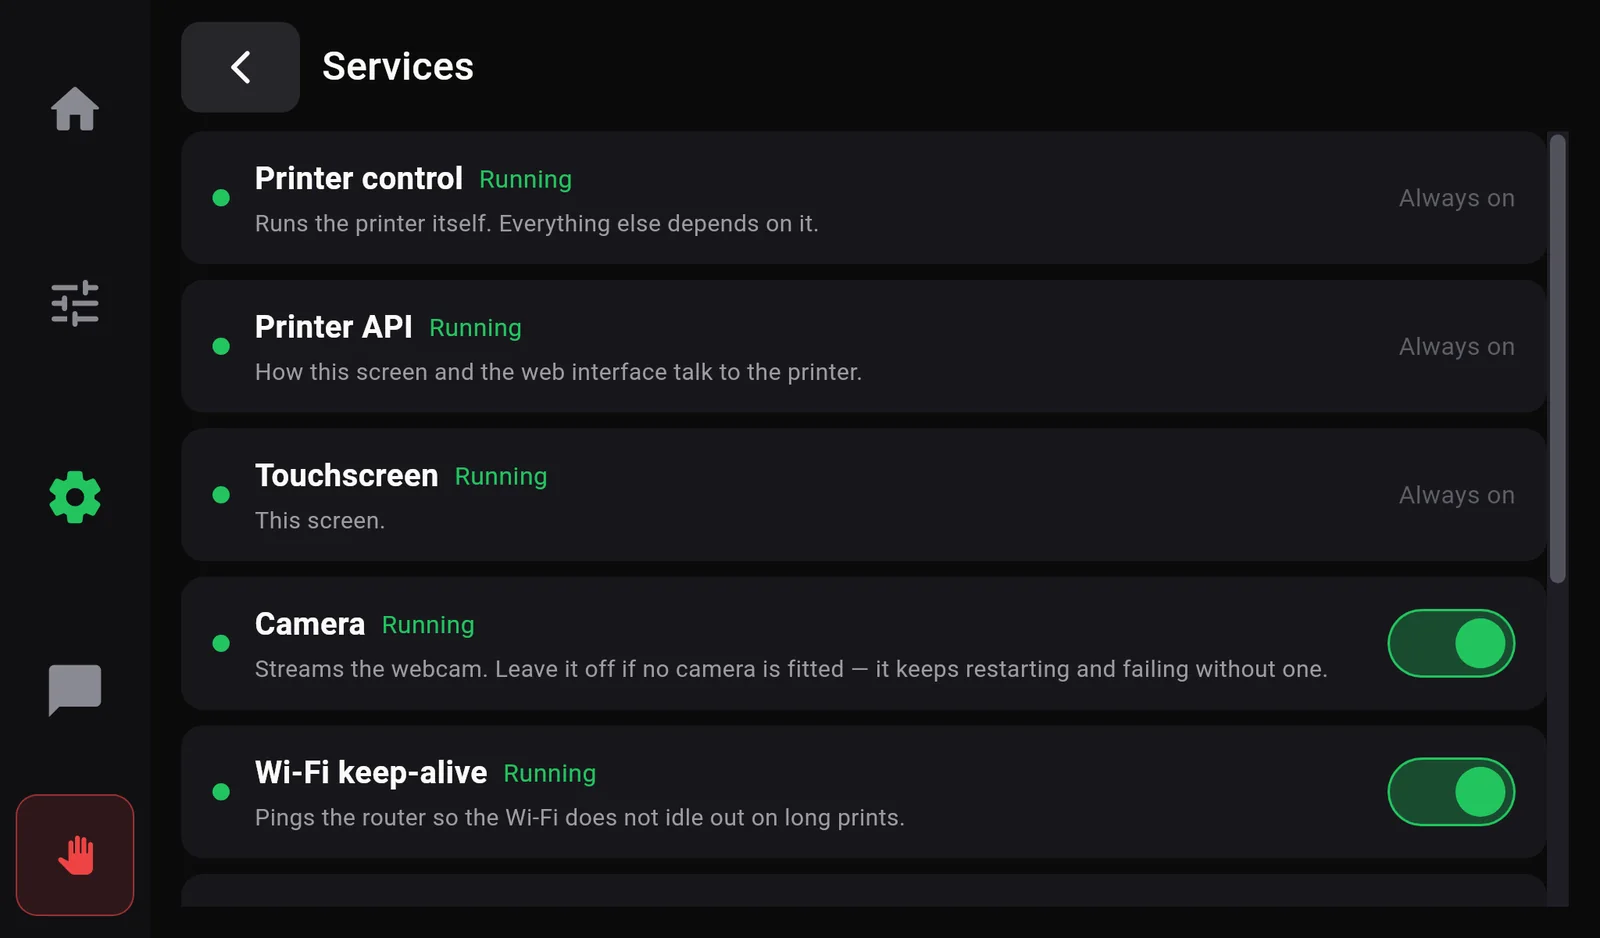
In Services, a green dot means running, grey means off and red means not working. Always on services cannot be switched off from the screen. If no camera is fitted, the Camera service can be switched off.
Machine Information
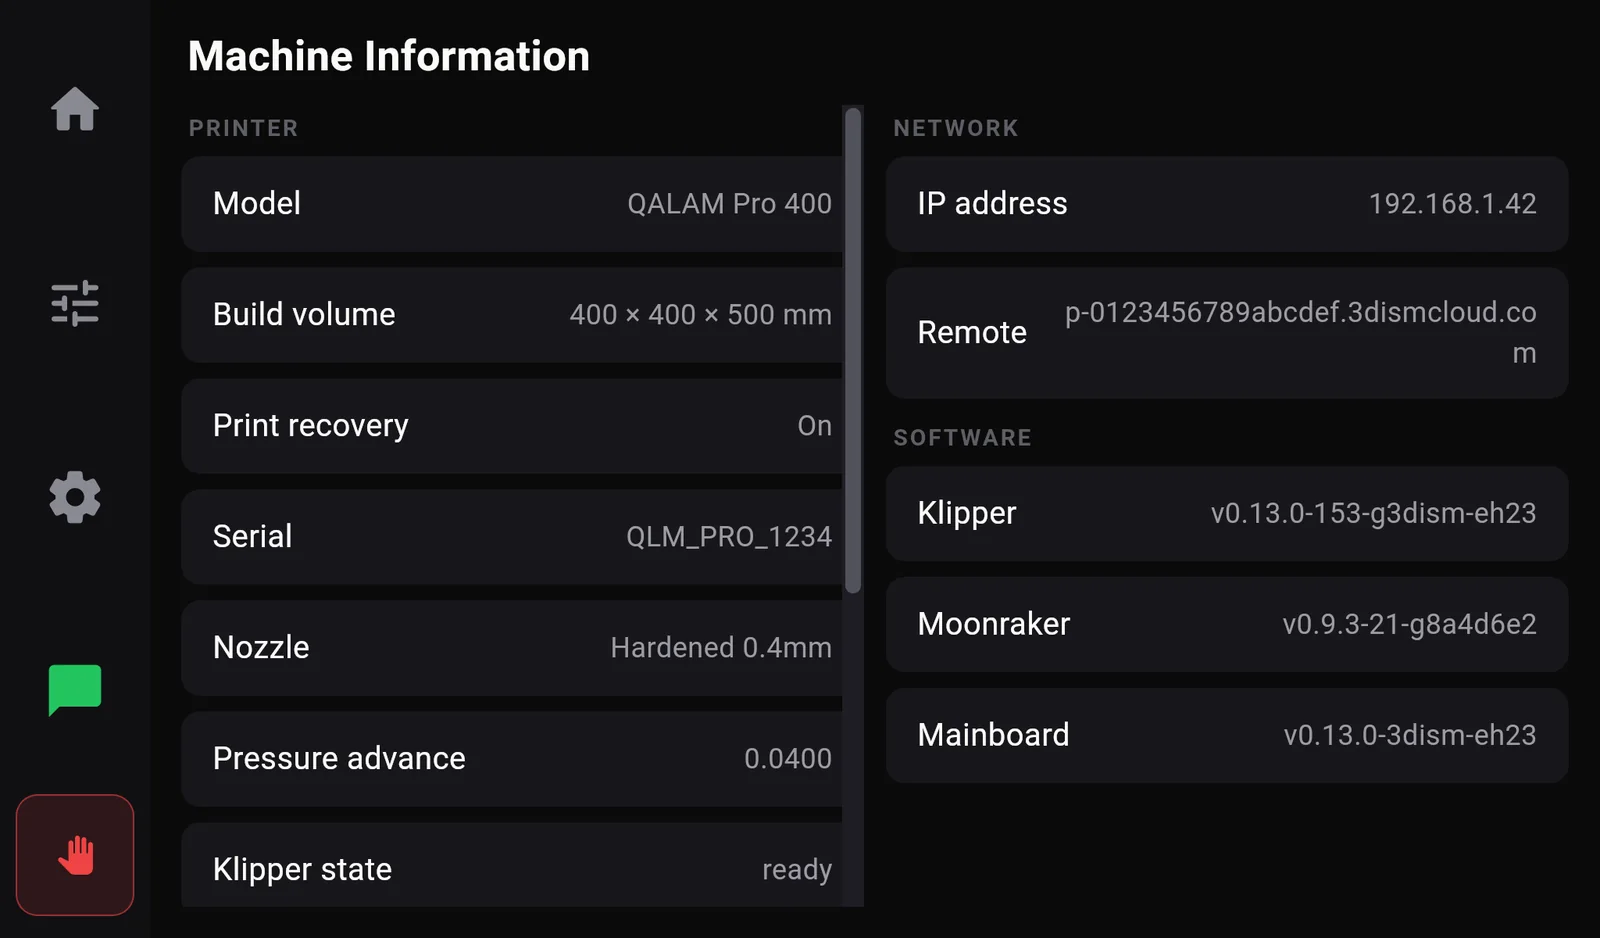 icon).
| Row | Meaning |
|---|---|
| Model | QALAM Pro 300 or QALAM Pro 400. |
| Build volume | The largest part the machine can print, in mm. |
| Print recovery | On: power-loss recovery is working. On (no chip): working, but saved to storage rather than to a recovery chip. Not fitted: not available on this machine. |
| Serial | The machine's serial number. Quote it when you contact 3DISM. |
| Nozzle | The nozzle type set in Controls. |
| Pressure advance | The value the printer is using now. |
| Klipper state | ready is normal. Other words (startup, shutdown, error) are for support. |
| USAGE | Total print time, number of prints, filament used (as a length) and the longest print. |
| IP address, Remote | The printer's network address and its 3DISM Remote address. |
| SOFTWARE | Versions of the printer software and control boards. |
If the machine is missing something its model normally has, an amber note says so, for example Expected on a QALAM Pro 400 but missing from this machine's configuration: … Contact 3DISM support.
This page is read when the screen starts. If the network came up later, the IP address may show a dash; the Wi‑Fi page always shows the current address.
Chapter 07
Where to find it
| I want to… | Go to |
|---|---|
| Start a print | Home›Print Files›file›Print |
| Print from a USB stick | Print Files›USB Drive |
| Adjust the first layer during a print | Fine Tune›Closer to bed / Further from bed |
| Change print speed or flow | Fine Tune (while printing) |
| Skip one failed part | Print screen › tap the picture › tap the part |
| Pause, resume, cancel | Print screen, bottom row |
| Load or change filament | Controls›Filament |
| Heat the nozzle or bed | Tap a temperature on Home, or Controls›Nozzle & Extruder / Heatbed |
| Turn heaters off after a job | Home › the amber Heater on … tap to cool line |
| Home or move the axes | Controls›Motion |
| Level the bed | Settings›Printer Calibration›Auto Bed Leveling |
| Adjust the bed corner knobs | Printer Calibration›Bed Leveling Corners |
| Join Wi‑Fi, find the IP address | Settings›Wi‑Fi |
| Pair with 3DISM Remote | Settings›3DISM Remote |
| Resume after a power cut | Print Files›Recovery |
| Restart the printer software | Settings›Toolbox›Firmware restart |
| Serial number, versions | Info, and Settings›Firmware |
| Stop everything now | Hold the red hand for ¾ second |