Walkthrough · 01
Calibrate bed mesh
Get a perfect first layer at any bed temperature
Aluminium build plates aren't perfectly flat — most bow by tens of microns as they heat. A bed mesh maps that bow at a specific temperature so the toolhead can follow the surface during the first layer instead of crashing through it. 3DISM stores three meshes — one for each temperature range — and auto-picks the right one when a print starts.
Open Bed Mesh from the More menu
From the home screen tap More → Bed Mesh. You'll land on a panel with three temperature-range cards: 60 – 80 °C for PLA / TPU, 80 – 100 °C for PETG / ASA, and 100 – 120 °C for ABS / PC. Each card stores its own mesh profile.
Cards with a green border + a green saved dot already have a profile. Cards without are blank — calibrate those before printing in that material range.
Tip. Re-mesh after physical work on the printer — new build plate, swapped probe, removed and reseated the bed. Once a year on a stable machine is usually plenty.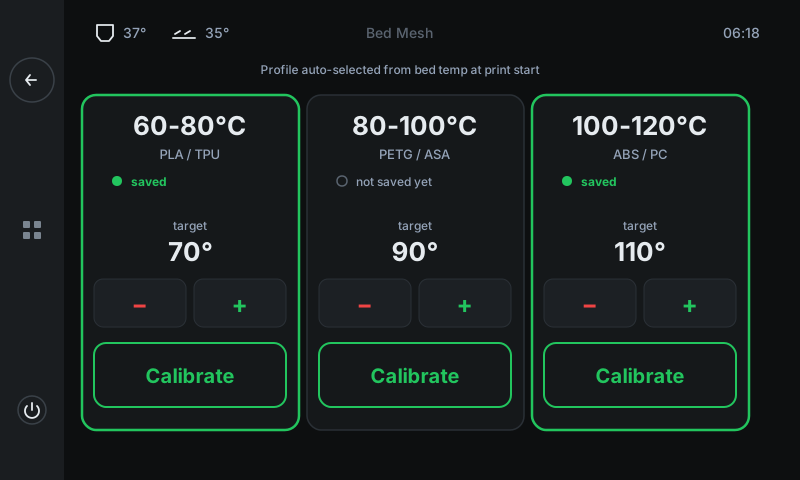 12345
1234560 – 80 °C card — Mesh for PLA / TPU prints. Green border = profile saved. Tap Calibrate to (re)measure at this card's target temperature.
80 – 100 °C card — Mesh for PETG / ASA. The grey border + 'not saved yet' note tells you this profile is missing — calibrate it before your first PETG print.
100 – 120 °C card — Mesh for ABS / PC. Worth re-measuring whenever you swap to a new build plate.
Target temperature — The exact bed temperature the mesh will be measured at. Use ± to tweak inside the range (most users leave it at the default).
Calibrate button — Starts the full measure cycle: heat → home → probe a grid of points → save as a profile named after this card's range.
Start the calibration
Tap Calibrate on whichever range you want to measure. The panel switches to a running view showing live progress through the cycle:
• HEATING — bed heats to the target. Bigger temperatures take longer (ABS at 110°C can be a 5-minute wait).
• HOMING — toolhead finds X, Y, and Z reference points.
• PROBING GRID — touches the bed at ~25 points to map the surface.
• SAVING — fires SAVE_CONFIG to commit the profile, then the printer reloads Klipper.
Total time: ~5 minutes per mesh. The screen returns to the main panel automatically when done — you'll see the freshly-saved card now has a green border.
Heads up. Don't touch the toolhead or bed while the mesh is probing — bumping it offsets the entire mesh by however much you moved it.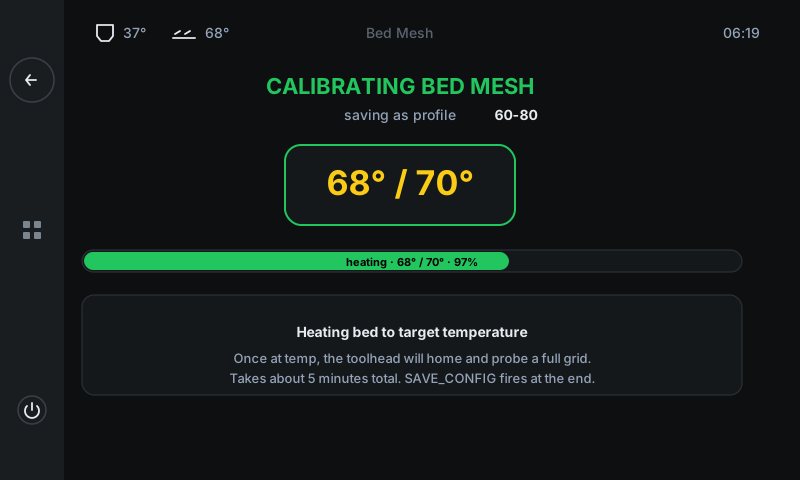 1234
1234Phase title — What stage of the cycle we're in. Goes through HEATING → HOMING → MEASURING → SAVING → COMPLETE. The line below it names the profile that will be saved.
Live bed temp — Current / target bed temperature. Yellow while heating, green when at target and ready to probe.
Progress bar — Percentage through the current phase. Updates once per second.
Phase explanation — Plain-language description of what the printer is doing in the current phase, plus what comes next.
Profiles are auto-selected at print start
Once you've saved meshes for the temperatures you print at, you don't need to do anything else. When a print starts, the slicer's bed-temperature line tells 3DISM which range it falls into, and the matching profile loads automatically.
Bed at 65°C → 60-80 profile loads.
Bed at 90°C → 80-100 profile loads.
Bed at 110°C → 100-120 profile loads.Tip. If no profile matches the print's bed temperature, the printer falls back to a flat plane (no compensation). Your first layer will still print — it just won't track surface bow. Calibrate the matching range when you can.