Walkthrough · 01
Your first print
From the home screen to a finished part
This walkthrough takes you from the moment you turn the printer on to watching your first part come out of the chamber. We'll cover what the home screen shows you, how to pick a file, and what to look for once the print starts.
The home screen
When the printer boots, you land on the home screen. It's your main dashboard. Six big tiles cover everything you'll do day-to-day, and a strip of live temperatures sits across the top so you can glance at the heaters from any panel.
Pick a tile and tap it. There's no menu diving — every common task is one tap from here.
Tip. The Wi-Fi tile is the fastest way to switch networks if you move the printer to a new room or take it to a client.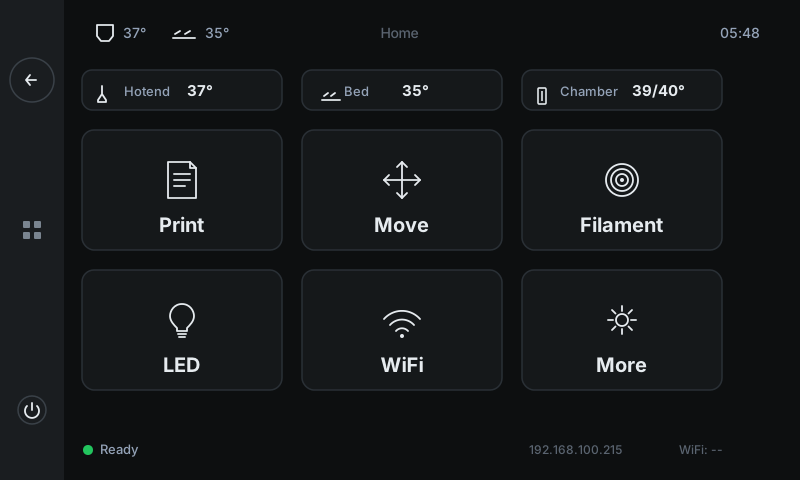 123456
Live temperatures — Hotend, bed, and chamber actual / target. Stays visible across every panel so you always know where the heaters are.
Print — Opens the file browser. Pick a G-code file from the printer's storage to start a job.
Filament — Guided load / unload. The printer heats the hotend automatically and walks you through each step.
More — Less-frequent controls — bed mesh, fans, input shaper, info, system settings.
Side panel — Back, open the quick-action menu, and power off. Available from every screen.
Status row — Current printer state, LAN IP address, and Wi-Fi signal. Glance here to confirm the machine is reachable.
Pick your file
Tap Print to open the file browser. Every G-code file you've uploaded to the printer appears here as a card with a preview thumbnail, file size, and the date you added it. Most-recent goes first, so the part you just sliced is right at the top.
Tap a card to begin the print. The printer will home, heat the hotend and bed to the temperatures baked into the file, and run a small purge line at the edge of the build plate before the first layer.
Tip. Slice with your colour / material thumbnails turned on in OrcaSlicer — they make picking the right file at the machine much faster.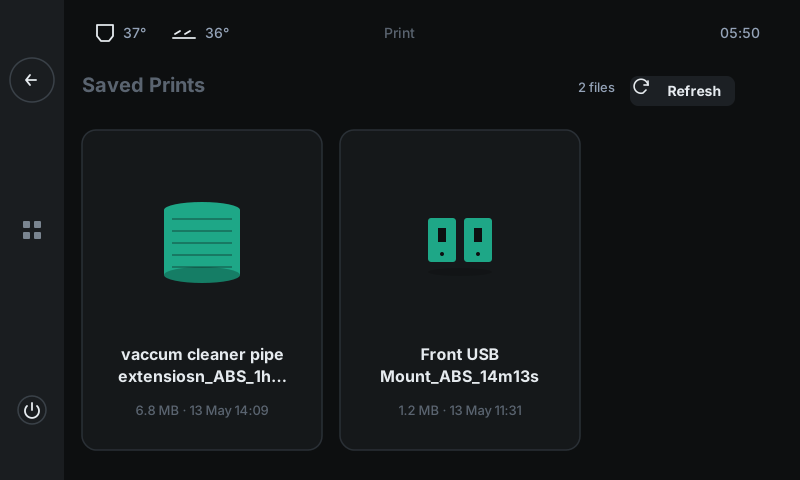 123
123Saved Prints header — Section heading + a small "N files" counter on the right showing how many G-code files are on the printer.
Refresh — Re-scans the printer's storage. Use this after you upload a new file from your laptop and it doesn't appear yet.
File card — One per uploaded G-code. Shows a slicer-generated thumbnail, the name (ellipsized when long), file size, and upload date. Tap to start.
Watch it print
Once you tap a file, the printer switches to the Job Status panel. This is your single view of everything happening during a print: progress, live temperatures, layer count, and elapsed / remaining time.
It updates once per second.
Heads up. Don't open the printer's enclosure mid-print on ABS / ASA — it'll cause warping. Wait for the print to finish or pause first.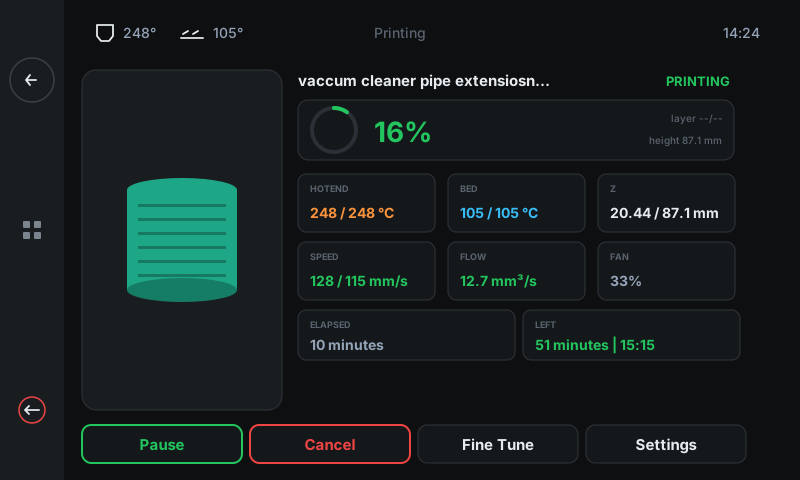 123456
Progress — Filename + state on top. Big percentage + circular ring inside the card. Green = on track.
Live temps + Z — Hotend (orange) and bed (blue) show actual / target. Z card shows current height / model height. Numbers go green when on target.
Speed / Flow / Fan — Real-time mechanical numbers. Useful when you've cranked a value up in Fine Tune and want to verify the printer is following.
Elapsed + Left — How long the print has been running, and a live estimate of how much remains.
Action row — Pause / Cancel / Fine Tune (tweak live without stopping) / Settings.
Part preview — Slicer-generated thumbnail of what's printing, alongside the live data.
When the print finishes
The printer waves you off when the job is done. The progress ring fills to 100 %, a green COMPLETE banner flashes on the Job Status panel for a few seconds, and then the LCD returns to the home screen.
Before you grab the part, give the bed a minute to cool. PEI and PETG-coated build sheets release the part on their own as they drop under about 40 °C — no scraping needed. Pry too soon and you'll mark the sheet.
Tip. Want an email the moment a print finishes? Pair the printer with 3DISM Cloud (see Connect to Cloud — coming soon) and you'll get a notification per print, with the file name and elapsed time included.