Walkthrough · 01
Change filament
Switch colour or material between prints
Switching from PLA to ABS, or just changing colours? The Filament panel runs the whole heat-and-feed dance for you. Pick the new material, tap a button, follow the prompt — it heats the hotend, retracts the old spool, then feeds the new one. Total time at the machine: about two minutes of nozzle work, plus heat-up.
Open the Filament panel
From the home screen, tap the Filament tile. The panel that opens has everything you need to load, unload, or change filament — material picker at the top, live temperature, distance / speed, and two big action buttons.
Tip. Custom material lets you set any hotend temperature you want — useful for niche filaments or for matching what the spool's manufacturer recommends.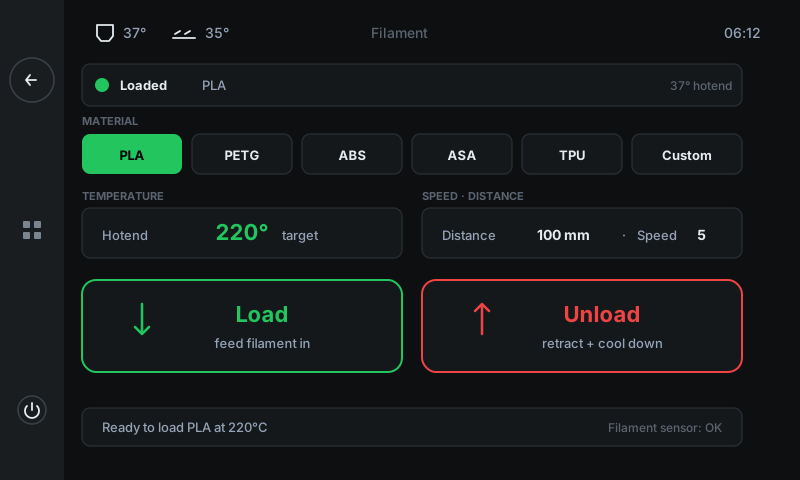 123456
Current state — Tells you whether filament is loaded right now and which material the printer thinks it is.
Material picker — Pick the material you're about to load — the picker sets the right hotend temperature automatically. PLA (190°C) / PETG (240°C) / ABS (250°C) / ASA (250°C) / TPU (220°C) / Custom for anything else.
Temperature — Live hotend temperature, with the target set by the material picker. Wait until both numbers match before loading / unloading.
Distance · Speed — How much filament to push (100 mm by default — covers the bowden tube + a clean purge) and how fast. Defaults work for 99% of changes.
Load — Press to feed filament IN. Use this after you've inserted a new spool into the extruder.
Unload — Press to RETRACT filament. The printer heats the nozzle, melts the existing strand free, then pulls it back out of the extruder.
Unload the current filament
Pick the new material first (so the target temperature is right for it), then tap Unload. The panel switches to an operation view that shows you what's happening live:
• HEATING — heating the hotend to the load temperature
• UNLOADING — extruder retracts the filament from the bowden tube
• COMPLETE — ready for the new spool
When the strand is loose and dangling out of the extruder, pull it out the rest of the way by hand.
Heads up. Don't pull the filament out while the panel says HEATING. Wait for UNLOADING — the strand needs to be molten to slip free without stripping in the extruder gears.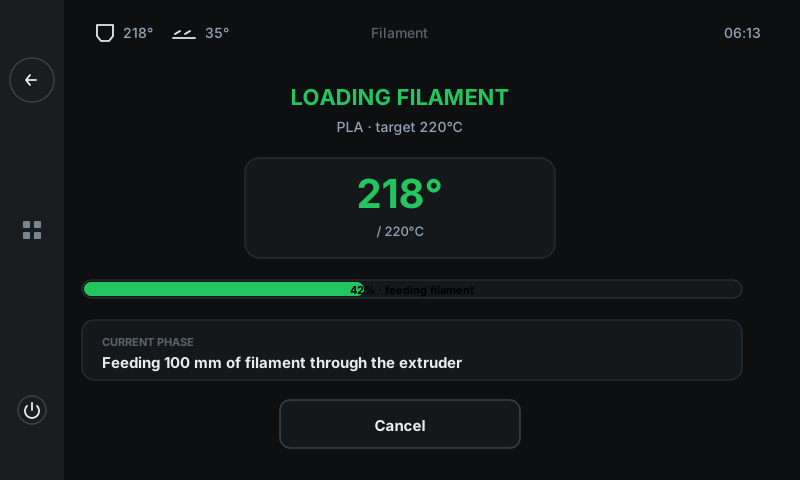 12345
12345Phase title — What the printer is doing right now. Cycles through HEATING → LOADING/UNLOADING → COMPLETE.
Temperature card — Big live hotend temperature, with the target underneath. Goes green when at target.
Progress bar — How far through the current phase. 'Heating' shows temperature progress, 'Loading/Unloading' shows filament distance progress.
Current phase — Plain-language description of exactly what's happening — useful when something doesn't feel right.
Cancel — Aborts the operation. Use only if something looks wrong — under normal conditions just let the cycle finish.
Insert the new spool
With the old filament out, feed the new strand into the top of the extruder until you feel the extruder gear bite it. Don't push hard — a gentle insert is enough.
Now tap Load. The same operation view appears — HEATING (if temp dropped), then LOADING (feeds 100 mm through to clear the old colour from the nozzle), then COMPLETE.
You'll see a small extruded ribbon of the new colour come out the nozzle. Wipe it off the bed before your next print.
Tip. Switching between very different colours (e.g. black → white)? Bump the Distance to 150 mm — extra purge clears the old colour from the melt chamber so your first layer isn't streaky.Ready to print
When the panel returns to the main view and shows the new material as Loaded, you're done. Start your next print as usual — the printer will heat to whatever the slicer set, which may differ slightly from the load temperature.