Walkthrough · 01
First time setup
From unboxing to your first print
Just turned the printer on for the first time? This walkthrough gets you from a freshly-booted machine to a finished part in about 10 minutes: connect to your Wi-Fi, find the printer's IP address, paste it into OrcaSlicer, prove the connection works, then slice a model and send it to print — all from your laptop.
Connect the printer to Wi-Fi
On the printer's touchscreen, open the side panel's quick menu and tap Network. You'll see a list of every Wi-Fi network nearby.
Tap Connect on your network. Type the password on the on-screen keyboard. Wait a few seconds for the printer to join — the SSID moves to the top with a green border and (Connected) badge.
Tip. The cleanest way to get on Wi-Fi for the first time is via the LCD. If your printer was pre-provisioned by 3DISM, this step may already be done — check the bottom of the home screen for a non-blank IP address.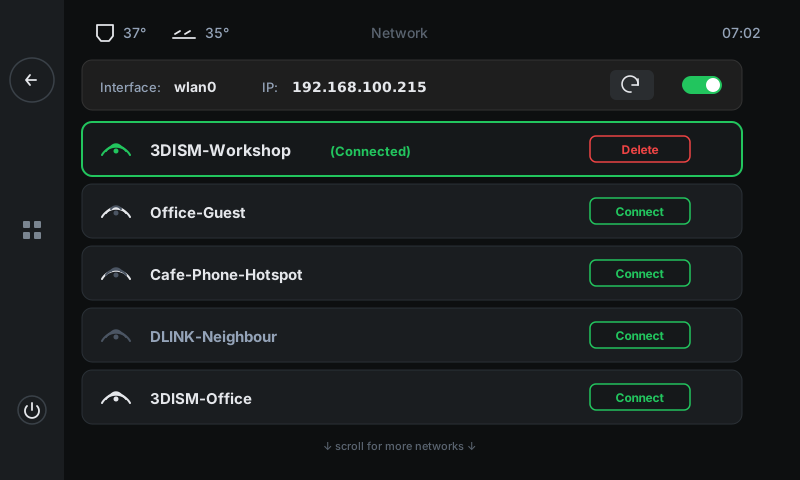 12
12Connected indicator — Green border + (Connected) label confirms the printer joined the network successfully.
Pick a network — Tap Connect on the SSID you want to join. The printer asks for the password, then connects.
Find your printer's IP address
Once connected, the printer's IP address is shown in three places. The easiest is the bottom status row of the home screen — go back to Home and look at the bottom-right corner. You'll see something like
192.168.100.215.Write it down or take a photo with your phone. You'll type it into OrcaSlicer in the next step.
Tip. The IP is also on the Info panel (More → Info → IP Address) and at the top of the Network panel. Any of the three works.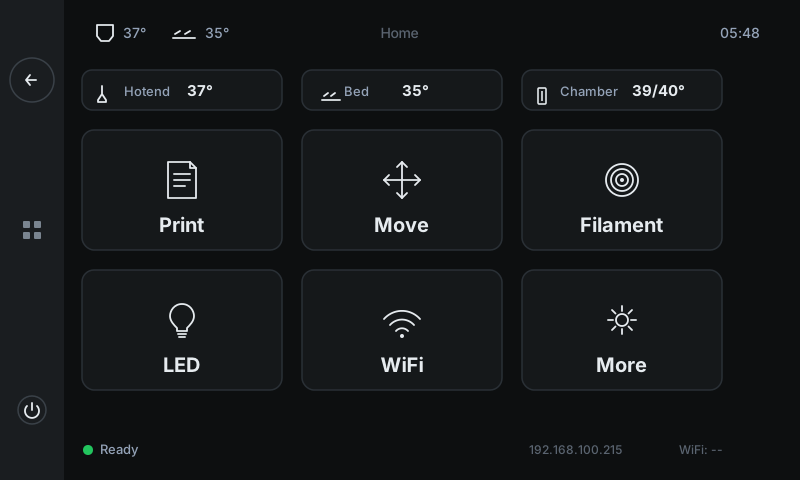 1
1Your printer's IP — Local IP address assigned by your router. This is what OrcaSlicer needs in the next step.
Tell OrcaSlicer about your printer
Open OrcaSlicer on your laptop. At the top of the left sidebar, you'll see your Printer name with a Wi-Fi icon next to it. Click that Wi-Fi icon — a dialog called Physical Printer opens.
Fill in three things:
• Host Type: Octo/Klipper
• Printer Agent: Orca
• Hostname, IP or URL: the IP you wrote down in Step 2 (e.g.
192.168.100.215)Leave the other fields blank — they're for advanced setups.
Heads up. If you see HTTPS / certificate fields below the password box, leave them blank. They're only for advanced cloud setups, not your local LAN.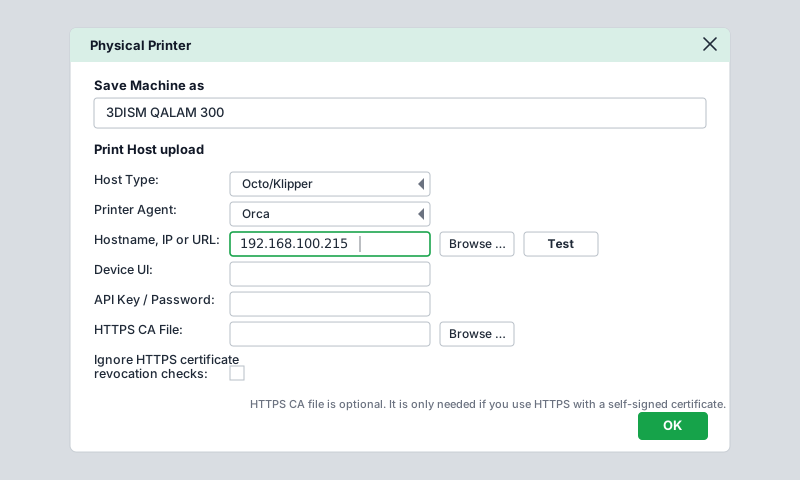 1234
1234Host Type — Choose Octo/Klipper. This is the protocol family Moonraker speaks.
Printer Agent — Choose Orca. Tells the slicer to use the OrcaSlicer-flavoured upload endpoint.
Paste your IP here — The IP address from Step 2. Just the digits — no http:// prefix, no port number.
Test button — Click after pasting the IP. The slicer pings the printer to confirm it's reachable.
Test the connection
Click Test. After a second or two, you should see a green-bordered popup that says:
Connection to OctoPrint is working correctly.
Click OK on the popup, then OK on the Physical Printer dialog to save. Your printer is now linked to OrcaSlicer.
Heads up. If you get an error: double-check the IP (typo / wrong segment), make sure your laptop and printer are on the SAME Wi-Fi network, and confirm the printer is fully booted (Ready state in the status bar). A re-tap of Test after a few seconds usually resolves transient failures.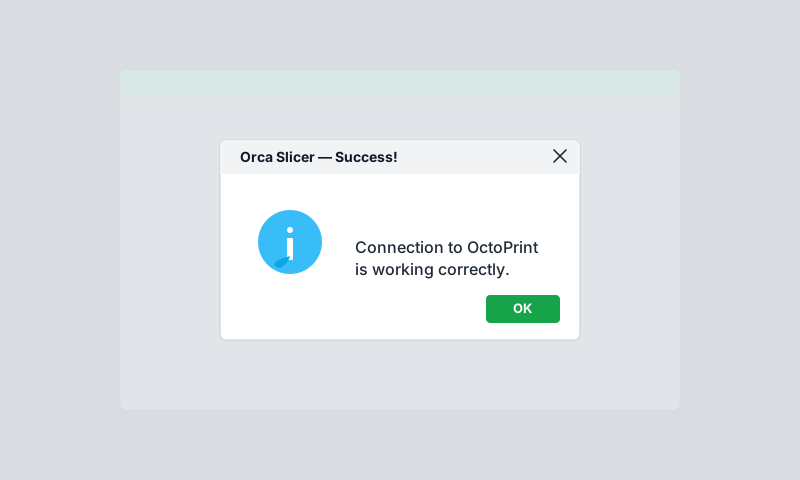 1
1Success message — Confirms OrcaSlicer can reach the printer over your network. If you see an error instead — wrong IP, printer not on the same network, or Moonraker not running.
Open the Device tab
Now switch to the Device tab at the top of OrcaSlicer (third tab, between Preview and Project). This embeds the printer's live dashboard right inside the slicer — same controls you'd see from Mainsail in a browser.
From here you can: see live temperatures, jog the toolhead, browse files already on the printer, run calibrations, monitor a running print. It's the control panel for everything you'd do remotely.
Tip. The Device tab is also where Heightmap lives — a colour-mapped visualisation of your latest bed mesh. Useful for sanity-checking that your bed is flat (or seeing which corner is warped).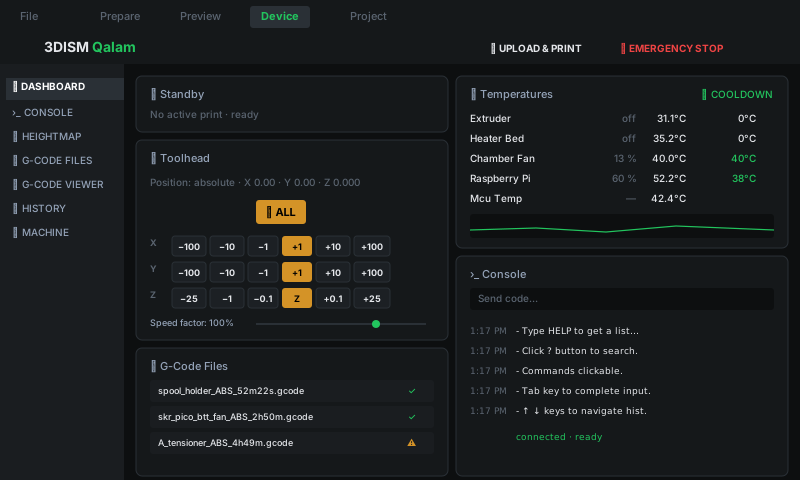 123456
Brand header — Confirms which printer you're looking at — useful when you have multiple machines paired.
Left sidebar — Switch between Dashboard, Console (G-code prompt), Heightmap (bed mesh visualisation), G-code Files (storage), G-code Viewer (preview), History (last prints), Machine (hardware info).
Live state — Standby / Printing / Paused / Error. Mirrors what the LCD's home screen shows.
Temperatures — Live current vs. target for every heater + fan. Tap Cooldown to zero every heater at once.
Toolhead — Same XY jog controls + Z buttons + Home All you have on the LCD's Move panel — but with finer step sizes, useful for diagnostics from your laptop.
Console — G-code prompt for typing commands directly. Same as the SSH/Mainsail console — useful for the rare diagnostic that needs a manual G-code.
Slice a model and send it to print
Now do the actual print. Switch back to Prepare, drop a model onto the build plate (or open one of the test STL files OrcaSlicer ships with). Pick your filament + process profile, then click Slice plate in the top-right.
After slicing, switch to Preview to inspect the toolpath, walls, infill, supports — everything that's actually about to be printed.
When you're happy, click the green Print button (also top-right). A dropdown appears with two options:
• Print — uploads the G-code to the printer and starts printing immediately
• Export G-code file — saves to disk so you can transfer via USB / SD instead
Click Print. OrcaSlicer uploads the file, tells Moonraker to start it, and the printer's LCD switches to the Job Status panel automatically. You're printing.
Tip. Once a print is uploaded and started, the printer's LCD switches to Job Status automatically — same view you've already seen in the Your first print walkthrough. From there everything else (live temps, progress, fine-tune, pause) works the same.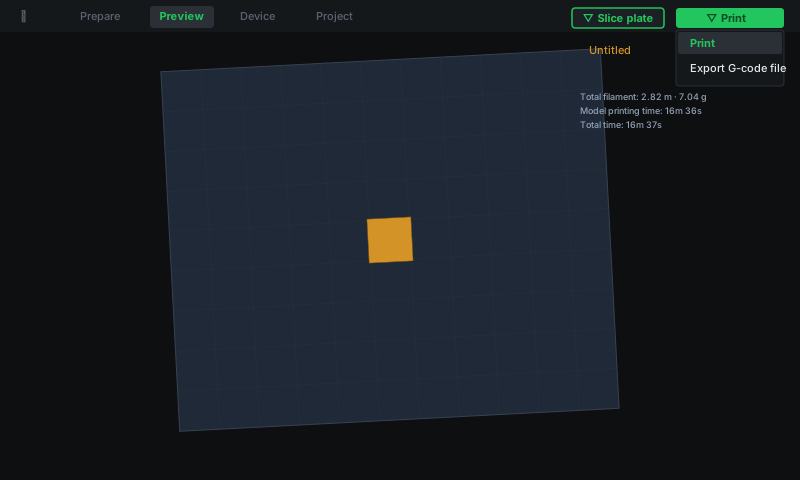 1234
1234Slice plate — Generates the G-code from your model + profile. Always do this first — the Print button only shows up after a successful slice.
Print dropdown — Green button with a small caret. Click the caret to reveal Print / Export. Click the body of the button to repeat the last action.
Print (highlighted) — Sends the sliced G-code straight to the printer over the connection you just set up. The job starts within seconds.
Export G-code file — Saves the file to your laptop's disk instead. Useful if your network is flaky or if you want to keep an archive copy.